Payment Options
Merchants can use 2Checkout to accept Visa, MasterCard, Discover, American Express, Diners, JCB, PIN debit cards with the Visa or MasterCard logo, Debit cards with the Visa or MasterCard logo, and PayPal.
2Checkout Countries and Currencies
Merchants can accept payments in many local currencies across the world. View the full list of countries and currencies supported by 2Checkout
Gateway Fees
2Checkout has no monthly fees and a simple fee schedule of 2.9% + $0.30 per transaction. Fees are reduced if your sales volume exceeds $50,000/month. See https://www.2checkout.com/pricing
How to integrate Paid Memberships Pro with 2Checkout
Paid Memberships Pro Settings:
- In your WordPress admin go to Memberships > Settings > Payment Gateway & SSL.
- Select 2Checkout in the Payment Gateway dropdown.
- Enter your 2Checkout API Username. To locate these settings in your 2Checkout account, go to:
- Settings > User Access.
- Click “Manage User Access”.
- Click “View roles”.
- Click “Add role” and create a role with the “Manage API Access” box checked. You can name this role “API Access”
- Then, go to “View Users” and add a new user with your desired username and password. Assign this new user the role you created in step 4 above.
- Enter your 2Checkout API Password. This is the password for the user created in Step 3.
- Enter your 2Checkout Account Number. This can be found in your 2Checkout account in the upper right corner.
- Enter your 2Checkout Secret Word. This can be found in your 2Checkout account under Integrations > Webhooks & API > Secret Word.
- Click Save Settings.
2Checkout Settings:
- Make note of your 2Checkout INS URL shown in the WordPress admin under Memberships > Settings > Payment Gateway & SSL > 2Checkout INS URL field.
- Sign in to your 2Checkout account.
- Go to Dashboard > Integrations > Webhooks & API.
- In the Redirect URL section check “Enable return after sale“
- Set the value for the Redirect URL and Approved URL to the 2Checkout INS URL from Step 1.
- For Return method, select Header Redirect
- Click Save Settings.
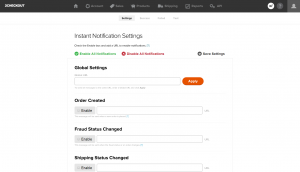
- Click the Notifications tab.
- In the Global URL field, enter the 2Checkout INS URL from Step 1.
- Click Apply.
- Check Enable All Notifications.
- Click Save Settings.
2Checkout Sandbox/Testing mode
Testing your 2Checkout integration requires you to set up a 2Checkout sandbox account and use 2Checkout’s provided sandbox test credit card information.
- Log in to your 2Checkout Sandbox account.
- Navigate to the Memberships > Payment Settings page of your WordPress site.
- Set your “Payment Gateway” to “2Checkout”.
- Set the “Gateway Environment” to “Sandbox/Testing”.
After saving the settings, log out or browse to your membership levels page in incognito mode to test checkout for a paid level. 2Checkout’s Sandbox Test Data page has card numbers you can use for a test checkout. Use any valid future expiration date and either of the test cards below:
| Number | CVV |
|---|---|
4000000000000002 | 123 |
4222222222222220 | 123 |
For more information, visit 2Checkout’s Hosted Checkout Testing documentation.