Refunds are an unavoidable part of your membership business. Even if you clearly state that you do not offer refunds for membership, there will be people who dispute a charge via their bank or PayPal. If you’re unsure what your site’s refund policy should be, this companion guides explains our refund policy at PMPro and thoughts on best practices.
In this guide, we cover the one-click refunds feature in Paid Memberships Pro which was introduced in version 2.8. If your payment gateway does not yet offer refund integration for PMPro, you can use the manual refund process also covered in this guide. Follow these steps to maintain good data in your membership reports.

Video: How to Process a Refund
One-Click Refunds for Stripe and PayPal
Paid Memberships Pro offers native support for full refunds right in your WordPress site admin. This new feature streamlines the process you and your membership site managers need to follow to handle a refund case.
One-click refunds are offered in three specific places within the WordPress admin:
- On the single user “Edit Profile” screen within the “Membership Level” section.
- On the All Orders admin list view.
- On a single Edit Order admin screen.
While you can process a refund from any of these screens, the most common situation is that you are processing a full refund for the last payment received and cancelling a user’s membership in one step. For this reason, the best way to process a refund is from the Edit Profile page for the user whose membership you need to refund.
Refund and Cancel Membership In One Step
- Locate the Member You Want to Refund: Search for the member on the Members List or All Users screen in the WordPress admin. When you locate the right user, click their username to “Edit” their profile.
- Locate the “Membership Level” Section:
- Change the membership level dropdown to another level or select “–None–” if preferred.
- Check the box to “Cancel this user’s subscription at the gateway.”.
- Check the box to “Refund this user’s most recent order.”
- Click “Update Profile” at the bottom of the page.
When the profile updates, PMPro gets to work sending notifications to your connected payment gateway. The user’s subscription is cancelled and their last order is refunded. You will see a message at the top of the screen that confirms whether the refund was successful.
You and the user receive an email about the membership cancellation (if selected) and the membership refund. You can customize the contents of these messages from the Memberships > Settings > Email Templates page in the WordPress admin.
Refund a Single Order
- Navigate to Memberships > Orders in the WordPress admin.
- Use the search form to locate the order you want to refund. You can search for an order by Transaction ID, Subscription ID, or by member profile fields like email or username.
- Hover over the Order Code and locate the “Refund” link in the row actions.
- Click “Refund”.
- A window will appear asking you to confirm this (irreversible) refund.
- After confirming, PMPro sends a message to your connected payment gateway. You will see a message at the top of the screen that confirms whether the refund was successful.
If the refund is successful, you and the user receive an email about the membership refund. You can customize the contents of this message from the Memberships > Settings > Email Templates page in the WordPress admin.
Note that refunding a single order does not cancel a member’s subscription or membership in this site. You can do this in a single step from the Edit User screen, or you can follow up with this step after you have completed the refund from the Edit Order screen.
At this time, Paid Memberships Pro’s built-in refunds feature can only process a full refund. If you need to process a partial refund, follow the manual steps below.
Manual Refund Process
If you aren’t using PayPal or Stripe, or if you have an order that cannot be successfully refunded through the one-click process, follow the steps below to process a refund manually.
1. Locate the Member Record
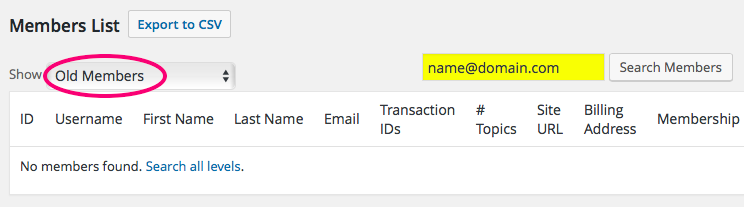
If the membership is still active, you can search for the member under Memberships > Members List. I generally enter the account email address to locate the record.
If membership is cancelled (the member already cancelled their membership via the “Membership Cancel” page), the member will show up in the Members List by selecting “Old Members” from the “Show” dropdown.
2. Edit the Member
- In the Members List, click the member’s username to be taken to the “Edit User” admin page.
- Scroll to the “Membership” section and change the “Current Level” to “None” (or another default “Free” level if applicable for your site).
- Additional settings in this section include:
- Expires: Change this field to set a different expiration date or set to “No”.
- Send the user an email about this change: Optionally send the “Admin Change” email to the user after updating.
- Cancel this user’s subscription at the gateway: Checking this box will cancel the recurring portion (if applicable) with the gateway. This is important to check if your are canceling the member and there is an active subscription with your gateway!
- Click “Update User”.

After clicking “Update User”, the membership is updated, the member is notified (if selected) and the subscription is cancelled at the gateway (if selected). Now to actually process the refund.
3. Update the Order and Refund at the Gateway
- Locate the Order to refund. This is the last order in the “Member History” section of the User Profile. Or, navigate to Membership > Orders and search for the user.
- Click the “Invoice ID” to view the Order.
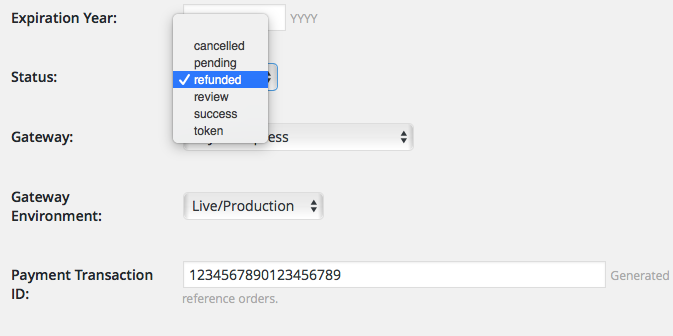
- Scroll to “Payment Transaction ID”. This is the transaction ID you will use to look up the order in your gateway.
- Log in to your gateway account and search for the order. This varies based on the gateway used. Remember to check the “Gateway” field on the order if you are using the Add PayPal Express Add On in addition to another primary gateway, such as Stripe.
- Process the refund at the gateway. Be careful as most gateways have multiple confirmation steps to approve a refund. You may have to click “Okay” two or three times to actually process the refund.
- Update the Order Status. On the “Edit Order” page, update the “Status” to “Refunded”. This will ensure that your Membership Sales and Revenue reports are accurate.
What about a dispute or chargeback?
The process is fairly similar for a disputed charge. You can try to respond to cases via the gateway or resolve the dispute directly with the member. Here’s our guide on how to respond to a chargeback in a membership site if you find yourself in this (unpleasant) situation.
When these efforts fail and you are forced to accept a dispute, go through the same process above:
- Use the automatic refund process, or:
- Edit the user’s membership to “None”.
- Check the box to “Cancel this user’s subscription at the gateway” if applicable.
- Update the order to “Refunded”.