The Membership Account page is a commonly linked-to landing page for members – both as a redirect from other areas on your membership site or on log in. This page can be enhanced with more than just the default Membership Account shortcode or block to become a true Member Dashboard.
Below are a few Member Dashboard concepts based on the common membership site types we support here at Paid Memberships Pro.
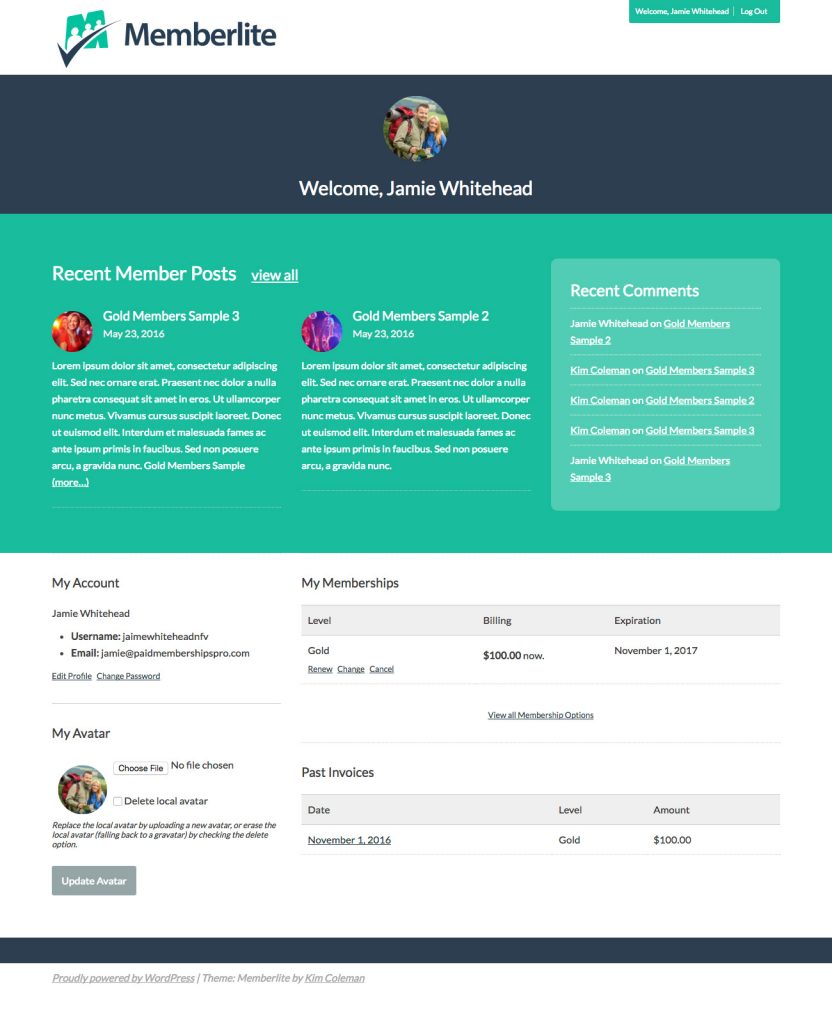
Blog, Content Publisher, or Magazine Site Member Dashboard
Plugins used in the Demo:
- Paid Memberships Pro
- Basic User Avatars
- Memberlite Shortcodes
- Widgetize Pages Lite
Demo theme:
How to Set Up Your Page
- Navigate to Widgetize Pages > Add Sidebar to create a new in-page widget area named “Member Dashboard”. [Widgetize Pages Lite must be installed and activated]
- Navigate to Appearance > Widgets.
- Add the “Recent Comments” widget to the newly created “Member Dashboard” widget area.
- Navigate to Memberships > Page Settings in the WordPress Admin.
- Edit your site’s “Membership Account” page.
- Set the “Template” to “Fluid Width”.
- In the “Memberlite Settings” area, check the boxes to hide breadcrumbs and hide the page title.
- Replace the entire page’s content with the code block below.
- Add the block of CSS below to a child theme’s stylesheet or a stylesheet for PMPro Customization
- Save and Publish the page.
Custom page content for this dashboard layout:
Custom CSS for this dashboard layout:
<style>
#basic-user-avatar-form p {display: inline-block; width: 70%; }
#basic-user-avatar-form .avatar {float: left; }
#basic-user-avatar-form p.description {clear: both; font-size: .8em; font-style: italic; line-height: 1.2em; width: 100%; }
.recent_comments {background: rgba(255,255,255,0.25); border-radius: 10px; padding: 1px 3rem 3rem 3rem; }
.recent_comments ul {margin: 0; }
.recent_comments li {list-style: none; border-top: 1px dotted #FFF; margin: 0; padding: 1rem 0; }
</style>
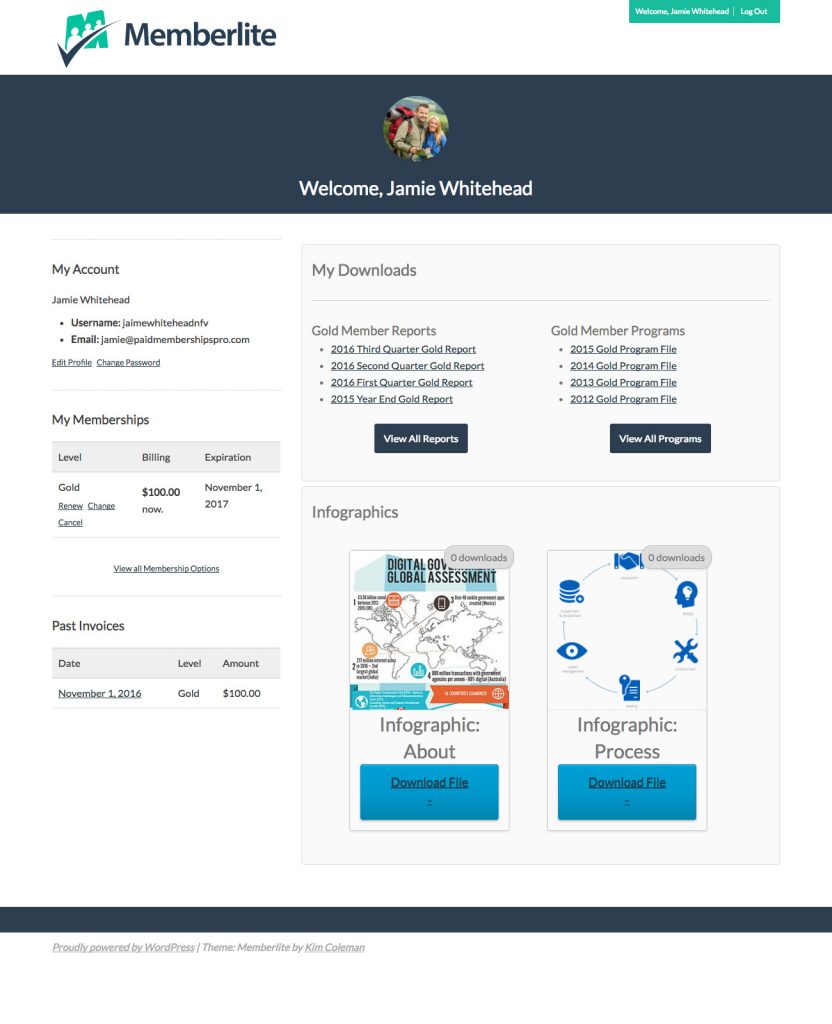
Premium Downloads with Download Monitor Member Dashboard
Plugins used in the Demo:
- Paid Memberships Pro
- Download Monitor
- Download Monitor Add On for Paid Memberships Pro
- Memberlite Shortcodes
Demo theme:
How to Set Up Your Page
- Navigate to Memberships > Page Settings in the WordPress Admin.
- Edit your site’s “Membership Account” page.
- Set the “Template” to “Fluid Width”.
- In the “Memberlite Settings” area, check the boxes to hide breadcrumbs and hide the page title.
- Replace the entire page’s content with the code block below.
- Add the block of custom CSS below to a child theme’s stylesheet or a stylesheet for PMPro Customizations
- Save and Publish the page.
Custom page content for this dashboard layout:
Custom CSS for this dashboard layout:
<style>
.infographics ul li {display: inline-block; list-style: none; width: 45%; }
</style>
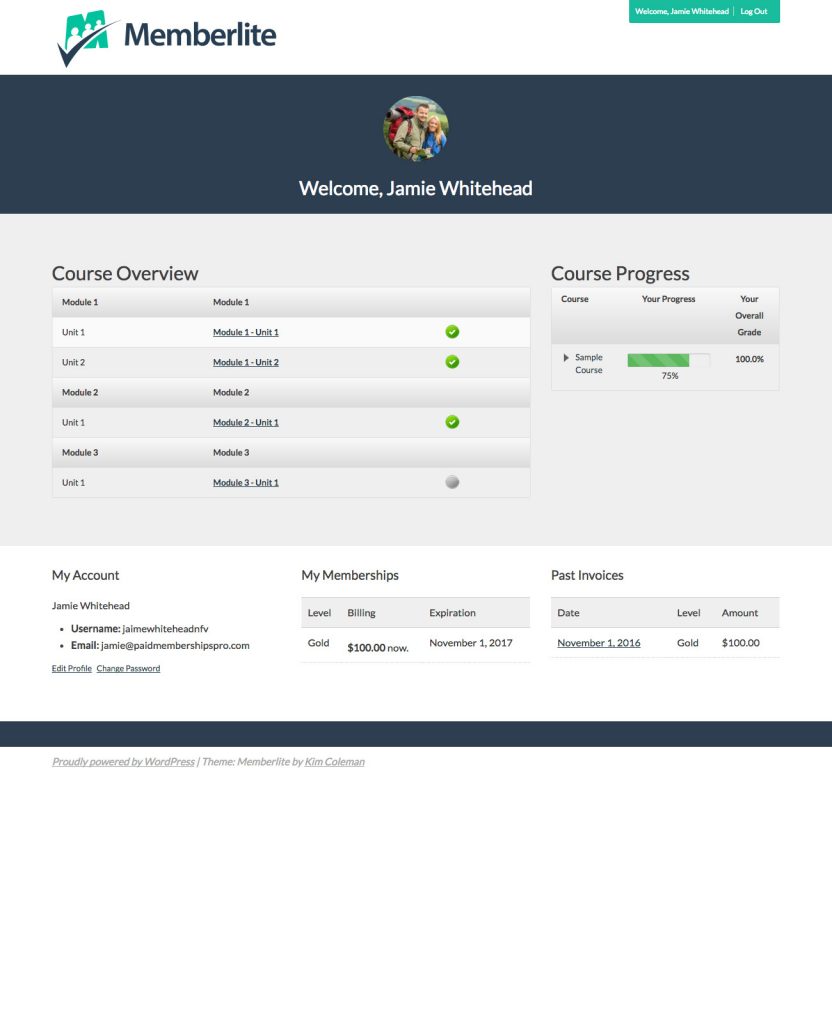
eLearning Member Dashboard
Plugins used in the Demo:
- Paid Memberships Pro
- Memberlite Shortcodes
- Paid Memberships Pro Add On for WP Courseware
- WP Courseware
Demo theme:
How to Set Up Your Page
- Navigate to Memberships > Page Settings in the WordPress Admin.
- Edit your site’s “Membership Account” page.
- Set the “Template” to “Fluid Width”.
- In the “Memberlite Settings” area, check the boxes to hide breadcrumbs and hide the page title.
- Replace the entire page’s content with the code block below
- Add the block of custom CSS below to a child theme’s stylesheet or a stylesheet for PMPro Customizations
- Save and Publish the page.
Custom page content for this dashboard layout:
Custom CSS for this dashboard layout:
<style>
#pmpro_account .pmpro_box {border-top: none; }
#pmpro_account-membership div.pmpro_actionlinks {display: none; }
</style>
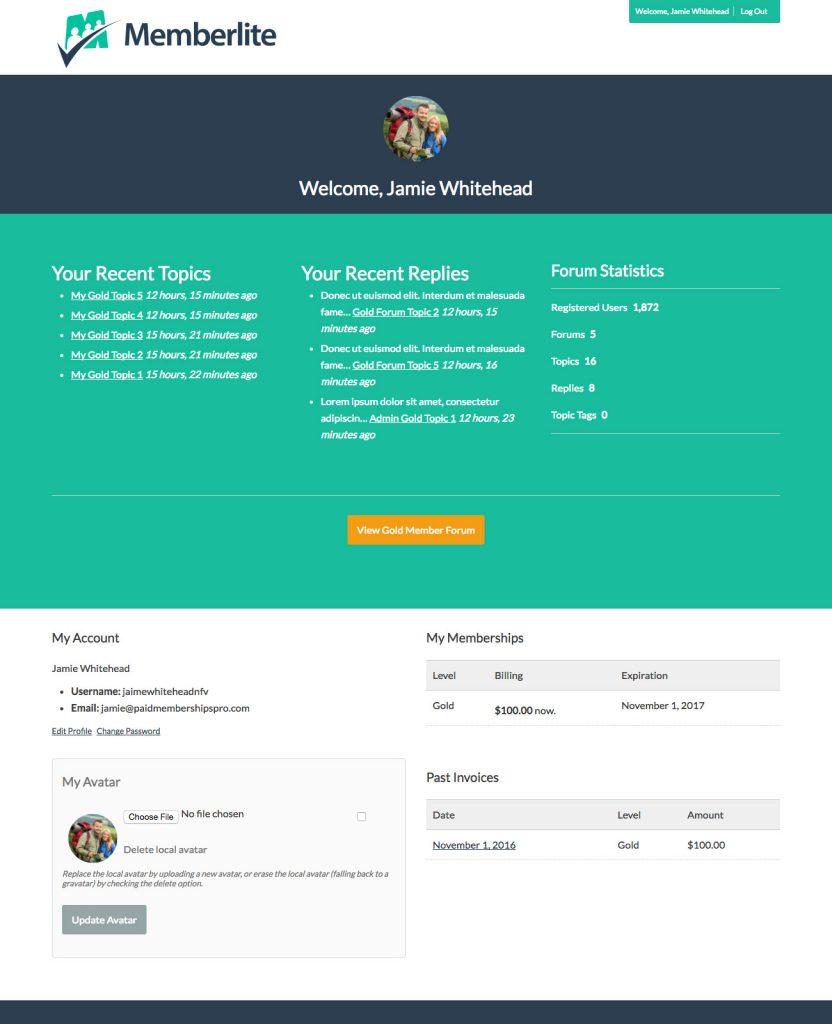
bbPress Forums Member Dashboard
Plugins used in the Demo:
- Paid Memberships Pro
- Basic User Avatars
- bbPress
- bbPress Add On for Paid Memberships Pro
- Memberlite Shortcodes
- Widgetize Pages Lite
Demo theme:
How to Set Up Your Page
- Navigate to Widgetize Pages > Add Sidebar to create a new in-page widget area named “Member Dashboard”. [Widgetize Pages Lite must be installed and activated]
- Navigate to Appearance > Widgets.
- Add the “(bbPress) Statistics” widget to the newly created “Member Dashboard” widget area.
- Navigate to Memberships > Page Settings in the WordPress Admin.
- Edit your site’s “Membership Account” page.
- Set the “Template” to “Fluid Width”.
- In the “Memberlite Settings” area, check the boxes to hide breadcrumbs and hide the page title.
- Replace the entire page’s content with the code block below
- Add the block of custom CSS below to a child theme’s stylesheet or a stylesheet for PMPro Customizations
- Save and Publish the page.
Custom page content for this dashboard layout:
Custom CSS for this dashboard layout:
<style>
#basic-user-avatar-form p {display: inline-block; width: 70%; }
#basic-user-avatar-form .avatar {float: left; }
#basic-user-avatar-form p.description {clear: both; font-size: .8em; font-style: italic; line-height: 1.2em; width: 100%; }
#pmpro_account .pmpro_box {border-top: none; }
#pmpro_account-membership div.pmpro_actionlinks {display: none; }
.widget_display_topics li {margin-bottom: .5rem; }
.widget_display_topics div {display: inline-block; }
.widget_display_stats dl {padding-top: 1em; }
.widget_display_stats dt {border: none; clear: left; float: left; font-weight: normal; margin: 0 .5em 1em 0; padding: 0; }
.widget_display_stats dd {margin: 0 1em 1em 0; }
</style>
Now go make a cooler Member Dashboard!
The ideas in this post are a starting point to creating the BEST member dashboard that fits your membership site model. You can pull from all of the concepts or start with your own. If you have components of the dashboard that vary based on the member’s level, use the membership shortcode or block to reveal specific sections to the member. There are many, many possibilities if you spend a bit of time considering the user experience of your membership site.
If you aren’t using the Memberlite theme, you can still make use of the proposed ideas—but you’ll need to work within the confines of your theme’s shortcode and layout options.
Related Reading: How to Customize the Frontend Pages
We have a few articles in our blog on how to adjust the appearance of your frontend membership pages. Check the links below to explore the guides:
- Making a Powerful Member Dashboard for Your Membership Account Page
- Create a Dual Login and Benefits of Registration Page
- Customizing the Paid Memberships Pro Membership Pricing Page
- How to Use a Page Builder to Create a Custom Membership Level Pricing Page
- Membership Pricing Pages and Streamlining the Checkout Process
- Using Page Builders to Enhance Your Site’s Membership Pages
- Design a Specific Level’s Membership Checkout Page Using CSS
- Customizing the Member Links list on Membership Account Page
- Add Links by Membership Level to the Membership Account Page “links” Section
- Customizing the Member Cancellation Process
- How to Load a Custom Template for Membership Pages or System-Generated Emails

Download the free ebook: Get 29 insights and ‘aha moments’ for new or veteran membership site business owners. Use these nuggets of wisdom to inspire or challenge you.