With Paid Memberships Pro version 3.0+, members can hold multiple membership levels at one time. For this reason, you must now set up Level Groups, which define how different levels relate to each other.
Each Level Group has specific permissions related to the levels within, specifically:
- Users can only choose one level from this group (the classic tiered membership access), or
- Users can choose multiple levels from this group (for “a la carte” or Add On memberships that charge a one-time payment or set up a separate recurring subscription).
This documentation shows you how to create or edit your level groups.
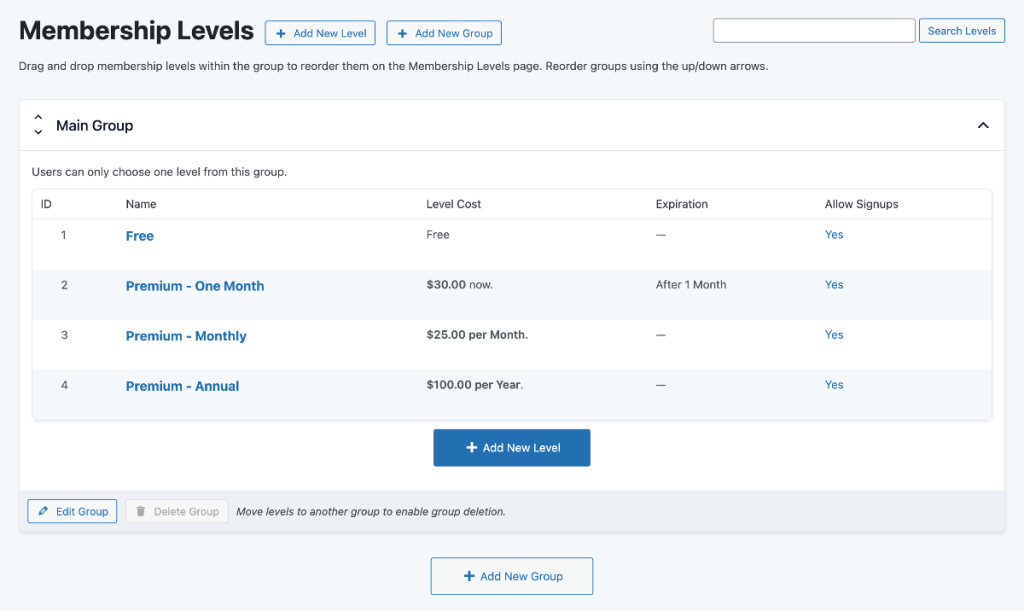
Add a Level Group
- From the WordPress admin, navigate to Memberships > Settings > Levels.
- Click + Add New Group
- Name Your Group: Assign a name to your level group. This name is shown on your Membership Levels page (if you are using the default membership levels page).
- Enable Multiple Selections Per Member: Check the box “Allow users to choose multiple levels from this group” if you want to allow members to hold multiple membership levels simultaneously within the same group. If your level group is for tiers of access, do not check this box.
- Save Settings.
Note: PMPro automatically sets up a Level Group called “Main Group” on activation. You can edit this level group to change the name or the level’s setting for multiple selections.
Video: Membership Level Groups
Add or Remove Membership Levels From a Group
Once a level group is created, you can now add new membership levels to the group or move existing levels into the group.
- From the WordPress admin, navigate to Memberships > Settings > Levels.
- To add a new level, click the Add New Level button within the context of the Level Group you want to add the level to.
To move an existing level into another group, use these steps:
- From the WordPress admin, navigate to Memberships > Settings > Levels.
- Select a level to edit.
- In the General Information box, adjust the Group setting.
- Save changes.
Each level in the table has several row actions, which allow you to edit, copy, or delete the level. We do not recommend deleting a level if there are active members that hold the specific level.
If you want to archive a level and no longer allow public signups, you should edit the level and adjust the “Disable New Signups” setting.
How To Reorder Level Groups
Level Groups can be recorded by using the and buttons on the Memberships > Levels admin page.
How To Reorder Membership Levels Within The Group
If you’re using the default Membership Levels Block or shortcode, you can update the display order from the Memberships > Levels admin page. This sorting also adjusts the order in which your levels are displayed in the protected content messages and in your admin area checkbox lists.
- Using your mouse, hover and click on the level you want to move.
- Drag the level to the desired placement in the list.
- That’s it. This will automatically update the levels order.
Navigate to the page assigned as the “Membership Levels” page to see the updated output.
Note: You can only drag and drop levels within the group the level is assigned to. To reassign the level group, edit the specific level and assign it to a different group.
Get Support From Our Team of Experts
Have a question about how to use this feature? Our Support Page outlines three ways to get support.
Our Max plans include hands-on help customizing your membership site and implementing new features. Upgrade to PMPro Max now »
Last updated on April 1, 2026

