The landing page for your membership levels is a primary place where your site attracts and sells its membership products. At PMPro, we offer several ways for you to design this page, including the default membership levels page shortcode or block and more extended options when using the Advanced Levels Page Add On.
But, some sites want even more control over designing this page. If you would like to design a completely custom membership level pricing page, this guide is for you.
In this article, we’ll cover the basics of designing a custom membership level pricing page using page builders, like the Block Editor or Elementor, as well as a few free pricing table plugins.
Table of contents
Flexible Options for Your Levels Page
Many people using Paid Memberships Pro don’t realize that you do not need to use the default plugin-generated Membership Level page.
In step 2 of the plugin setup process, we automatically generate a page named “Membership Levels” with the recommended shortcode. We do this so that your site is set up as fast as possible—so that you can begin accepting new member signups without any design delays.
But, this page can be totally customized to fit your design goals and theme styling.

Offering clear and concise payment options, paired with a compelling showcase of your features, is essential for any business. This is often the final opportunity to win your customer over.
—Jarryd Long, Support Manager at Paid Memberships Pro
Choosing Your Tools: Ways to Customize Your Membership Levels Page
Here are the most popular methods, Add Ons, and third-party tools you can use to create and customize your membership pricing page:
- Use Custom CSS to adjust the default layout.
- Replace the default shortcode with the Advanced Levels Page Add On. This Add On has extensive options for the levels page design and layout, including column-based and comparison tables.
- Use your theme’s included “pricing page” layouts to craft a totally custom page.
- Use a page builder or a free pricing table plugin, like Easy Pricing Tables.
- Create your own custom Page Templates for the levels page layout (requires coding experience).
In this article, we want to focus on how to create a custom membership level pricing page with a page builder. Specifically, we’re going to cover the exact steps to use Elementor to create a Membership Levels page.
Keep reading to learn how, plus get links to other popular page builders and pricing table plugins you can use that follow (roughly) the same steps.
Video Demo: Using Elementor to Create a Custom Membership Level Pricing Page
Step-By-Step: Custom Pricing Pages With Elementor
While there are many ways to create a custom membership pricing page, the steps are roughly the same for any approach you choose. Here are the four main steps to building a custom levels page:
- Create the membership pricing page using a plugin or page builder of your choice.
- Assign this custom-made page as your Paid Memberships Pro “Levels Page”.
- Make sure that the buttons on your custom page link to the respective membership checkout page for that particular level.
- Delete the PMPro-generated Membership Levels page.
These steps assume you are working on an existing membership site and want to create the new design without affecting the current site’s levels page.
If you are setting up a brand new membership site, you can edit the generated page for your Membership Levels. Just remove the membership levels page shortcode or block from that page and begin your work.
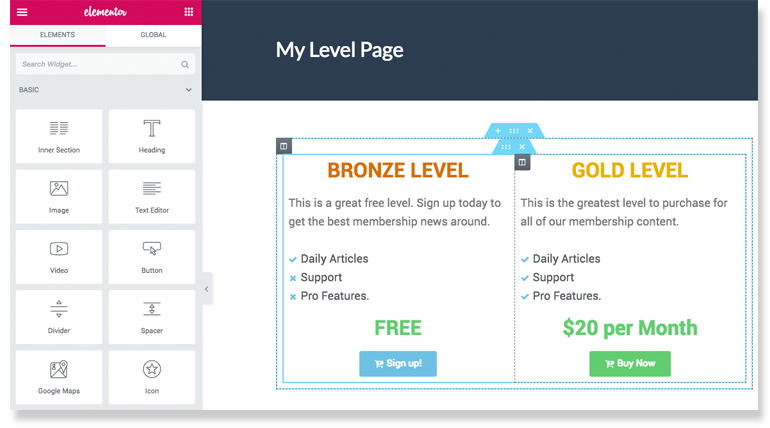
1. Create the New Membership Pricing Page
- Navigate to Pages > Add New in the WordPress admin.
- Enter a title for your new membership levels page. For example, My Level Page.
- Start creating the layout exactly as you need it.
- Add images, a comparison table, testimonials, and more.
2. Assign the New Membership Pricing Page in PMPro Page Settings
This step ensures that every link to your membership levels page will direct users to your new/custom page instead of the plugin-generated page.
- Navigate to Memberships > Settings > Pages in the WordPress admin.
- For the Level Page setting, select your new custom membership pricing page.
- Save changes.

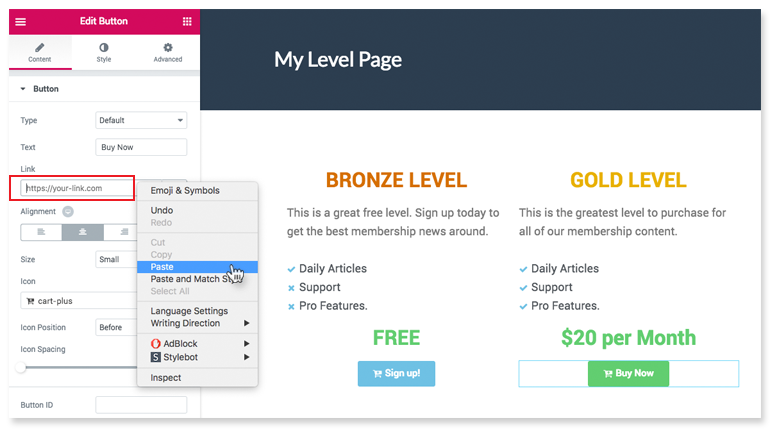
3. Link “buttons” to the Level-Specific Checkout Page
In our working demo, we created a pricing page with two membership levels. One level is free; the other is a premium membership.
You now need to link the “Sign Up” and “Buy Now” buttons to the membership checkout page.
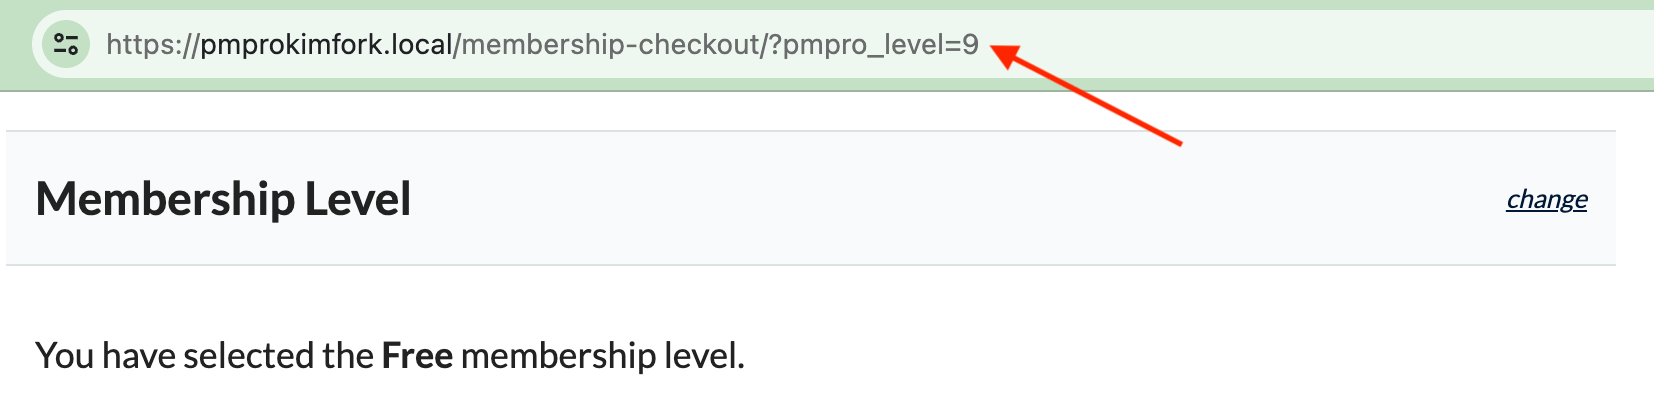
- For most sites, the URL for membership checkout will be something like this:
https://SITEDOMAIN.com/membership-checkout/?pmpro_level=1 - This URL is mostly the same for each level checkout page—you just need to update the last attribute of the URL with the appropriate level’s ID.
How to Find Your Membership Level Checkout Links
- If it’s still active, navigate to the default Membership Levels page and click the “Select” button for a specific level. You can also find these links on the Memberships > Settings > Levels page by clicking the word “Yes” in the “Allow signups?” column.
- Copy the URL of the checkout page. Each URL must include the membership level’s ID, which looks something like
/membership-account/membership-checkout/?pmpro_level=18
- Add the copied URL to the button/link that you created on your custom membership levels page. Repeat steps 1-3 for each Membership Level you have added to your custom page.
4. Delete the PMPro-Generated Membership Levels Page
As a clean up step, you will also want to delete the old (plugin-generated) membership levels page and redirect that deleted page’s slug to this new page. You can alternately update your new page’s slug to match that of your previous page.
- Navigate to Pages in the WordPress admin.
- Locate the Membership Levels page.
- Delete the page.
- Optional: redirect the page to your new pricing page using a plugin to help with redirects (like Yoast SEO).
- Optional: if you want to keep the old page’s URL, you can also delete it from the trash then update your new page’s URL to match the deleted page.
By following the steps outlined above, you can create a custom membership levels page that aligns with your brand and site theme.
Additional Page Builders and Pricing Table Plugins
In addition to Elementor, you can also use these supported page builders or the pricing table plugins listed below to create and customize your membership pricing page:
Easy Pricing Tables by Fatcat Apps
Easy Pricing Tables by FatCat Apps has an intuitive user interface and is free to use.
Pricing Tables by Supsystic
Pricing Tables by Supsystic lets you choose a template for your pricing table that you can then edit.
CoBlocks
CoBlocks is a collection of additional blocks built for the Block Editor (Gutenberg). The plugin is free to use and includes a pricing table layout
WordPress Block Editor
If you are a fan of the native WordPress Block Editor you can use built-in blocks with the need for additional pricing plugins. Just set up your membership pricing page as you would like to in Gutenberg. Create a button and link that button to the respective membership checkout page.
FAQs on Custom Pricing Pages
Creating a custom pricing page allows you to tailor the design to match your brand, provide clear and compelling information about your membership levels, and improve the overall user experience. This can lead to higher conversion rates and better member retention.
Once you have created your custom pricing page and set it as the default, you can delete the old PMPro-generated Membership Levels page. Optionally, you can redirect the old page’s URL to your new page using a redirect plugin like Yoast SEO.
Keep your page clear, concise, and visually appealing. Use a consistent CTA, optimize for SEO, and continuously test and refine the page based on user feedback.
Concluding Thoughts on Custom Pricing Pages
Creating a custom membership level pricing page that matches your brand and site theme is sure to have a positive effect on conversions.
By using tools like Elementor or other no-code tools, you can craft a visually appealing pricing page that converts more visitors into paying members.
The steps outlined in this guide showed you the framework for removing the default PMPro-generated levels page and replacing it with your own layout. Remember to keep your custom page up to date as you add new level options or change plan descriptions and pricing. Plus, don’t be afraid to experiment with different layouts or A/B test different page styles to find what works best for your audience.
Feel free to reach out to our support team if you have any further questions or need assistance with creating your custom membership level pricing page.
Related Reading: How to Customize the Frontend Pages
We have a few articles in our blog on how to adjust the appearance of your frontend membership pages. Check the links below to explore the guides:
- Making a Powerful Member Dashboard for Your Membership Account Page
- Create a Dual Login and Benefits of Registration Page
- How to Create a Custom Membership Level Pricing Page
- Membership Pricing Pages and Streamlining the Checkout Process
- Using Page Builders to Enhance Your Site’s Membership Pages
- Design a Specific Level’s Membership Checkout Page Using CSS
- Customizing the Member Links list on Membership Account Page
- Add Links by Membership Level to the Membership Account Page “links” Section
- Customizing the Member Cancellation Process
- How to Load a Custom Template for Membership Pages or System-Generated Emails
Free Download: The AI-Powered Membership Site Blueprint
Download the free guide: Learn how to plan, build, and grow a membership site using AI as your strategic partner: from buyer persona to launch and beyond.


