User Fields is a robust feature in Paid Memberships Pro that allows you to create custom fields for your membership site. By default, every user sees the field type you configured in PMPro’s User Fields settings — text, textarea, dropdown, and more. But sometimes you need one group of users to edit a field while another group can only view it.
This code recipe shows you how to change a PMPro User Field’s type based on the current user’s WordPress role or capability.
Best Practices and Considerations
Test with a non-admin account before going live. Because this code recipe checks against the manage_options capability, it is easy to verify as an admin but easy to miss when testing as a subscriber. Create a test member account, assign a membership level, and confirm that the field renders as plain text on the front-end profile page.
This recipe registers the field in code. You will not see this field in PMPro’s User Fields settings. Do not add a field with the same name (member_number). Duplicate field registrations can cause unpredictable behavior. If you have an existing field with this name set up, remove it before adding this snippet.
The readonly field type prevents input but does not hide the value. Members will see the stored value displayed as plain text.
Role versus capability. The snippet checks current_user_can( 'manage_options' ) rather than checking for the administrator role by name. This is the WordPress-recommended approach and means the field will also be editable by any other role granted the manage_options capability (such as a custom admin role). Adjust the capability in the code snippet if your site uses a different privilege structure.
About the Code Recipe
This recipe hooks into init to register a PMPro User Field dynamically. Then the snippet checks whether the current user is logged in and whether they have the manage_options capability.
If the user is an administrator, the field type is set to text — a standard editable text input. For everyone else, including logged-out visitors, the field type defaults to readonly, which displays the stored value as plain text instead of an editable field.
After setting the field type based on the capability check, a field group called “Member Details” is created with pmpro_add_field_group(). Then the field is registered to that field group and set to appear on the profile page with 'profile' => true. At the end of the function, the field is finally added with pmpro_add_user_field().
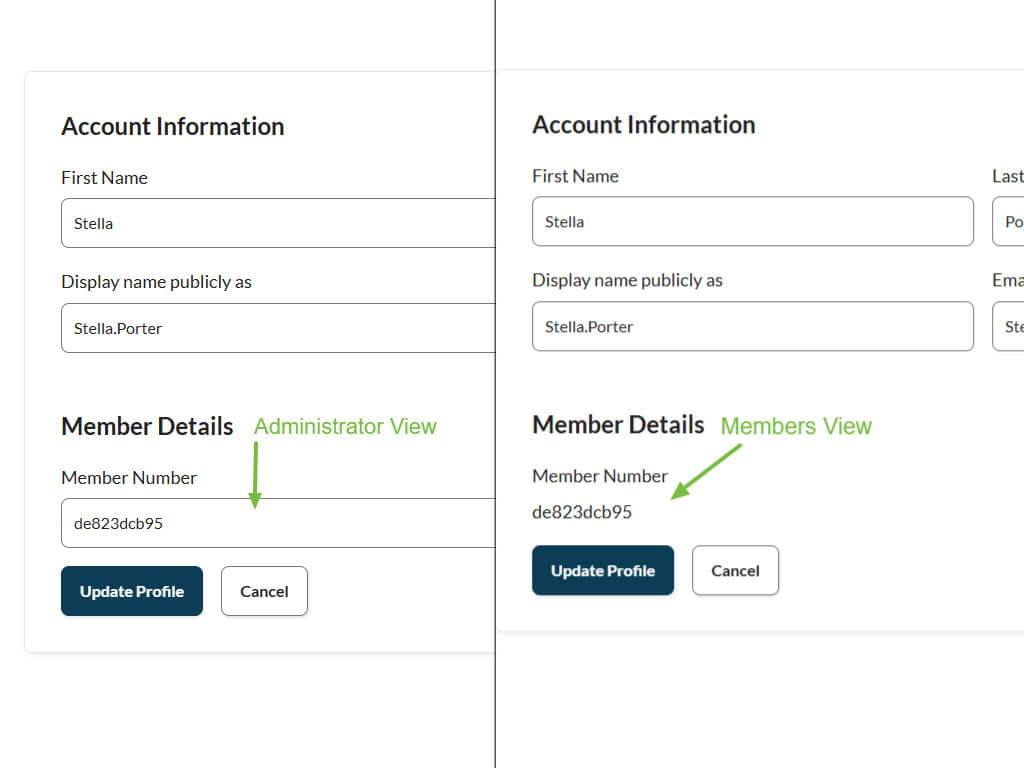
The result: administrators editing any user’s profile see an editable “Member Number” field. Members viewing their own profile see the same field rendered as read-only text.
The Code Recipe
Adding the Recipe to Your Website
You can add this recipe to your site by creating a custom plugin or using the Code Snippets plugin available for free in the WordPress repository. Read this companion article for step-by-step directions on either method.
How To Customize This Recipe
- Change the field name and label. Replace
member_numberandMember Numberwith the field name and display label you want to use. The field name must be unique across all User Fields on your site. - Target a different role or capability. Swap
manage_optionsfor any WordPress capability that matches the role you want to give edit access. For example, useedit_usersto extend edit access to editors. Or check for a custom role slug within_array( 'your_role', (array) $current_user->roles ). - Extend to multiple fields. To add more than one field, repeat the
$fields[] = new PMPro_Field(...)block for each additional field, changing the field name and label each time. All fields in the list will switch between editable and read-only together, following the same capability check. - Show the field on checkout as well. Add
'checkout' => trueto the field options array, after line 42 where it saysprofile => true, to display the field (as read-only for members, editable for admins) on the checkout page.

Get Support From Our Team of Experts
Have a question about how to use this feature? Our Support Page outlines three ways to get support.
Our Max plans include hands-on help customizing your membership site and implementing new features. Upgrade to PMPro Max now »