Tracking your membership site’s performance and analytics are crucial when it comes to understanding your audience and making informed business decisions. Better ecommerce analytics can support efforts like conversion rate optimization (CRO), planning your content, price experiments, improved UX, and everything in between.
In this guide, we show you how to send ecommerce analytics data to Google Tag Manager at three key points in the checkout experience: view membership, add membership to cart, and purchase (complete checkout).
After completing this tutorial, you’ll be fully set up to track and view ecommerce analytics for your membership site in Google Analytics 4 (GA4).

About Google Tag Manager
Google Tag Manager (GTM) gives you a central place to manage all of the custom scripts and snippets you want to use on your membership site. Right now, the PMPro site uses GTM to add Google Analytics 4 (GA4) with custom dimensions and ecommerce analytics.
Google Tag Manager is a tag management system (TMS) that allows you to quickly and easily update measurement codes and related code fragments collectively known as tags on your website or mobile app. Once the small segment of Tag Manager code has been added to your project, you can safely and easily deploy analytics and measurement tag configurations from a web-based user interface.
In the past, we’ve also used GTM to add a Facebook Pixel with custom event tracking.
What I love about GTM is that once you have data properly sent to the tracking code, you can set up as many new Tags as you want through a relatively friendly user interface. And, if you decide not to keep a Tag active, you can pause it. Your work is saved there in the interface, but completely deactivated on your site.
Custom Code vs. an Ecommerce Analytics Plugin
We used to have an analytics plugin on our site that added the Google Analytics UA tracking code. Then we wrote custom filters to add membership information. Then Google Analytics introduced GA4. So we had to rewrite that custom filter…
As you can see, managing a bunch of separate analytics tools, tracking scripts, and our custom coded filters was quickly becoming a nightmare. We switched to a completely custom code solution over other popular analytics plugins like Monster Insights because:
- We know that the custom code on our site isn’t phoning home to any unauthorized third parties.
- We didn’t want our WordPress site admin cluttered with upsells or banners.
- We don’t need a heavy dashboard screen that shows limited reports (that’s what the GA4 app is for).
- There’s no annual fee to using custom code—once the code is in place, you are good to go.
- We can trust that we understand our code and it won’t break with plugin updates. If we have to update it, we know where to look and how to solve it.
Important Update: PMPro now offers a complete Google Analytics Integration plugin with custom membership data and full ecommerce tracking. Say goodbye to Monster Insights or Google Site Kit. This Add On is your all-in-one solution for Google Analytics integration.
If you are using an analytics plugin and do not want to change methods, its possible that the code recipe in step 3 of this guide will work as is or with some adjustments. I’d suggest using that code as a starting place to write a custom filter for your analytics plugin of choice. The logic there is a good basis to understand how to grab data about the default checkout journey in Paid Memberships Pro.
How to Set Up Ecommerce Analytics for Paid Memberships Pro
The following steps assume you have already set up the basic Google Tag Manager script with Google Analytics 4 configured in this guide. You’ll also need:
- Access to your Google Tag Manager account.
- Access to your GA4 Property in Google Analytics.
Let’s go.
1. Set Up Google Tag Manager Triggers
Triggers tell Google Tag Manager when to fire certain tags. For this tutorial, we need to configure three triggers in the GTM dashboard: View Item Event, Add to Cart Event, and Purchase Event.
- In Google Tag Manager, click on Triggers > New.
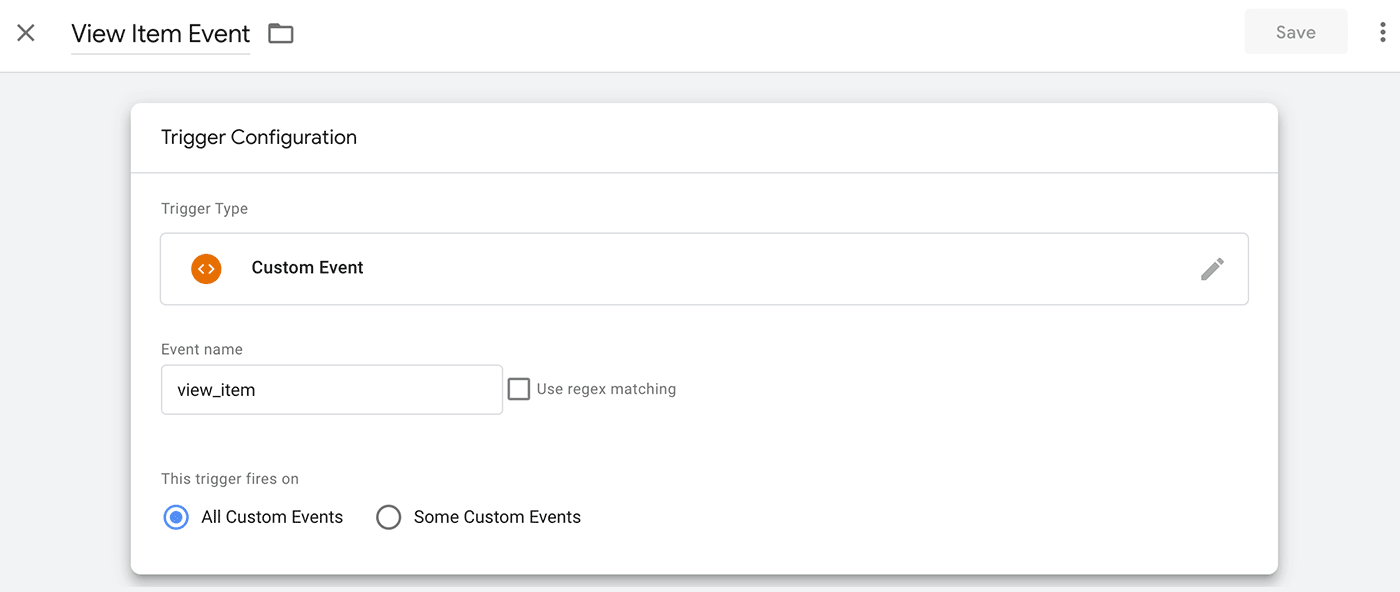
- Set the Trigger’s name to View Item Event.
- In the Trigger Configuration, select Trigger Type > Custom Event.
- For the Event name, enter
view_item. - Save the Trigger.
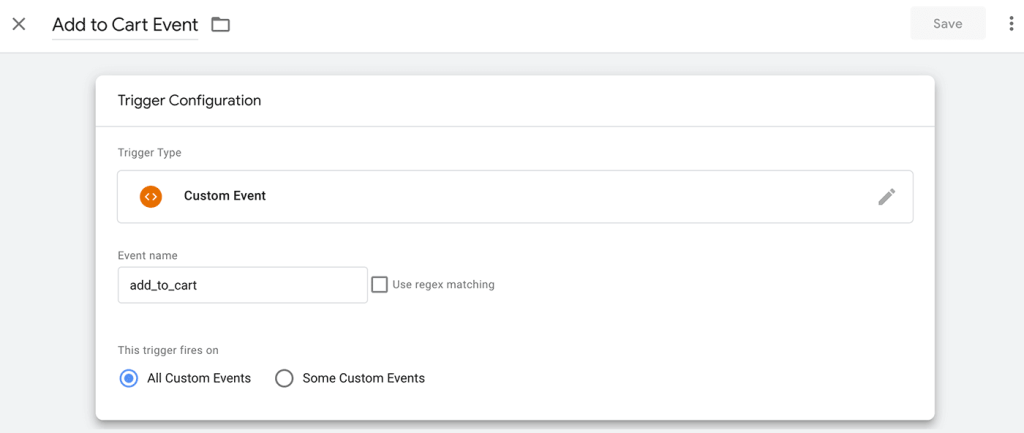
Repeat these steps to create two more triggers for:
- Add to Cart Event. Set the Event type to
add_to_cart, and - Purchase Event. Set the Event type to
purchase
Here are three screenshots of what the Triggers in GTM should look like when you completed this step:

2. Set Up a General GA4 Events Tag in GTM
I read so many tutorials on GA4 Event tracking and found this next step to be the most straightforward way Google recommends setting up tracking for Events. What we’re doing here is telling GTM to listen for our named event types.
If GTM sees any of these event types coming from our membership site, it knows to send the data to GA4.
- In Google Tag Manager, navigate to Tags > New.
- Name the Tag GA4 Events.
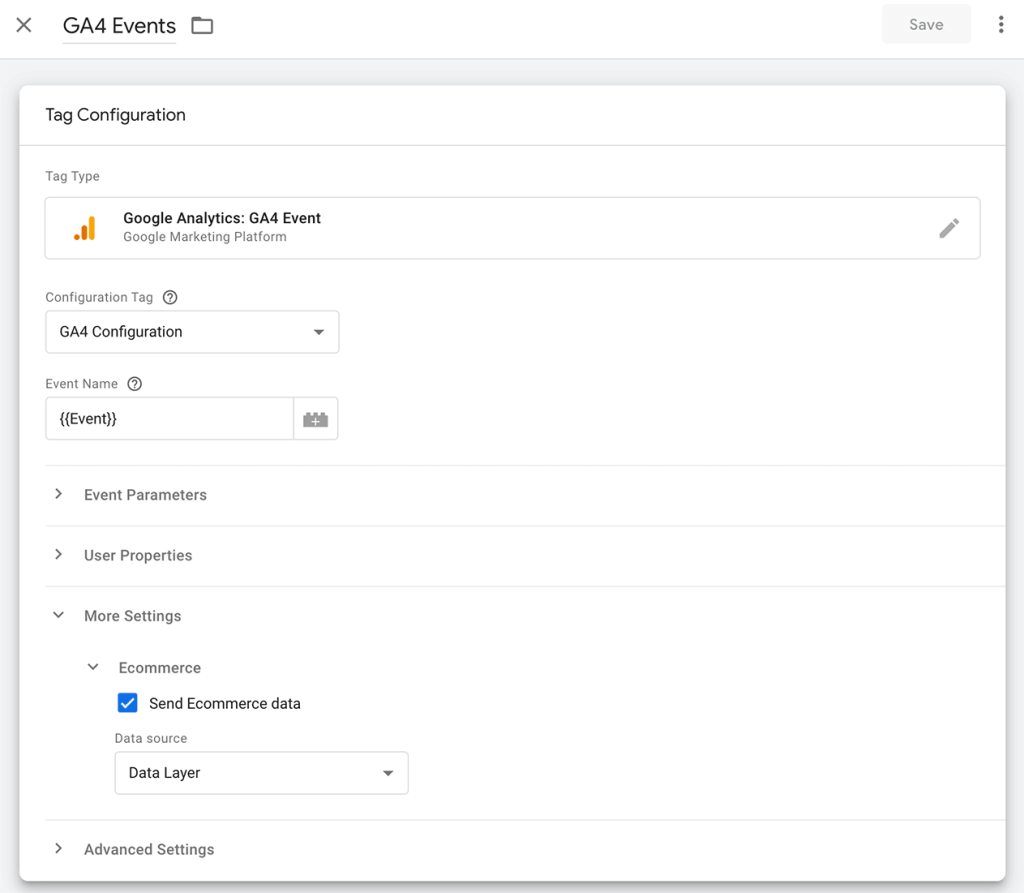
- First set up the Tag Configuration
- Set the Tag Type to Google Analytics: GA4 Event.
- Select your GA4 Configuration in the dropdown for Configuration Tag. If you don’t have GA4 configured yet, refer to our companion guide on basic Google Tag Manager setup for GA4.
- In the Event Name field, enter these exact characters:
{{Event}} - Toggle the More Settings box, and check the box to Send Ecommerce data in the Ecommerce section. The Data source should be set to Data Layer.
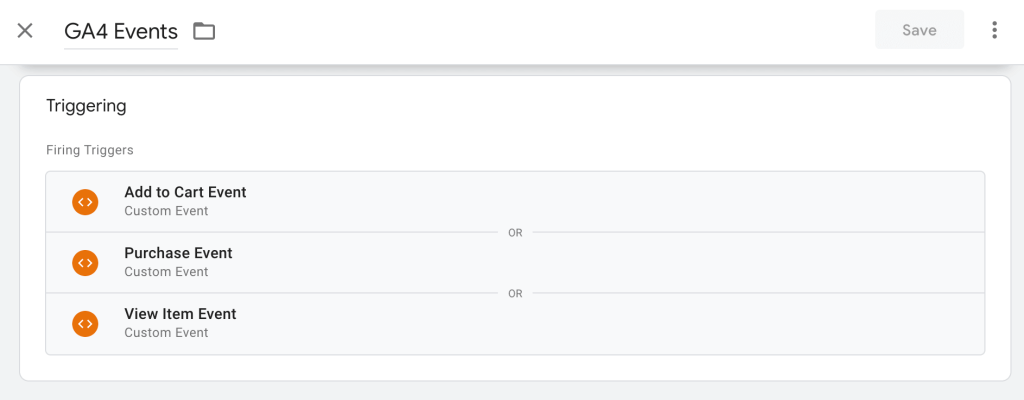
- Now set up the Tag Triggering
- In the Firing triggers section, add each of the triggers you created in the previous step: View Item Event, Add to Cart Event, and Purchase Event.
- Click the + icon, and add each of your custom events.
You are now ready to save all these changes and publish the Workspace changes to Google Tag Manager. Once published, your custom triggers, variables, and tags will immediately be updated in your membership site.
- In the main Google Tag Manager dashboard, click the big blue Submit button in the upper right menu area.
- Optionally enter notes about the version and changes (internal only).
- Click Publish.
3. Add the Custom Ecommerce Analytics DataLayer Code to Your Site
The code recipe below populates GTM’s dataLayer with ecommerce analytics for three ecommerce events: view_item, add_to_cart, and purchase.
- The
view_itemevent is triggered when someone visits your Membership Levels page - The
add_to_cartevent is triggered when a user visits the checkout page for a single level. - The
purchaseevent is triggered after the checkout is completed. The code tracks purchases for free membership levels, $0 checkouts, and paid checkouts.
Why these three events? Google designed the default GA4 Monetization > Ecommerce purchases report with these three events in mind. If you want to use other events, refer to the GA4 documentation for other built in event types. You’ll need to create custom explorations for your events if you do not use the GA4 standards.
You can add this recipe to your site by creating a custom plugin or using the Code Snippets plugin available for free in the WordPress repository. Read this companion article for step-by-step directions on either method.
Note: this is not drop in code. You must customize this code for your site.
- Update line 32 with a comma-separated list of the level IDs shown on your Membership Levels page.
- If you are using custom landing pages and need this snippet to also run on other pages, you’ll need to adjust the page conditions on lines 23 and 70 (and maybe 98 if you have custom confirmation page logic).
4. Test Your Ecommerce Analytics Setup
The most wonderful thing about using Google Tag Manager is their built-in testing interface. You can now instantly verify your setup without days to “wait and see” what Google Analytics was actually tracking.
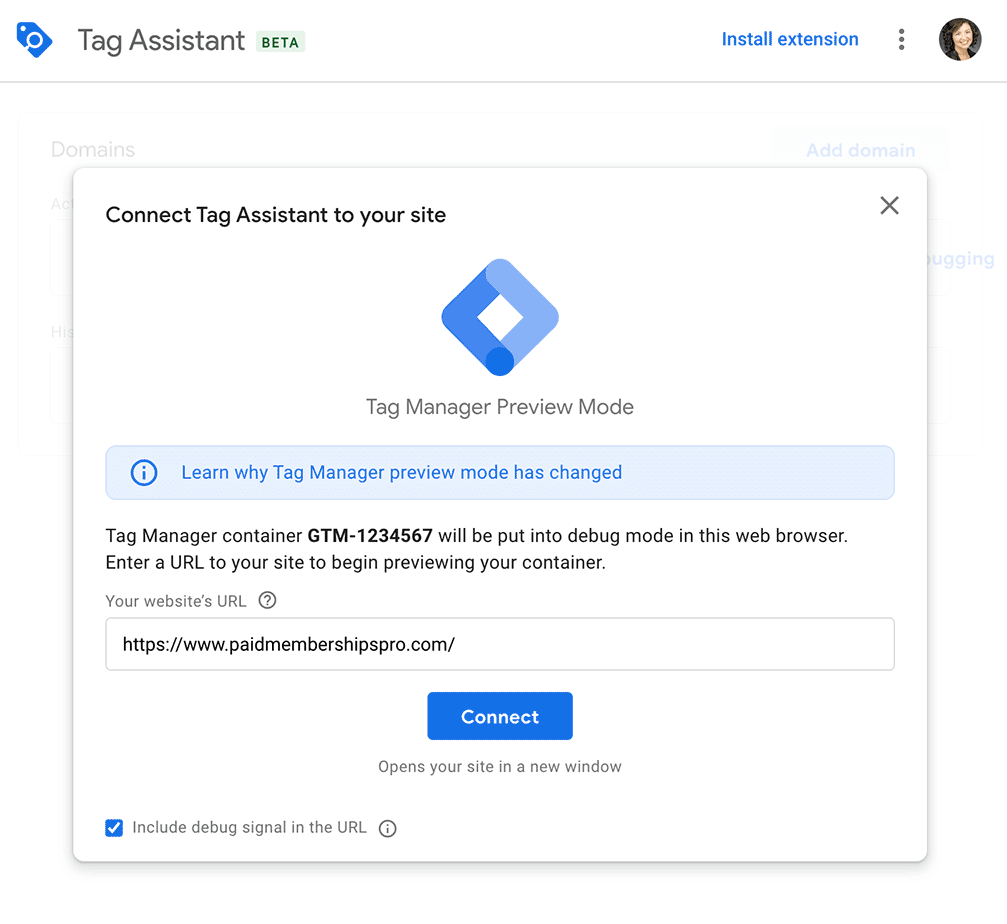
- In Google Tag Manager, click the Preview button in the upper right menu area.
- This button triggers a new tab with the Tag Assistant interface. You must enter the URL of your membership site.
- Once the window loads, be sure you are not logged in as an administrator account. Most GA4 setups do not track activity for logged in admins—but that can vary based on your site.
- Navigate your membership site to the pages that will trigger ecommerce analytics events:
- Visit your pricing or membership levels page.
- Click a button to start checkout for a membership level.
- If you can (and you should), complete a checkout. You can do this for a free membership level or use a coupon code to do an actual paid checkout (and refund yourself later). I strongly recommend doing a true checkout so that you can validate the complete ecommerce analytics tracking is configured correctly.
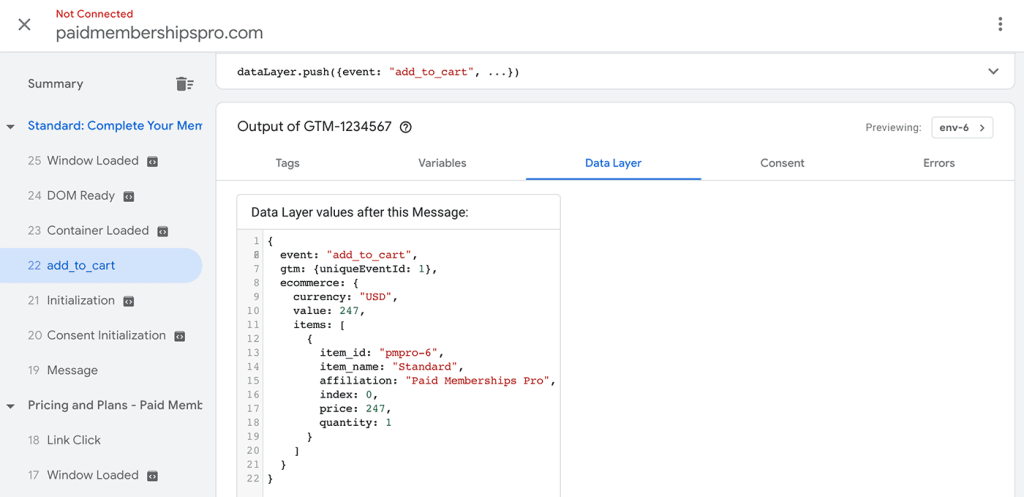
Once you have fully navigated around your site, return to the Tag Assistant window to verify that your events and dataLayer are all configured properly.
Ecommerce Analytics Set Up—Now What?
This article gave you the steps to track and view e-commerce analytics for a membership site in Google Analytics 4 (GA4). At the end of this guide, you should have completed all the necessary steps to:
- Set up Google Tag Manager triggers
- Create a general GA4 events tag in GTM
- Add the custom ecommerce analytics datalayer code to your site
- Validate your setup by testing the ecommerce analytics using Tag Assistant.
In a few days, your GA4 dashboard will be populated with all these juicy ecommerce analytics. Use this data to help you see just how many people are hitting your pricing page and completing the membership checkout experience.
In a month, that data will give you data on your current site’s conversion rate—and prime you for more work on CRO and understanding the top value pages across your whole membership business.
More Content About Membership Site Data and Analytics
- Membership Site Analytics: How to Set Up GA4 and GTM with Custom Dimensions
- Ecommerce Analytics: Send Events to Google Tag Manager and Google Analytics 4 (GA4)
- How to Set Up Google Analytics GA4 Conversion Events for Membership Sites
- How to Reliably Track Ad Campaign Conversions with Privacy-First Affiliate Tracking
- Extraordinary Strategies to Manage Membership Engagement
- Does Your Membership Registration Page Maximize Conversions?
- Top Membership Site KPIs to Measure
Free Download: The AI-Powered Membership Site Blueprint
Download the free guide: Learn how to plan, build, and grow a membership site using AI as your strategic partner: from buyer persona to launch and beyond.


