In this guide, we show you how to use custom code to set up three key components for your membership site analytics:
- Google Tag Manager to manage all of the custom scripts and snippets you want to use on your membership site.
- Google Analytics 4 (GA4) as your general website analytics platform.
- Custom Dimensions for your membership site’s unique data.
After completing this tutorial, you’ll be fully set up to track and view general membership site analytics with custom data in Google Analytics 4 (GA4).

Table of contents
- Custom Code…or an Analytics Plugin?
- Video Demo: Using Google Analytics for your Membership Site
- 1. Install Google Tag Manager in Your Membership Site
- 2. Create Custom Dimensions in GA4
- 3. Create Variables For Custom Dimensions in GTM
- 4. Configure the Google Analytics 4 Tag
- Test Your Google Tag Manager and GA4 Analytics Setup
- Congratulations On Setting Up Google Tag Manager and GA4
Custom Code…or an Analytics Plugin?
The tutorial here is 100% custom code—no third party plugins required. We formerly recommended a few analytics plugins, such as GA Google Analytics by Jeff Starr or MonsterInsights. Today, we switched to a completely custom code solution over other popular analytics plugins like MonsterInsights because:
- We didn’t want our WordPress site admin cluttered with upsells or banners.
- We trust that the custom code on our site isn’t phoning home to any unauthorized third parties.
- We didn’t need analytics reports in our WordPress site dashboard—that’s what the GA4 app is for.
- There’s no ongoing fees to using custom code—once the code is in place, you are good to go.
If you are using an analytics plugin and do not want to change methods, its possible that the code recipe in this guide that pushes Membership Level to the dataLayer will work as is or with some adjustments. I’d suggest using that code as a starting place to write a custom filter for your analytics plugin of choice.
Important Update: PMPro now offers a complete Google Analytics Integration plugin with custom membership data and full ecommerce tracking. Say goodbye to Monster Insights or Google Site Kit. This Add On is your all-in-one solution for Google Analytics integration.
Video Demo: Using Google Analytics for your Membership Site
1. Install Google Tag Manager in Your Membership Site
When you create a new property in Google Tag Manager, you’re given two scripts to place in your website code. The code recipe below loads that script in your WordPress site head tag.
As a fallback, Google Tag Manager recommends adding the noscript tag to your website body. In this example, we use the default WordPress action wp_body_open. If this is not present in your theme, you may need to contact your theme author for help finding the right hook for your theme.
You must update lines 26 and 42 with the unique Container ID for your site’s Google Tag Manager property.
You can add this recipe to your site by creating a custom plugin or using the Code Snippets plugin available for free in the WordPress repository. Read this companion article for step-by-step directions on either method.
2. Create Custom Dimensions in GA4
The code at the end of this guide includes the logic to push custom information to the dataLayer, which will be used by GTM and GA4. In Google Analytics 4, these variables are called Custom Dimensions.
- Log in to your Google Analytics Dashboard.
- Select the property that is using Google Analytics 4 (GA4) you would like to manage.
- Navigate to the Admin management screen.
- Select Custom definitions under the Property column.
- Click Create custom dimensions.
This guide requires you to set up three custom dimensions:
- post_type: The post type of the content being viewed (i.e. ‘post’ or ‘page’)
- post_author: The first and last name of the post author (fallback to user-{ID} if no name)
- membership_level: The membership level of the current logged in user (fallback to ‘no_level’ for non-members and site visitors).
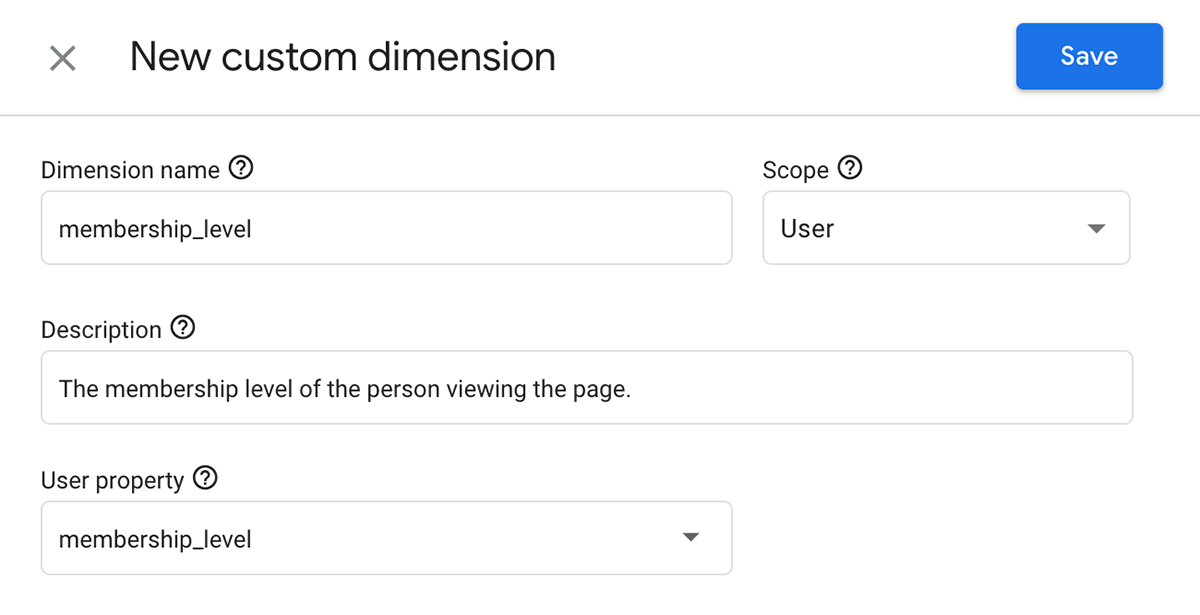
Here’s how to set up the membership_level dimension:
- Enter the Dimension name
membership_level - Set the Scope to User.
- Enter a basic description (for internal use only).
- Set the User property to
membership_level.
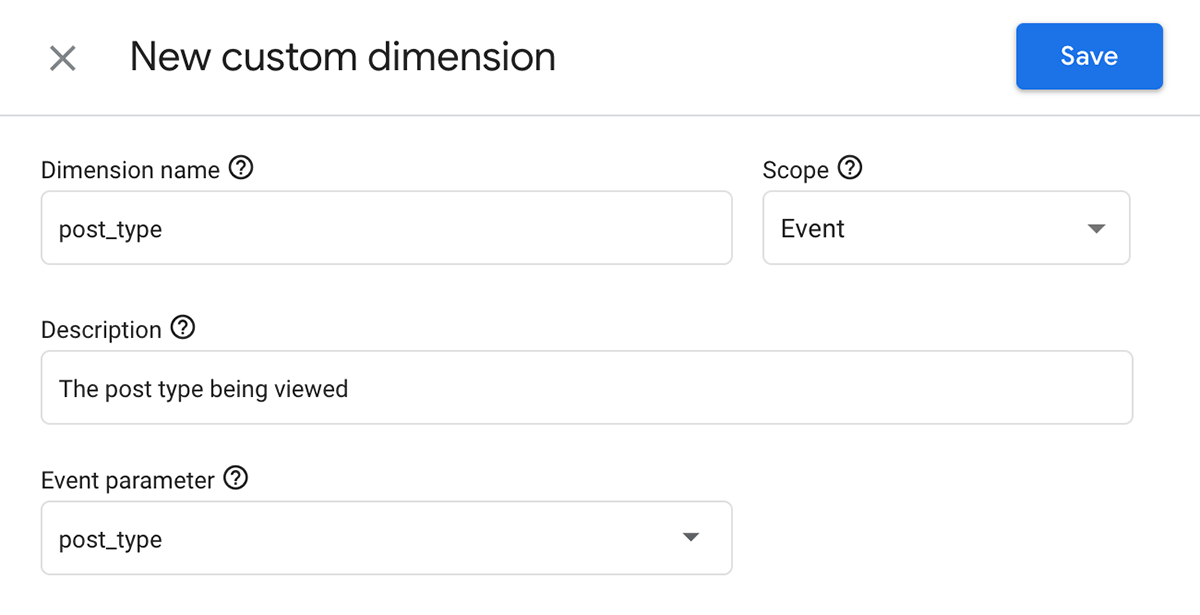
- Repeat these steps to create the other two dimensions in this guide (
post_typeandpost_author).- When you create these dimensions, set up the matching name and event parameter, but for the Scope field, select Event.
- Save Settings.
This is what the final Custom Definitions list for Google Analytics 4 should look like in your admin settings panel (ignore post_category below that isn’t a part of this tutorial):

3. Create Variables For Custom Dimensions in GTM
Since you may be using your custom dimensions in multiple tags and triggers, I find it helpful to set up the Variables in your GTM dashboard for all the fields this code passes to the dataLayer.
This way, you can easily reference a variable in your scripts without having to remember the exact name of the field passed in your custom code.
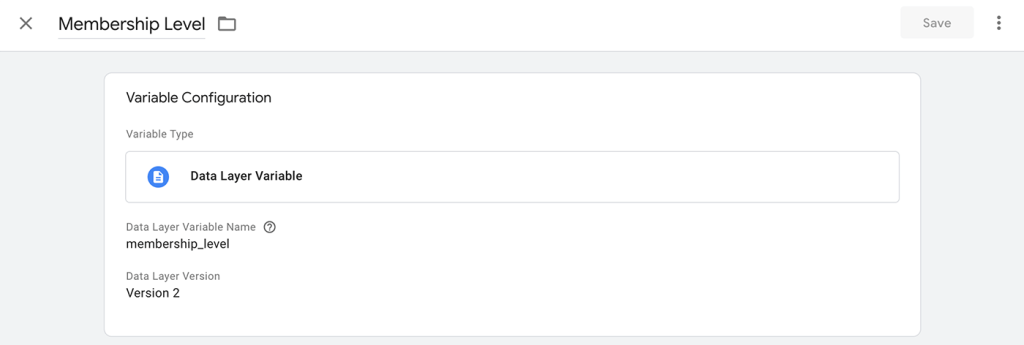
How to Create Variables in Google Tag Manager
- In Google Tag Manager, navigate to the property you want to edit, then select Variables in the left column menu.
- Google populates several built-in variables for you.
- In the User-Defined Variables section, click New.
- Give the variable a name you can remember, such as Membership Level. You’ll use this in creating Tags later in your GTM setup.
- In the Variable Configuration section, select Data Layer Variable for the type.
- For the name, enter:
membership_level - You don’t need to change the version or add a custom format.
- Click Save.
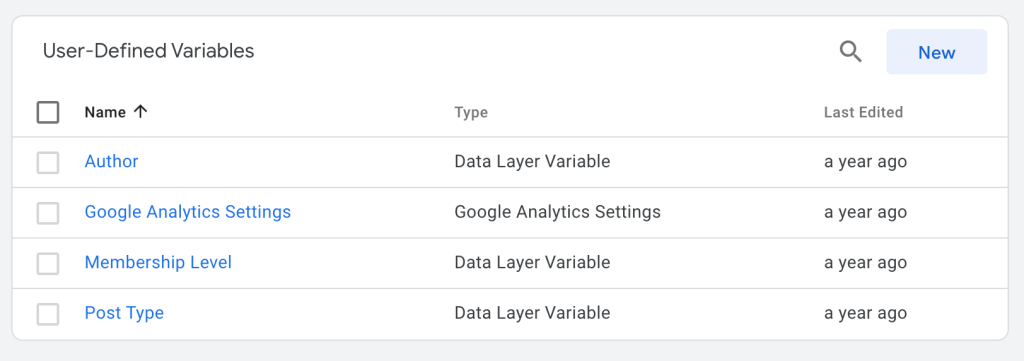
Repeat these steps to create additional variables for:
- Author. Set the Data Layer Variable Name to
post_author, and - Post Type. Set the Data Layer Variable Name to
post_type
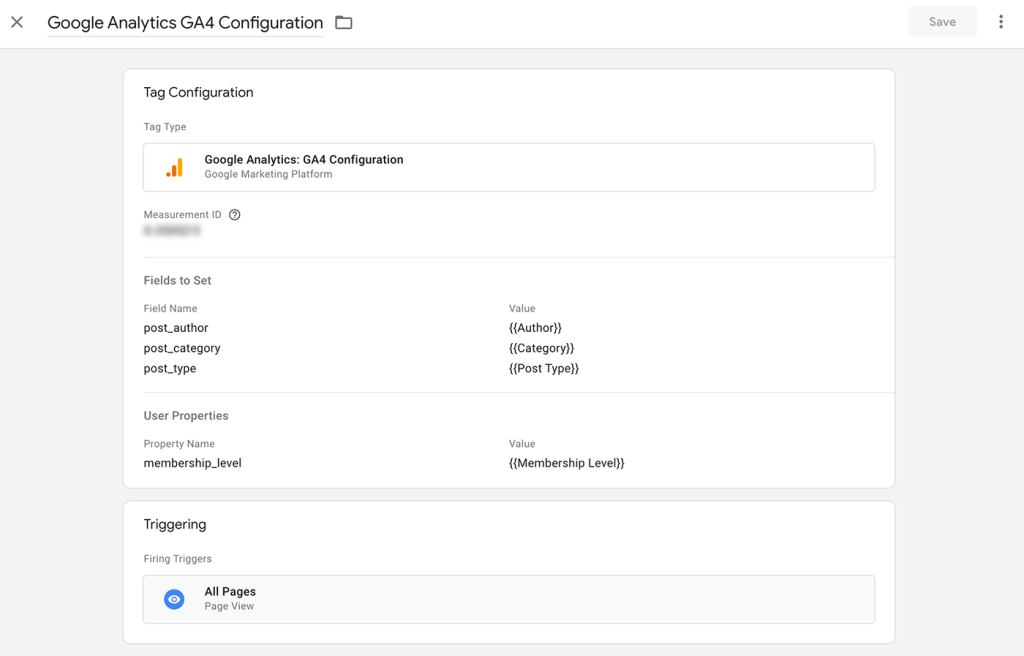
4. Configure the Google Analytics 4 Tag
The next steps show you how to create the GA4 Tag within GTM. Since you already have GTM set up in your membership site from step 1 in this guide, you can now focus on setting up the GTM workspace directly.
- In Google Tag Manager, navigate to Tags > New.
- Name the Tag GA4 Configuration.
- First set up the Tag Configuration
- Set the Tag Type to Google Analytics: GA4 Configuration
- Set the Measurement ID (e.g, G-A2ABC2ABCD) for your GA4 property. Here’s how to locate the Google Tag ID.
- Next, check the box to Send a page view event when this configuration loads.
- Toggle the Fields to set section and add fields just like the screenshot below.
- The field name should match either
post_authororpost_type. - The Value is the Variables you set up in the previous step.
- The field name should match either
- Toggle the User Properties section and add a field for
membership_level- The field name should be
membership_level. - The Value is the Membership Level Variable you set up in the previous step.
- The field name should be
- Now set up the Tag Triggering
- In the Firing triggers section, select All Pages.
Here’s a final screenshot of the GA4 Configuration Tag in Google Tag Manager with custom dimensions.
You are now ready to save all these changes and publish the Workspace changes to Google Tag Manager. Once published, your custom triggers, variables, and tags will immediately be updated in your membership site.
- In the main Google Tag Manager dashboard, click the big blue Submit button in the upper right menu area.
- Optionally enter notes about the version and changes (internal only).
- Click Publish.
Note: the steps above are specifically for custom dimensions in Google Analytics 4 (GA4). If you are using Google’s Universal Analytics (UA), see the instructions in this companion post for more information on configuring custom dimensions in UA.
Test Your Google Tag Manager and GA4 Analytics Setup
After you’ve completed these steps, you may be wondering if you actually did everything right. With Google Tag Manager’s built-in testing interface, you can instantly verify your setup without days to wait and check what is actually being tracked by GA4.
- In Google Tag Manager, click the Preview button in the upper right menu area. This button triggers a new tab with the Tag Assistant interface.
- Enter the URL of your membership site in the modal window that appears.
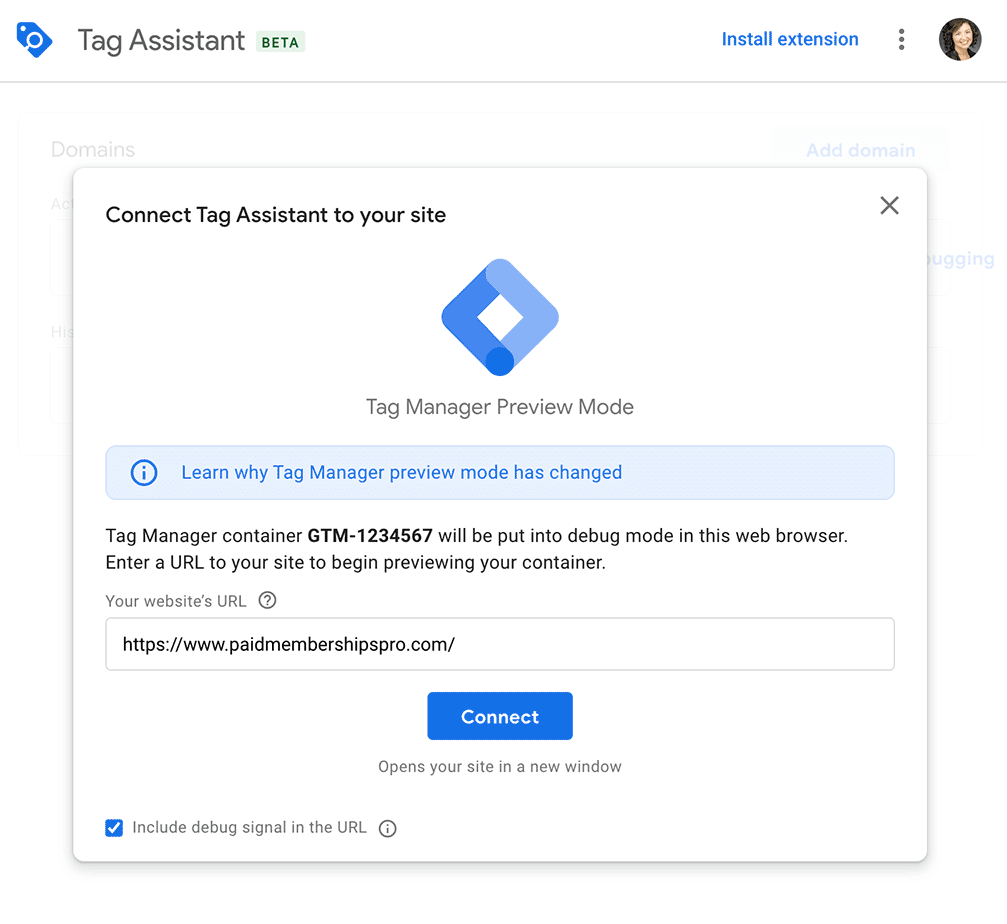
- Once the window loads, start navigating the site to trigger some page and post views, as well as trigger some dataLayer custom dimensions to be logged.
- You can log in to a user account with a membership level to test the custom dimension for
membership_level. Just be sure you are not logged in as an administrator account, since the GTM code recipe in step 1 of this guide does not not track activity for logged in admins.
Once you have fully navigated around your site, return to the Tag Assistant window to verify that your events and dataLayer are all configured properly.
Congratulations On Setting Up Google Tag Manager and GA4
This guide shows you how to set up Google Tag Manager and the new analytics tool: GA4. You didn’t use any premium plugins for this setup—it’s all done using custom code. Your membership site can now:
- Start using new Tags in Google Tag manager to track new things like embedded YouTube Videos or even set up a Facebook Pixel for ad retargeting.
- Your site is sending general page analytics data to GA4
- You set up some custom membership site data fields to popular in Google Tag Manager and then in GA4.
Now that you have GTM working with your site, you’ve paved the way to add more tags and track more things. GTM has loads of options to add additional tags directly in their workspace. For example, you could also implement a Facebook Pixel, which uses standard and custom data to:
- To help you build more accurately-refined audiences for your Facebook retargeting ads, and
- Track the returns on your ad spend investment
A natural progress, though, is to track ecommerce analytics in your membership site. Check out this companion guide for step-by-step instructions on Ecommerce Analytics: How to Send Events to Google Tag Manager and Google Analytics 4 (GA4).
More Content About Membership Site Data and Analytics
- Membership Site Analytics: How to Set Up GA4 and GTM with Custom Dimensions
- Ecommerce Analytics: Send Events to Google Tag Manager and Google Analytics 4 (GA4)
- How to Set Up Google Analytics GA4 Conversion Events for Membership Sites
- Extraordinary Strategies to Manage Membership Engagement
- Does Your Membership Registration Page Maximize Conversions?
- Top Membership Site KPIs to Measure
Free Download: The AI-Powered Membership Site Blueprint
Download the free guide: Learn how to plan, build, and grow a membership site using AI as your strategic partner: from buyer persona to launch and beyond.


