As a membership site owner, you want to deliver high-quality video content to your members without breaking the bank. Bunny CDN (also known as Bunny.net) is an affordable and high-performance CDN solution for video streaming.
In this post, we’ll walk you through the process of embedding a Bunny CDN video on your WordPress membership site, while also discussing how to protect your video content and utilize Bunny Stream for secure live streaming.

Table of contents
- What is Bunny CDN?
- The Benefits of Using Bunny CDN to Host Your Video Content
- How Does Bunny CDN Work?
- Video: How to Restrict and Embed Videos on Your WordPress Membership Site Using Bunny CDN
- Step-by-Step Guide: How to Restrict and Embed Videos on Your WordPress Membership Site Using Bunny CDN
- Do I Need a Video Player for WordPress?
- There You Have It!
- Run Your Online Video Business with WordPress
What is Bunny CDN?
Bunny CDN is a content delivery network (CDN) that offers fast and reliable video streaming services at competitive prices. It allows you to host, manage, and deliver your video content efficiently, ensuring an exceptional user experience for your members.
Learn more about Bunny CDN pricing here.
The Benefits of Using Bunny CDN to Host Your Video Content
There are a variety of video hosting options available, including YouTube, Vimeo, and Amazon S3. So, why should you use Bunny CDN?
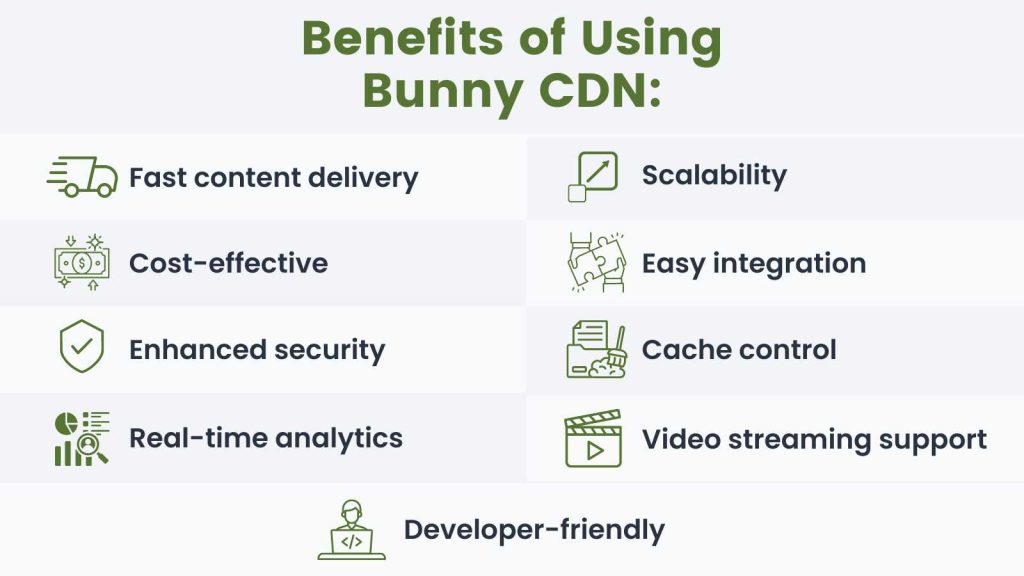
Here are a few of the main benefits:
- Fast Content Delivery. Bunny CDN uses a global network of servers to quickly deliver your content to users around the world. This reduces latency and ensures a fast and smooth experience for your users, improving user satisfaction and engagement.
- Scalability. As your website grows and experiences more traffic, Bunny CDN can easily handle the increased load without compromising performance. This allows your site to maintain optimal speed and reliability, even during peak traffic periods.
- Cost-Effective. Bunny CDN offers competitive pricing with a pay-as-you-go model, making it an affordable option for businesses of all sizes. You only pay for the bandwidth you use, with no upfront costs or long-term commitments required.
- Easy Integration. Bunny CDN provides simple integration options with popular platforms like WordPress, making it easy to implement and manage your CDN services.
- Enhanced Security. Bunny CDN offers various security features, such as SSL/TLS encryption, DDoS protection, and token authentication, to protect your content and website from malicious attacks.
- Cache Control. Bunny CDN provides powerful cache control options that allow you to manage how your content is cached and served to users. This enables you to optimize the performance and efficiency of your content delivery.
- Real-Time Analytics. Bunny CDN offers real-time analytics and monitoring tools, giving you valuable insights into your content delivery performance and user engagement. This helps you make data-driven decisions to improve your website and content strategy.
- Video Streaming Support. Bunny CDN supports video streaming, allowing you to deliver high-quality video content to your users quickly and efficiently. It works seamlessly with video players like Presto Player to provide an optimal viewing experience.
- Developer-Friendly. Bunny CDN offers a comprehensive API and detailed documentation, making it easy for developers to integrate and customize the CDN services according to their specific needs.
How Does Bunny CDN Work?
Bunny CDN works by caching and delivering your website’s content through a network of geographically distributed edge servers. This means that users will receive content from the nearest edge server, reducing latency and improving loading speeds.
To leverage these benefits for embedding and restricting videos on your website, you’ll first need to have a Bunny CDN account. Once you have an account, follow this step-by-step guide to get started with using Bunny CDN for optimal video delivery and access control.
Video: How to Restrict and Embed Videos on Your WordPress Membership Site Using Bunny CDN
Step-by-Step Guide: How to Restrict and Embed Videos on Your WordPress Membership Site Using Bunny CDN
There are two main components that Bunny CDN uses to restrict video content:
- Storage Zones
- Pull Zones
Now, let’s talk about what these terms actually mean and how to set them up.
Storage Zones
A storage zone is a scalable storage solution that you can use to house and manage your website’s static files, such as images, stylesheets, JavaScript files, and videos. Storage Zones serve as the origin for your content and can be easily integrated with BunnyCDN’s content delivery network (CDN) to ensure fast and reliable content delivery to users worldwide.
In other words: Storage zones are where all of your videos are stored on Bunny CDN.
You can set up as many storage zones as you want, and restrict access to entire storage zones or individual files within a storage zone.
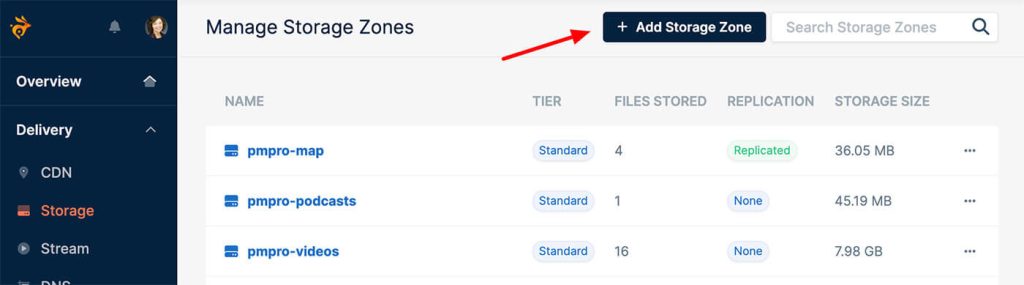
How to Set Up a Storage Zone
- In the dashboard, navigate to the Storage tab on the left-hand side menu. Click on Add Storage Zone.
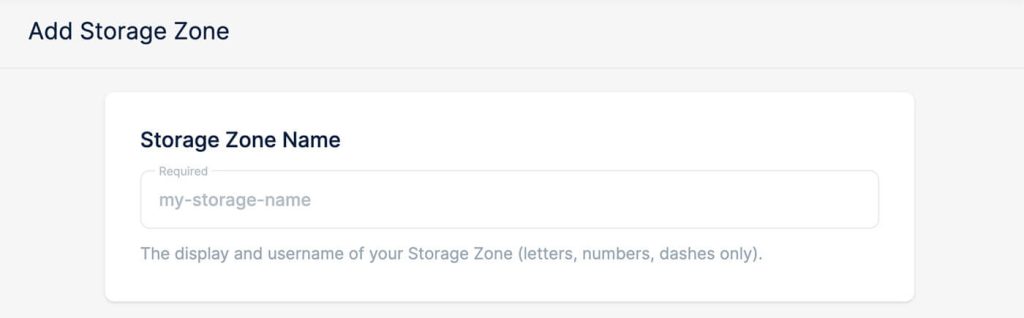
- Configure the storage zone:
- Enter a unique name for your storage zone. This will be used as an identifier and cannot be changed later.
- Choose the region that’s closest to your target audience. This helps optimize the delivery of your content.
- Toggle the Enable GEO Replication switch to replicate your data across multiple regions for better redundancy and performance. Note: Enabling this feature can increase costs.
- Save the storage zone by clicking the + Add Storage Zone button.
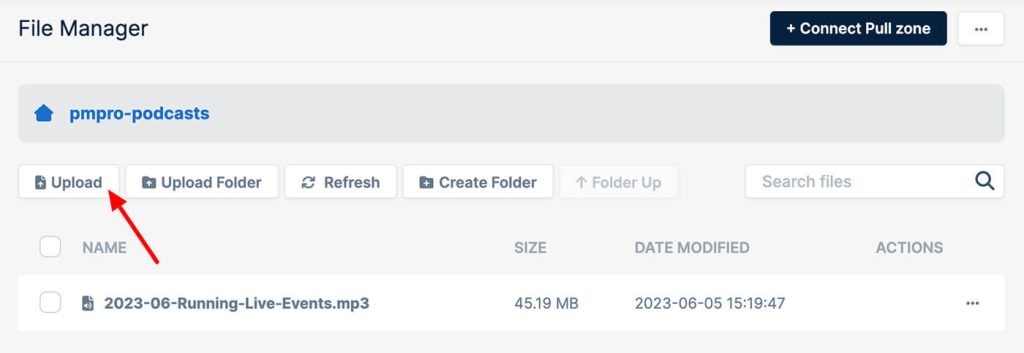
- Lastly, upload the video files that you want to protect to this storage zone.
Next, you’ll need to set up a pull zone to ensure that only authorized users can view your videos.
Pull Zones
Pull Zones define how the BunnyCDN content delivery network (CDN) fetches and serves your content to end-users. They act as a bridge between your origin server (or storage zone) and the BunnyCDN network.
When a user requests a file, the Pull Zone determines where to fetch the content from, as well as how to cache it on the CDN.
By using a Pull Zone, you can ensure that your content is distributed across multiple edge servers worldwide. This improves the performance and speed of your website, with users receiving the requested files from the nearest edge server instead of your origin server.
Additionally, it reduces the load on your origin server, as cached content is served directly from the CDN.
How to Set Up a Pull Zone to Restrict Your Videos
- Go to the Bunny CDN dashboard and navigate to the Pull Zones tab.
- Click on Add Pull Zone to create a new pull zone.
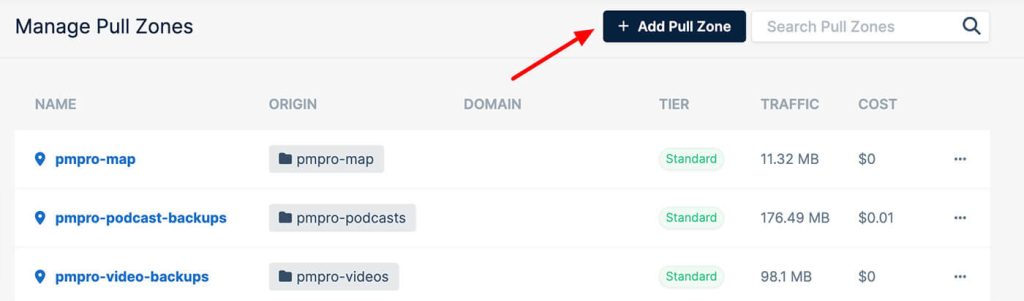
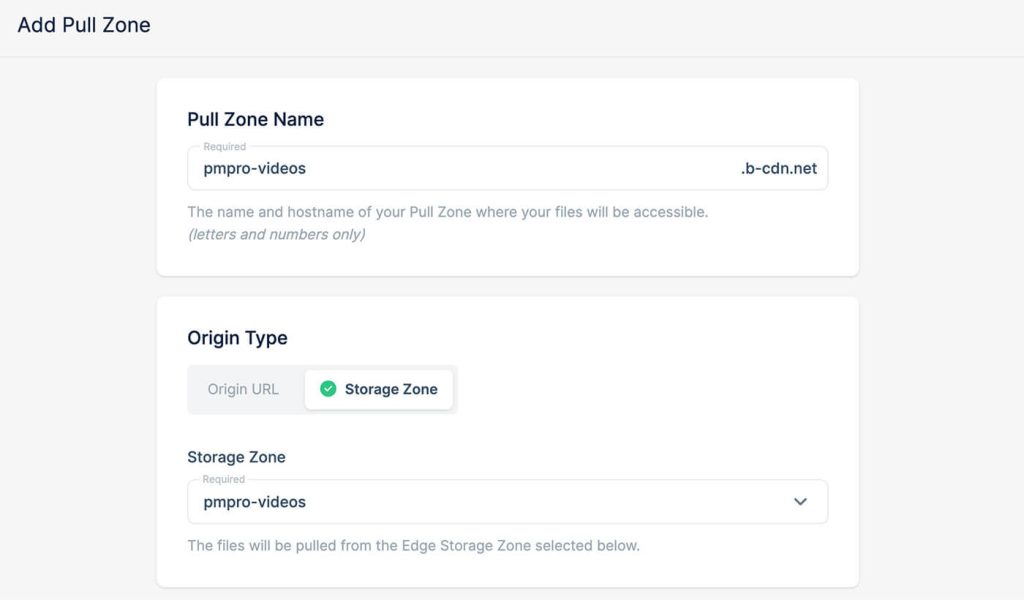
- Choose a name for your Pull Zone
- Specify the Origin URL or the Storage Zone you want to protect. This is the source of your content.
- You can change the pricing zones where your data is served from, if desired.
- Save the pull zone by clicking the + Add Pull Zone button, and BunnyCDN will generate a CDN URL for your content delivery.
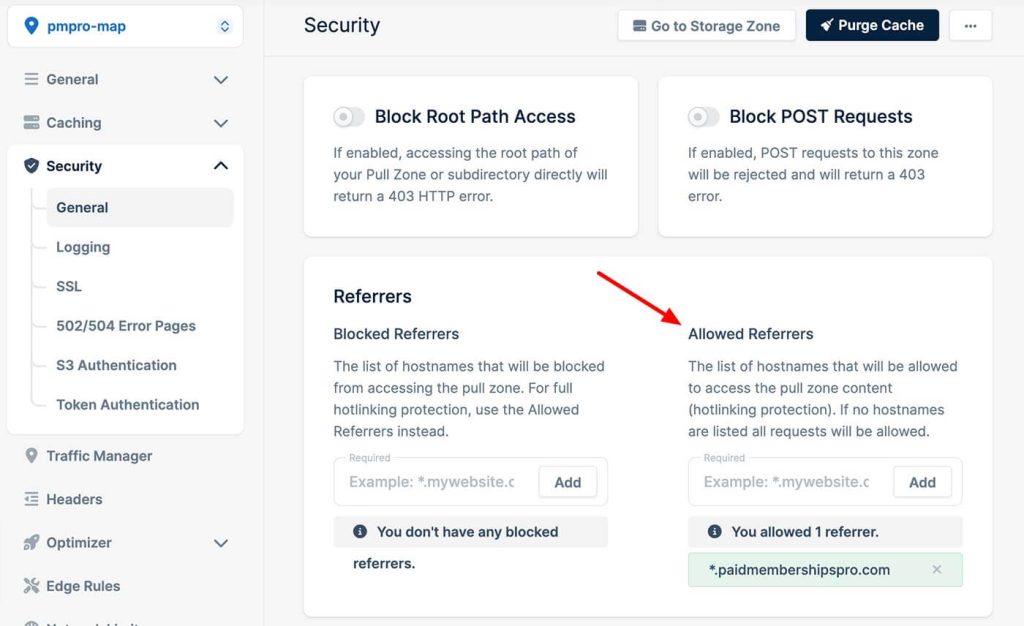
- To finish protecting your content, navigate to the Security tab.
- In the Allowed Referrers section, enter the URL of the WordPress website where you’ll be embedding your videos.
How to Embed Bunny CDN Videos on Your WordPress Membership Site
Now that you’ve got your videos uploaded to a storage zone and your pull zone specified, it’s time to embed your content.
To embed a video:
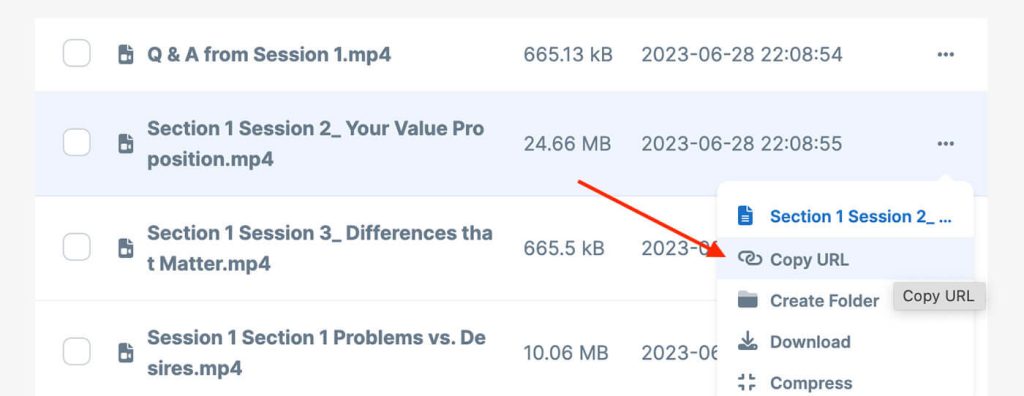
- In your Bunny CDN storage zone, go to the video that you want to embed, right click, and select Copy URL.
- Next, from your WordPress dashboard, navigate to the post or page where you want to embed the video and click Edit.
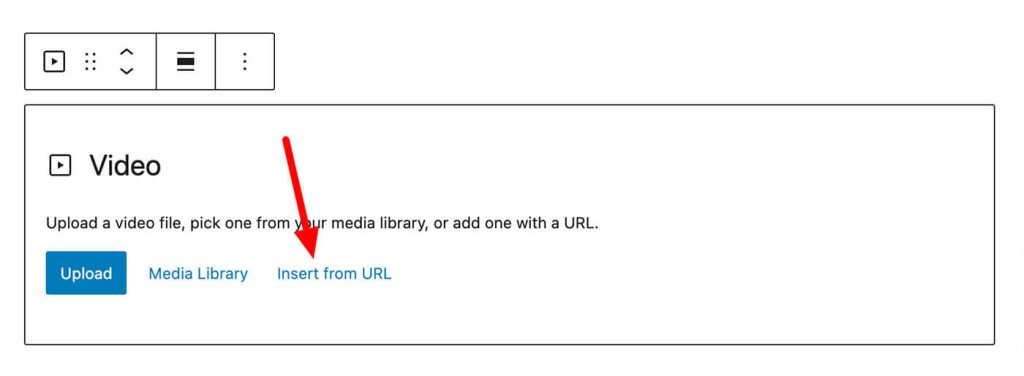
- Click the (+) icon and add the Video block.
- Select Insert from URL to add your Bunny CDN video URL.
- Save or update the post or page.
Now, your Bunny CDN-hosted video should be easily viewable exclusively by the members you’ve designated.
Remember: If the post or page where you embed the video is public, anyone will be able to see the video. So, make sure that you’ve assigned the right membership level to the post or page, and given the correct level of access to that membership level.
With Paid Memberships Pro, you can easily select a membership level within any page or post, or use our Membership Required block.
Do I Need a Video Player for WordPress?
While you can easily use the native Video block in the Gutenberg editor to embed your Bunny CDN videos, we like using Presto Player. It’s a powerful and feature-rich video player that is designed specifically for WordPress websites.
To learn more, check out our related post on how to restrict videos with Bunny.net, Presto Player, and Paid Memberships Pro.
If you’re still not sure which video hosting platform is best for your video membership business, we wrote a whole post on How to Sell Videos Online to Members Only.
There You Have It!
By following the steps in this guide, you can easily embed and protect Bunny CDN videos on your WordPress membership site without the need for costly plugins or additional layers.
We love Bunny CDN for private video hosting.
Plus, they even offer private video live streaming. Bunny CDN and Bunny Stream offer cost-effective, high-performance solutions for delivering both on-demand and live video content to your members, ensuring a seamless user experience.
If you’re still considering your options, check out our video hosting tools comparison chart below:
Run Your Online Video Business with WordPress
Ready to paywall your own members-only content and sell videos online? Give your members the video content they seek and earn a reliable income with a totally independent online business.
We know that a WordPress site has tons of moving parts. Choosing the right plugins, themes, video hosting, third party services, design assets, and more can feel overwhelming.
Paid Memberships Pro is a complete platform to help you make recurring revenue from your videos. But you may be asking: how do I put this thing together if I’m not a web developer?
We’ve got a complete guide that tells you exactly what you’ll get — the plugins, the support, and the training — when you manage your private video website on WordPress.
Free Download: The AI-Powered Membership Site Blueprint
Download the free guide: Learn how to plan, build, and grow a membership site using AI as your strategic partner: from buyer persona to launch and beyond.


