
This plugin automates sales and use tax calculation at membership checkout through the Avalara AvaTax cloud-based service. Membership sites using Paid Memberships Pro can now turn on AvaTax and know that accurate sales tax calculation will be applied to all member checkouts automatically. You can use your account with Avalara to process monthly or quarterly tax filings.
Installation
You must have the Paid Memberships Pro plugin installed and activated to use this Add On.
- Navigate to Memberships > Add Ons in the WordPress admin.
- Locate the Add On and click “Install Now“.
- Or, to install this plugin manually, download the .zip file above.
- Upload the compressed directory (.zip) via the Plugins > Add New > Upload Plugin screen in the WordPress admin.
- Activate the plugin through the Plugins screen in the WordPress admin.
Continue reading for setup instructions.
Initial Setup
- This AvaTax Integration requires an active account with AvaTax.
- Navigate to Memberships > AvaTax in the WordPress admin.
- Complete all fields in the Credentials section based on the information in your AvaTax profile.
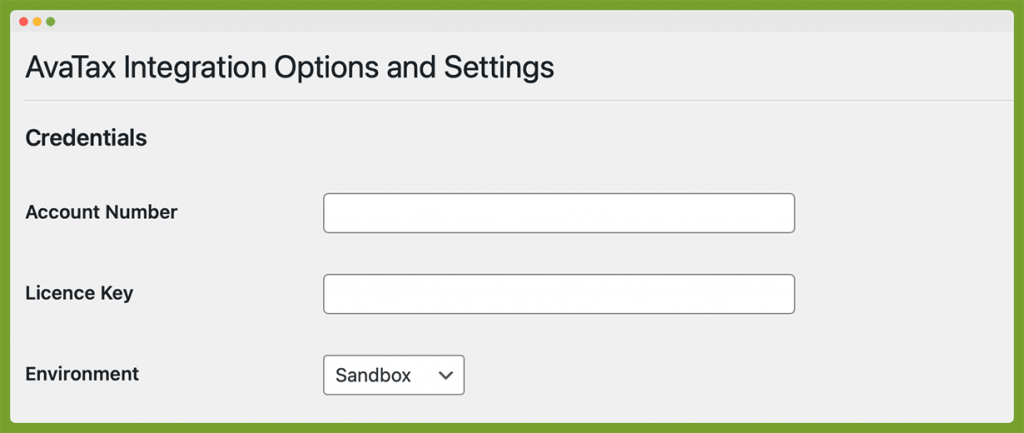
- Complete all fields in the Company section based on the information in your AvaTax profile.

- Save the settings page to validate your submitted fields. If no errors show, then you have successfully connected your membership site with your AvaTax account.
- If you site is not connected to AvaTax, double check that your settings fields exactly match the details in your AvaTax profile.
- If you enter the incorrect Account Number, License Key, or Code your site will not be able to connect to the AvaTax API.
Additional Settings
There are additional settings on this page in the WordPress admin that you can customize for your unique needs:
- Record Documents in AvaTax: When set to “No”, transactions will not be synchronized with AvaTax.
- Show VAT Fields at Checkout: Allows users to enter a VAT number at checkout.
- Site Prefix: A custom prefix to be used for this when transactions are sent to AvaTax. This should be different for any sites connecting to the same Avalara account to avoid repeating transaction codes and customer codes.

Membership Level Settings
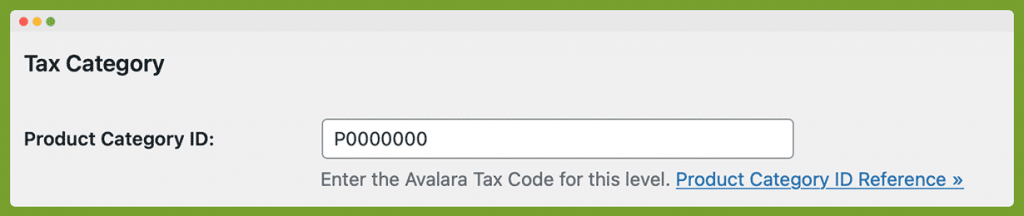
You can also adjust specific settings per membership level. Navigate to Memberships > Settings > Membership Levels, select a level to edit, and locate the heading “Tax Category”.
- Product Category ID: The tax code that should be used for the product being sold with this membership level. Available product category IDs can be found in the AvaTax documentation here.
Customer Exemptions
You can mark a user on your site as exempt from tax by going to their “Edit User” page in the WordPress admin.
- Locate the heading “PMPro AvaTax”.
- Check the “Exempt From Tax” checkbox and select an exemption reason from the dropdown.
- Click “Update Profile” to save settings.
Once an exemption is applied to a user, all future transactions that are sent to AvaTax will be marked as exempt from tax. This will not change the amount that the user pays at checkout, but will reduce your tax liability in AvaTax.
Frequently Asked Questions
- How can I synchronize my old orders with AvaTax?
Orders will only be synchronized with AvaTax when they are saved. With this in mind, if you would like an order from before you had the AvaTax Integration active to be sent to Avalara, you can do so by finding the order on the Memberships > Orders page, editing the order, and saving it. - Are recurring payments also sent to AvaTax?
Yes. When a recurring order is paid and an order is created in PMPro to reflect the payment, that order will also be sent to AvaTax. It is important to note that the tax rate charged for recurring payments will be the same as the tax rate when the user originally checked out. PMPro will not update subscription payment amounts based on tax rate changes after the subscription is created. We highly recommend disclosing this behavior on your website’s Terms of Service. We have recommended wording for this topic in the Settings > Privacy > Policy Guide screen in your WordPress admin. - Can I have tax be calculated on top of the membership price?
This is not currently a feature of the AvaTax Integration. - What happens when a transaction is locked in AvaTax?
Once AvaTax reports a transaction to tax authorities, they “lock” the order in their system. At this point, PMPro is unable to modify that transaction. If changes are needed after the transaction is locked in AvaTax, it will be necessary to make that change directly within AvaTax with the help of their support team. - How are refunds handled in the AvaTax Integration?
When an order is changed to “refunded” status in PMPro, the AvaTax Integration will try to void the transaction in AvaTax. If the order is already locked when we attempt to void the transaction, the refund will need to be entered directly into AvaTax.
This is a Free Add On.
Create a free account or log in to gain access to downloads and documentation.

