Making a manual payment for membership might seem counterintuitive when operating your membership business online. Most sites want things fast: an instant credit card or PayPal payment, so members can access your content without delay.
For some projects, though, manual payments are really important. Take the example of a super high-priced team course. With these large ticket purchases, sending the payment directly to your bank account reduces fees and gateway charge limits.
Or, take a super local community organization. If your members are all living in the same area, they may prefer to bring their dues payment to you in person (which also avoids credit card processing fees).
You need the Pay By Check: Manual and Offline Payments Add On. With this Add On, you’ll realize these clear benefits:
- Freedom for members to choose their preferred secure payment method.
- Secure options for people who might not want to pay with a credit card or have business requirements related to invoice payments.
- Confidence as the owner that only members whose manual payment has been confirmed can access all the benefits of your membership.
Keep reading to explore the documentation on setting up this Add On for your PMPro-powered membership site.
How It Works
There are many ways to set up this Add On, but for most cases sites use it to let members make manual payment for membership in addition to the site’s primary credit card payment method.
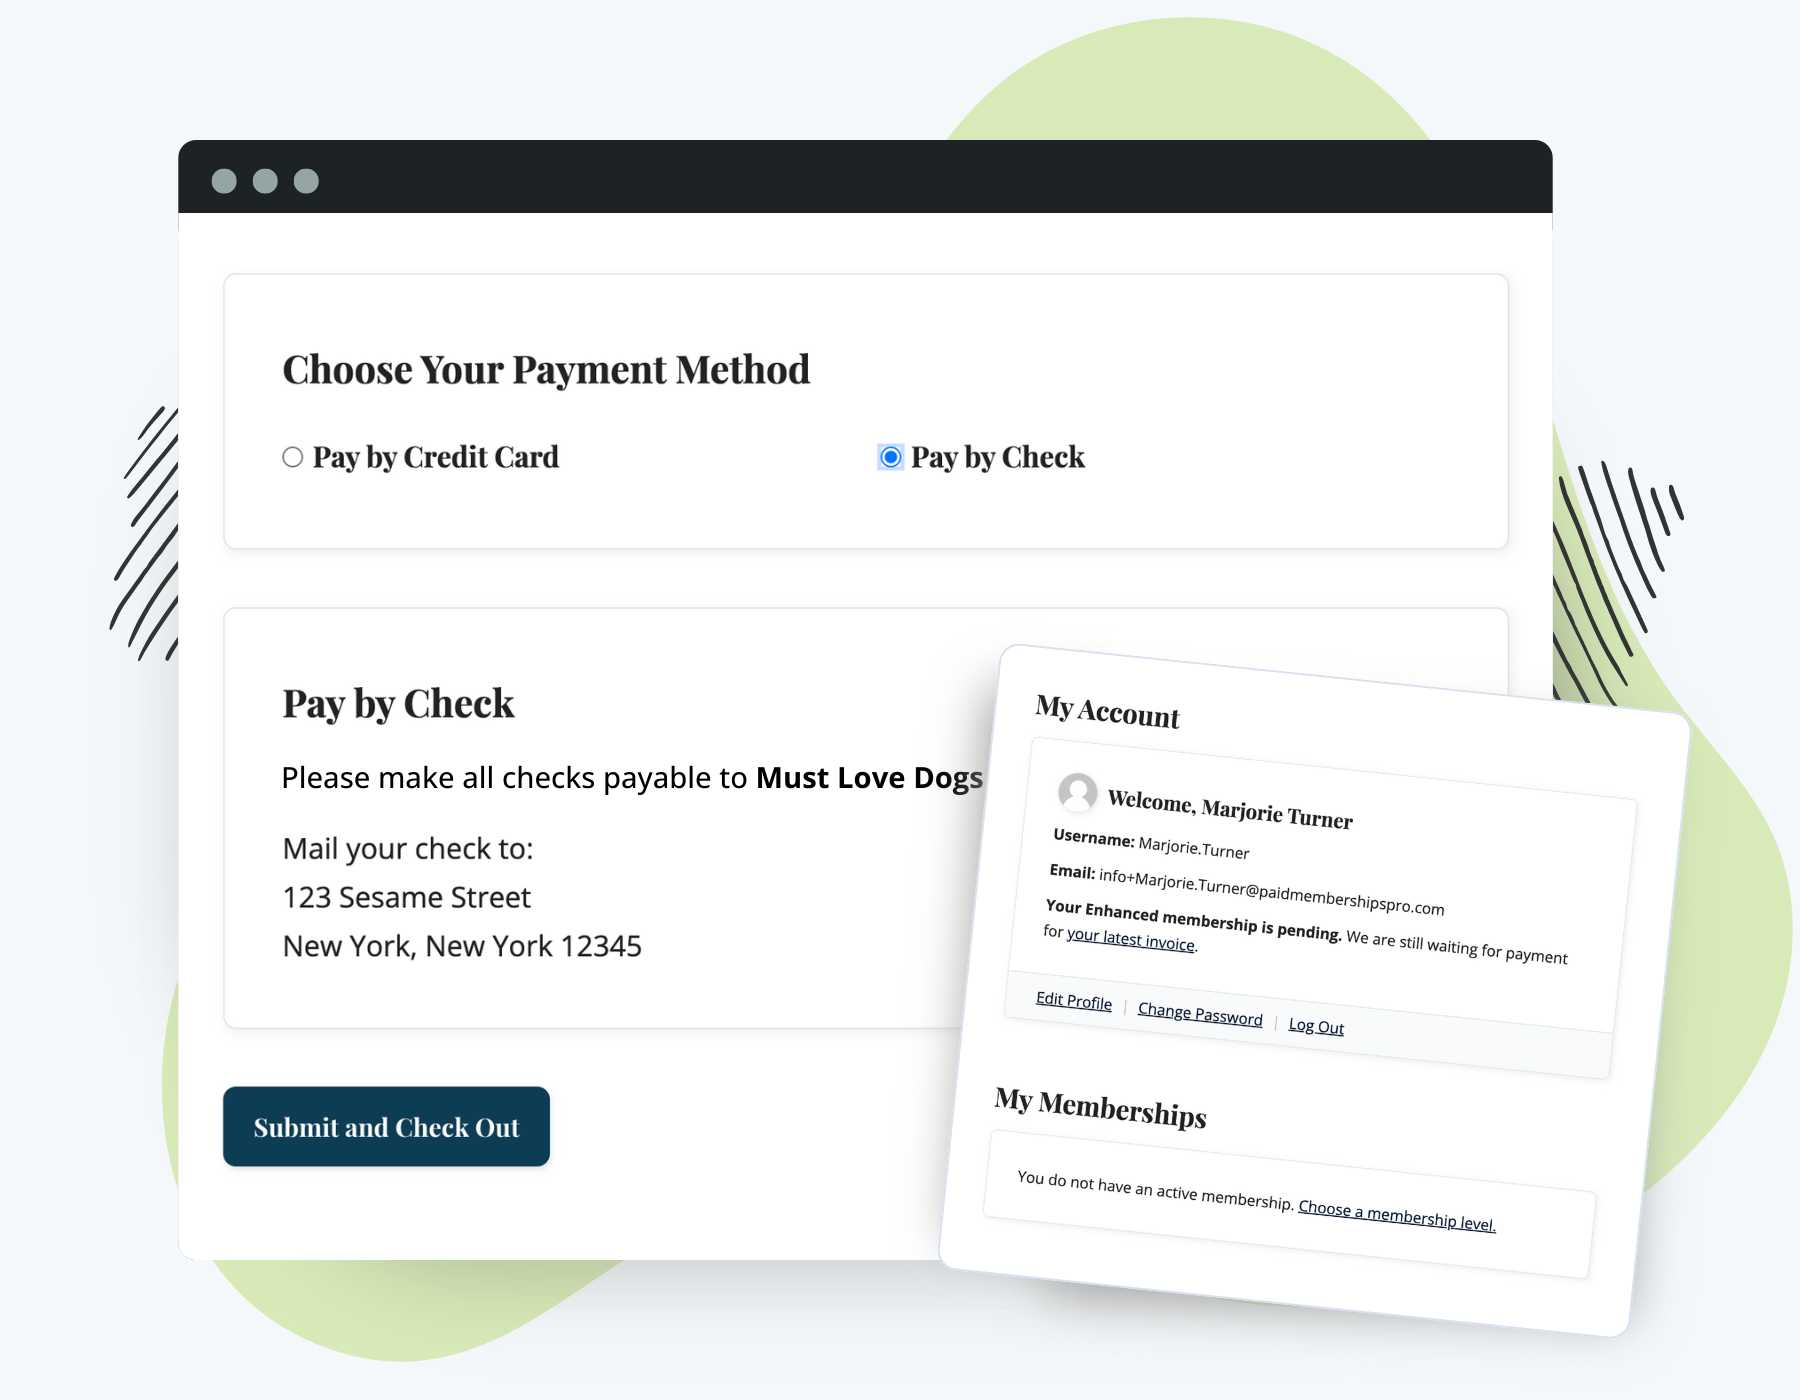
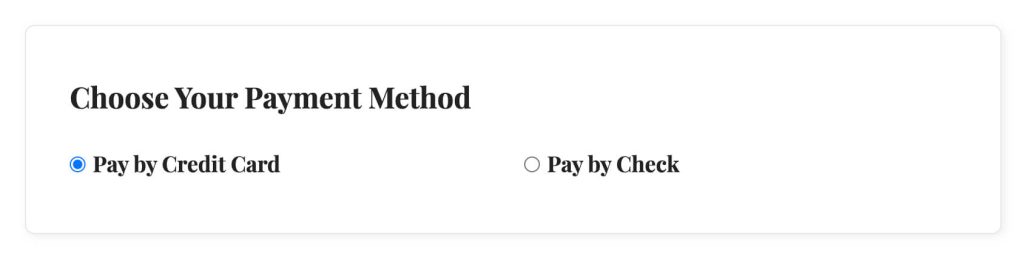
When users get to the checkout page, they will see a section where they can choose between Credit Card / PayPal or the configured Check / Manual payment gateway.
- If a user chooses to make a manual payment, they will be shown your custom instructions on how to make the payment. These instructions are shown on the checkout page, membership confirmation page, as well as in their confirmation email.
- After checkout, the member’s first order is set to “pending” status.
- The member does not gain immediate access to the benefits of their membership level.
After payment is received, whether by cash or check, bank transfer, or another manual method, the admin or membership manager must confirm receipt by editing the order to changing the status to success. Only then will the checkout complete and their full membership access will be granted.
Members whose order is not complete (in the pending status will see the default non-member-text notice when trying to access members-only content). To customize the default message, navigate to Memberships > Settings > Advanced Settings > Message Settings.
Video Demo
Installation
You must have the Paid Memberships Pro plugin installed and activated with a valid license type to use this Add On.
- Navigate to Memberships > Add Ons in the WordPress admin.
- Locate the Add On and click Install Now.
- To install this plugin manually, download the .zip file above, then upload the compressed directory via the Plugins > Add New > Upload Plugin screen in the WordPress admin.
- Activate the plugin through the Plugins screen in the WordPress admin.
How to Set Up the Manual Payments Gateway
To allow members to make an optional payment for membership, you must first set up your manual payment gateway.
- Navigate to Memberships > Settings > Payment Gateway in the WordPress admin.
- Select Pay by Check as the Payment Gateway.
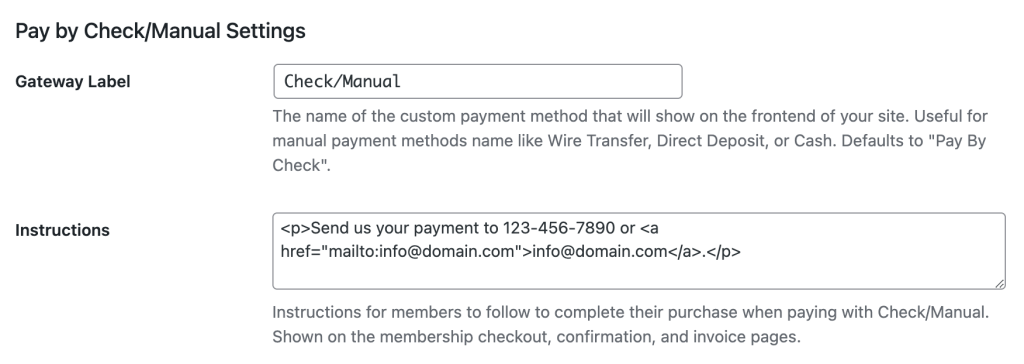
- Adjust the Gateway Label to match your goals, for example, “Check”, “Venmo”, “Cash”, or “Direct Deposit”.
- Then, add text to the Instructions field. This field should explain exactly how members should make the manual payment (e.g., your Venmo username, SWIFT bank code, or mailing address for check payment).
- Save the changes.
These steps configure your Manual Payment Gateway settings. You can keep the Manual Gateway as the default payment gateway, or switch to another primary gateway. Use these steps to have a primary gateway that accepts online payments, like Stripe, and allow members to choose to pay with the manual option.
- Navigate to Memberships > Settings > Payment Gateway in the WordPress admin.
- Select any other gateway, such as Stripe as the Payment Gateway.
- Save the changes.
Behind the scenes, the “Pay by Check/Manual” settings are stored in your database.
Set Up Membership Levels to Allow Manual Payments
With your payment gateway configured and the Add On active, you can now set which membership levels allow or do not allow manual payments. Repeat these steps for each level you offer.
- Navigate to Memberships > Levels and select a level to Edit.
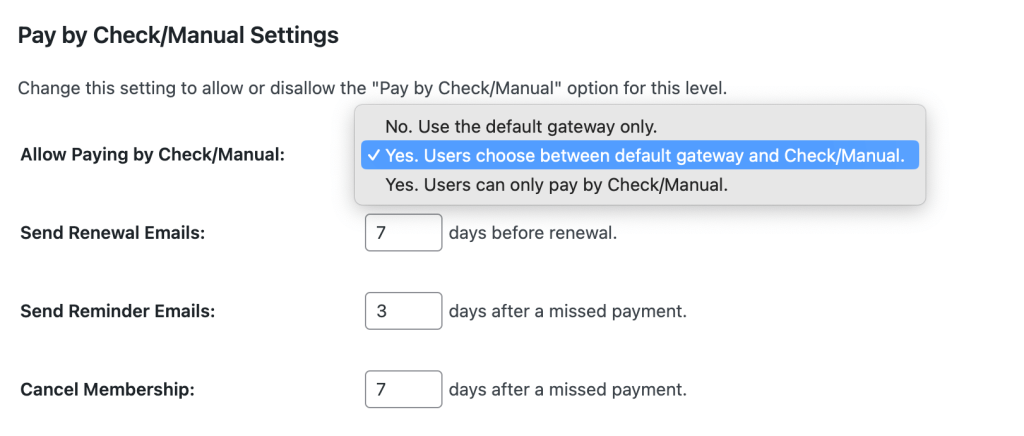
- Locate the Pay by Check/Manual Settings section. This section has several options:
- Allow Pay by Check/Manual: Choose whether this level allows people to pay manually only, as an option, or if manual payment is required.
- Send Renewal Emails: Set the number of days before renewal when reminder emails should be sent.
- Send Reminder Emails: Specify how many days after a missed payment a reminder email is sent.
- Cancel Membership: Determine the number of days after a missed payment when membership should be canceled.
- After changing the level’s settings, Save Changes.
Order Management and Access Controls
If you offer manual payments on a one-time or recurring payment level, the following admin details apply:
- When a user chooses to make manual payment at checkout, their initial checkout order will be marked as
pending. - Additionally, when the renewal payment is coming due, there will be a new order created with
pendingstatus. - When payment is confirmed, admins must view the order and select “Mark Order as Paid” to update the order to
success.
Once the order is marked as success, the member will gain full access to all protected content for their level.
A Note About Grace Periods
Existing customers who already have a successful order in the past may get access to the content right away. This is programmed to provide users with a grace period on their recurring payments.
To remove this grace period, you must modify the setting to cancel membership after a missed payment.
- Navigate to Memberships > Settings > Levels > Edit Level in the WordPress admin.
- Set the Cancel Membership value to “0” to give existing members no grace period on content access and cancel membership immediately after their current term ends.
- After changing the level’s settings, Save Changes.
In practice, it is best to give your existing customers a grace period. New users will not gain access to any content until their first order is marked success. Existing customers will appreciate retaining access for a few days until you receive payment.
How to Mark a Check Payment as Paid
When a member selects a manual payment option at checkout, their order is created with a “pending” status. This means the payment hasn’t been received yet, and the member doesn’t have access to your protected membership content.
Your job as the site administrator is to mark the order as “paid” (also called “success”) once you receive the payment. Only when the order status is changed to “success” will the member gain full access to their membership level and all protected content.
This guide covers three different methods you can use to mark a check payment as paid, depending on your preference and needs.
Method 1: Mark as Paid from the Orders List (Quick Action)
The quickest way to mark an order as paid is from the orders list table using the “Mark Paid” action. This is available in the row actions that appear when you hover over an order.
- Log in to your WordPress admin dashboard.
- Navigate to Memberships > Orders.
- Locate the order you want to mark as paid in the orders table.
- Hover over the row for that specific order to reveal the row actions.
- Click “Mark Paid” in the row actions.
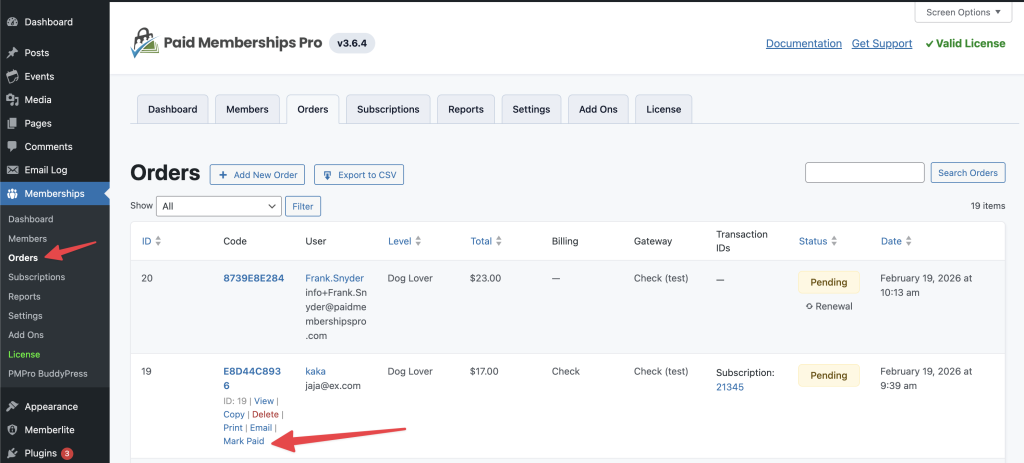
The order status will immediately change from pending to success. The member will now have access to your site’s protected content based on their membership level.
Method 2: Mark as Paid from the Order Edit Page (Button)
This method uses the dedicated button on the order edit screen. This button only appears when a manual payment gateway (like Pay by Check) was used for the order.
- Log in to your WordPress admin dashboard.
- Navigate to Memberships > Orders.
- Find and click on the order you want to mark as paid. This opens the Order summary page.
- On the order summary page, look for the “Mark Order as Paid” button.
- Click the Mark Order as Paid button.
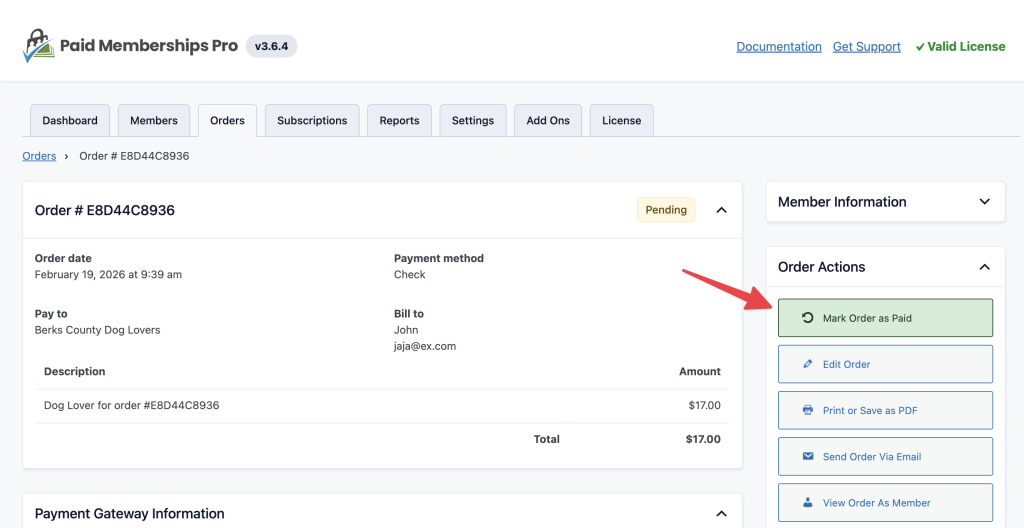
The order status will update to success and the member will receive access to their membership content.
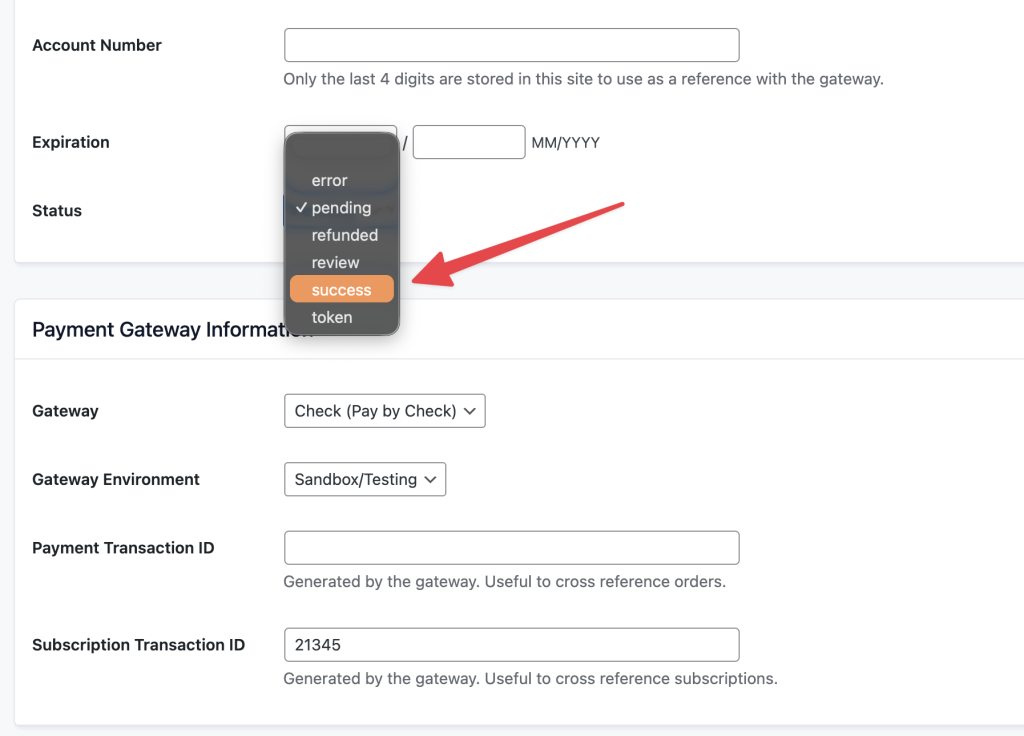
Method 3: Mark as Paid from the Order Edit Page (Edit Order Form)
This is the most comprehensive method. It allows you not only to change the order status to success but also to add important notes, such as the check number, payment date, or other relevant payment details.
- Log in to your WordPress admin dashboard.
- Navigate to Memberships > Orders.
- Find and click on the order you want to mark as paid.
- On the order edit page, look for the “Edit Order” button or link. Click it to open the Edit Order form.
- In the Edit Order form, locate the “Status” dropdown menu.
- Change the status from “pending” to “success”.
- (Optional) Scroll down to the “Notes” field. This is where you can record the check number, payment method details, or any other relevant information about the payment. For example, you might enter: “Check #1234 received on February 15, 2026”.
- Click Save Order at the bottom of the page to save your changes.
Email Notifications
This Add On offers three new email templates, allowing you to customize manual payment-related notifications:
- Pay by Check – Check Pending: Member notification of a new “invoice”.
- Pay by Check – Check Pending Admin: Admin notification that an invoice is pending.
- Pay by Check – Check Pending Reminder: Member notification as a reminder about a missed payment. The time frame is set in your level settings.
To customize these templates, go to Memberships > Settings > Email Templates and select one of the Pay by Check emails to modify.
Screenshots
Action and Filter Hooks
do_action( 'pmpropbc_activation' );
Execute additional code when you activate the Pay By Check Add On.
do_action( 'pmpropbc_deactivation' );
Execute additional code when you deactivate the Pay By Check Add On.
This is a Standard Add On.
Standard membership includes all Standard Add Ons, unlimited premium support, automatic updates, and additional benefits.

