Group Accounts requires you to have a minimum of two membership levels in your site: one that the owner of the group will hold (the parent account) and the level that members of the group get assigned (the child account).
Create the Child Account Level(s)
- Navigate to Memberships > Settings > Levels in the WordPress admin.
- Create a new membership level that members of the group (child accounts) will be assigned.
- The level pricing or expiration details here do not matter, but if you also plan to offer this level for individual checkout, you should set these up.
- If you do not set up level pricing or expiration details, the level will be available for free on your site. People without a group code will be able to sign up for this level at no cost.
- Do not set up any Group Account settings for this child account.
- You can consider to hide the child account level from your Membership Levels page using the Advanced Levels Shortcode Add On or a custom built pricing page.
- Save the level.
Note: You can use an existing membership level as your child level.
Create the Group Owner (Parent Account) Level
The next step to configure Group Accounts is to add a new membership level or edit an existing level to define group settings.
- Navigate to Memberships > Settings > Levels in the WordPress admin.
- Choose an existing level to edit or select Add New Level.
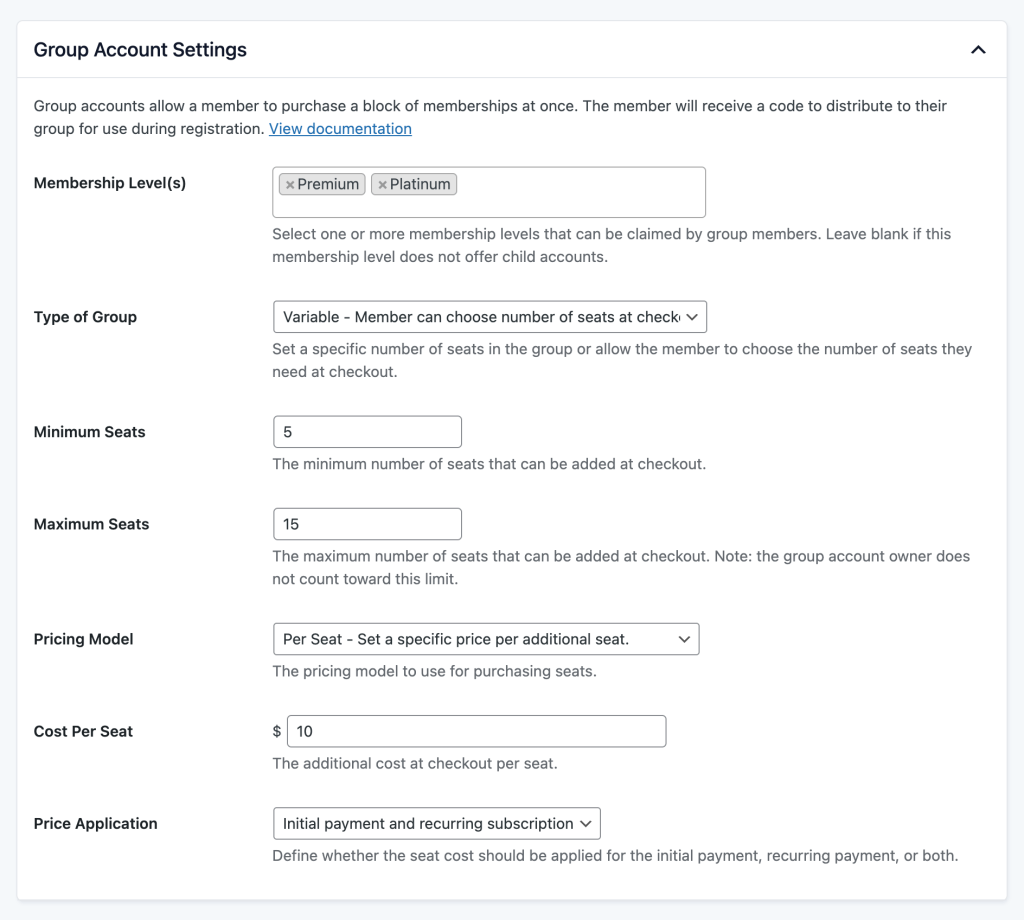
- Group Account Settings: In the edit level screen, find the Group Account Settings section.
- This section defines all the rules for your group membership, including:
- Membership Level(s): Select level(s) available for group members. This is the child account level that people who use your group code will be assigned at checkout (at no cost to them).
- Type of Group: Choose between a fixed number of seats or variable.
- Fixed Seats: The group includes a specific number of seats.
- Variable Seats: The user can select the number of seats they need at checkout.
- Based on the type of group you have chosen, the following fields may appear:
- Total Seats (Fixed): Specify the total number of seats in this group.
- Minimum/Maximum Seats (Variable): Set the range for purchasable seats.
- Pricing Model: Define how to handle child account pricing.
- None: Child account pricing is built into the price of the parent account’s membership level.
- Per Seat: Set an additional price to charge per seat at checkout.
- Cost Per Seat: If you have chosen per seat pricing, define the additional per-seat cost at checkout.
- Note: The total amount due will not automatically display at checkout. This is a known concern that we are working to improve.
- Price Application: Choose to apply the per seat cost to the initial checkout, recurring payments, or both.
- Note: If the parent’s level does not have recurring billing, and you choose to apply per seat pricing to the recurring payment, you must set up recurring billing for the parent level. If this is not defined, a default billing cycle of 1 per month will be used.
- Save the level to add or update settings.
Note: Discount Codes can be applied to the Parent Level, however, Discount Codes cannot be applied to the number of seats.
Get Support From Our Team of Experts
For more help with this PMPro feature, check out our Support Page with three ways to get support as a free or premium member.
Last updated on September 8, 2025
Was this article helpful?
YesNo

