
Kit is an email marketing platform that offers robust tools for automation and subscriber tagging. This integration subscribes and tags your Paid Memberships Pro members and users without a membership level (including cancelled members) in Kit. The plugin also adds purchase data to the subscriber for their membership purchases through the Paid Memberships Pro checkout process.
Installation
You must have the Paid Memberships Pro plugin installed and activated to use this Add On.
- Navigate to Memberships > Add Ons in the WordPress admin.
- Locate the Add On and click “Install Now“.
- Or, to install this plugin manually, download the .zip file above.
- Upload the compressed directory (.zip) via the Plugins > Add New > Upload Plugin screen in the WordPress admin.
- Activate the plugin through the Plugins screen in the WordPress admin.
General Settings
- Navigate to Settings > PMPro Kit in the WordPress admin.
- Enter your Kit API Key and API Secret Key. These keys can be found on the “Account Settings” page under Developer of the Kit app here. You must enter the API Secret Key in order to add purchase data for your subscribers.
- Optionally check the box to “Require Opt-In” and modify the “Require Opt-In Label“. This field will appear on your Membership Checkout page.
- Click “Save Settings“.
Video: How to Find Your Kit API Keys
How to Assign a Tag to a Membership Level
After saving your API Keys, you will have an option to assign unique tags to each membership level in your site. You can add new tags within your Kit app. See their documentation page on Creating and Managing Tags for more information.
- Navigate to Settings > PMPro Kit in the WordPress admin.
- For each membership level, select a tag from the dropdown list.
- Click “Save Settings“.
As new members join your site, the tag will be assigned to that subscriber in your Kit account. Note that when a member changes levels, the default Kit Integration will not remove tags for previously held levels. You can enable this using the pmpro_convertkit_after_all_membership_level_changes_remove_tags filter hook.
The Kit API for tags does not currently offer any batch processes, so removing tags alongside adding them requires two or more distinct API calls. This process can slow down a membership site where there are many level changes happening at once, specifically for sites using a Multiple Membership per User environment.
How to Import Existing Members and Tag them in Kit
Before you begin the import process, please review Kit’s documentation on Importing Subscribers with Tags and Custom Fields. The first step of the import process is to prepare a custom CSV of the member data from your PMPro membership site.
- Navigate to Memberships > Members. Export the full members list or filter your list to the correct data you’d like to import to Kit.
- In a spreadsheet editing program, remove all unnecessary columns. By default, Kit only includes two fields on your subscribers’ profiles: First Name and Email address. You must add additional fields within Kit for any custom data you would like to import. Leave the
membership_levelcolumn to help you populate the correct tags. - Add a new column to your spreadsheet labeled
Tagsand adjust the data for each subscriber to be imported. For example, if you want to tag people in your “Bronze” membership level with the Kit tag “pmpro-bronze”, add that single tag value to your Tags column. You can add multiple tags per subscriber, just separate them with a comma. - You can now remove the
membership_levelcolumn. - Export the data as a .csv then proceed to the Subscribers page in your Kit dashboard to complete the import.
How to Enable Debugging in the Kit Integration
Set the CK_DEBUG constant to logs errors in the Kit Integration Add On. You can refer to this comprehensive on How to enable debugging on your WordPress site for more help configuring the debug constant.
define( 'CK_DEBUG', true );
Once debugging has been enabled, run a test to subscribe a member to your list, either by proceeding through the checkout process, or hitting the ‘Save Profile’ button when editing a member’s profile through the WordPress Dashboard.
By default, the log file is a new file named log.txt that is automatically created and stored in the Kit Integration’s plugin folder. You can move the location of this file using the pmprock_logfile filter.
The majority of Kit errors are returned in plain English, ensuring that you can work on a fix around this quite easily.
Action and Filter Hooks
apply_filters( 'pmpro_convertkit_after_all_membership_level_changes_remove_tags', false, $unsubscribe_tags );
apply_filters( 'pmpro_convertkit_subscribe_fields', array $subscribe_fields, $user_email );
apply_filters( 'pmpro_convertkit_subscribe_tags', array $subscribe_tags, $user_email, $new_levels, $old_levels );
apply_filters( 'pmpro_convertkit_unsubscribe_tags', array $unsubscribe_tags, $user_email, $new_levels, $old_levels );
apply_filters( 'pmprock_logfile', $pmprock_log_file );
Screenshots
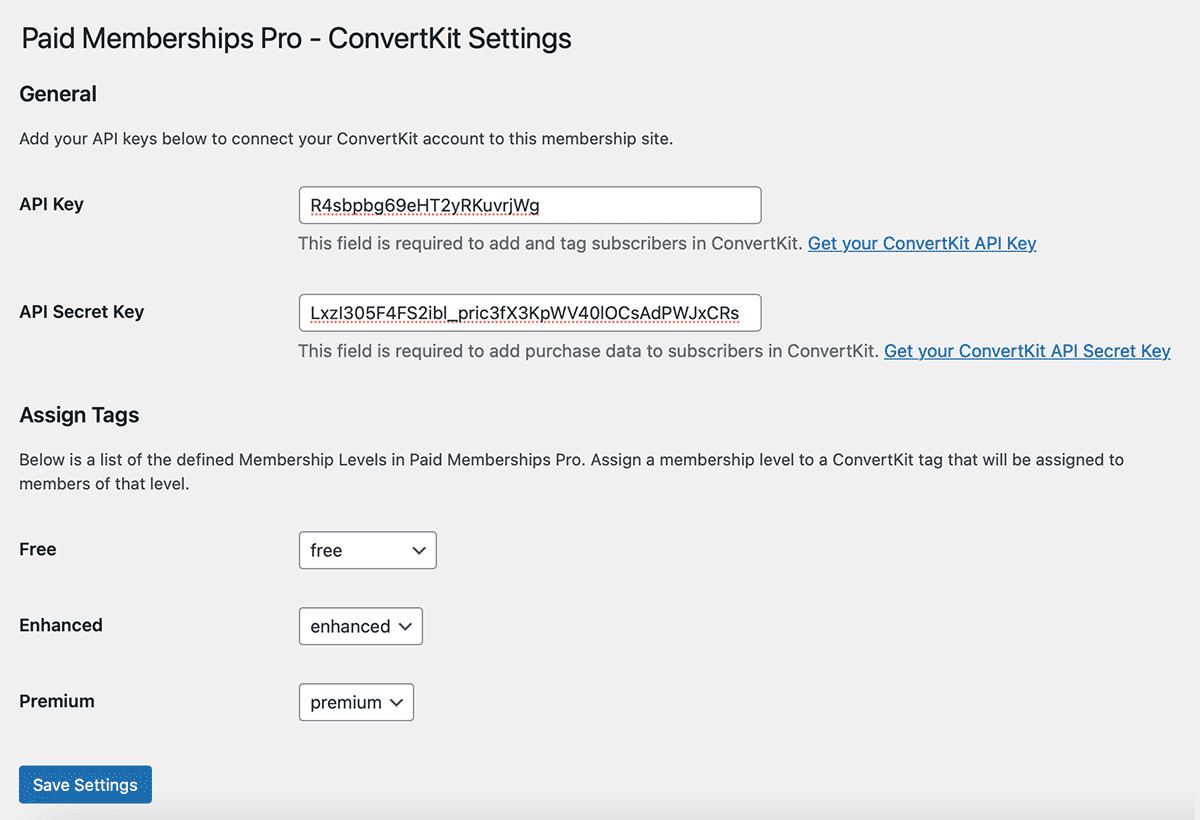
Navigate to Settings > PMPro Kit in the WordPress admin: enter your API and API Secret Keys; Map Tags to Membership Levels.
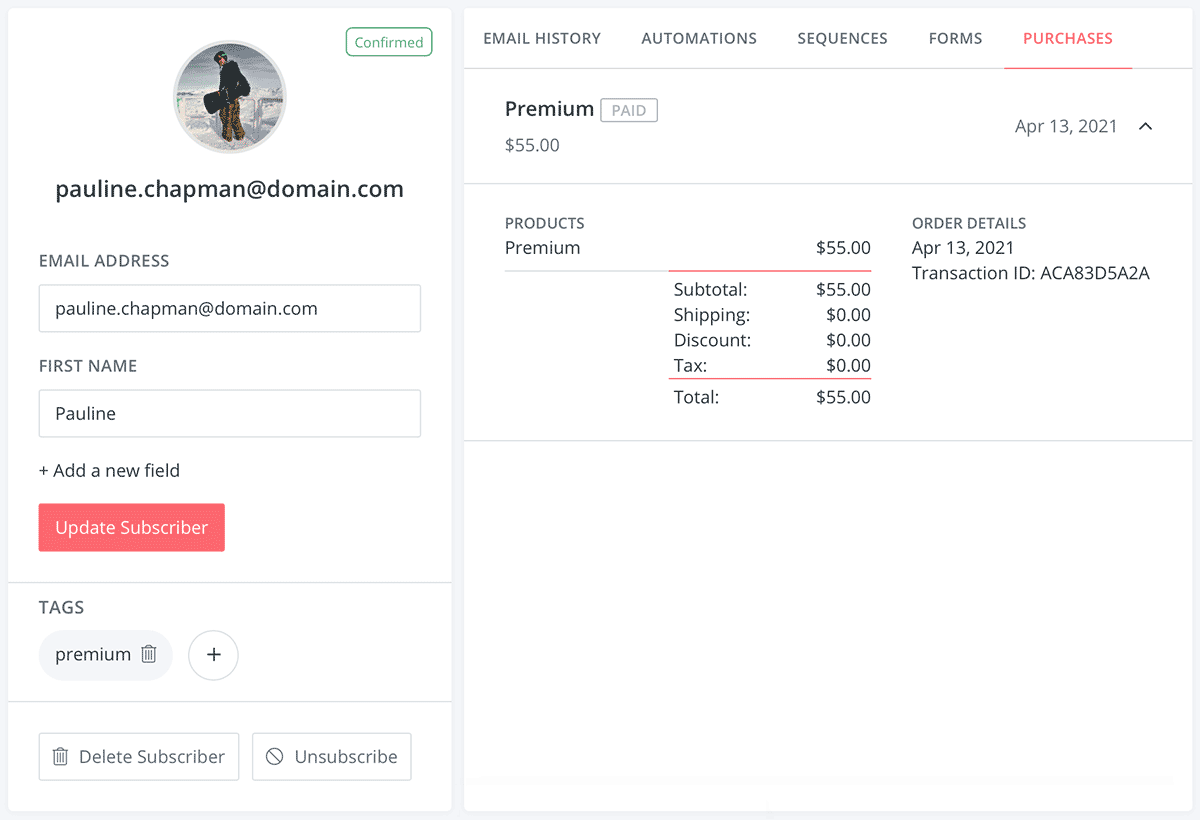
Example Kit Subscriber with purchase data for their initial membership checkout order.
This is a Free Add On.
Create a free account or log in to gain access to downloads and documentation.

