Stripe Checkout is a prebuilt payment page hosted by Stripe that simplifies the process of collecting payments from users.
In addition to accepting credit card payments, Stripe Checkout gives users the option to use other payment methods, such as bank debits, as well as Stripe Link.
Stripe Checkout integrates with Stripe Tax to calculate sales tax, VAT, and GST during the payment step. For business owners, this service simplifies the process of filing and remitting taxes.
About the Stripe Checkout Flow
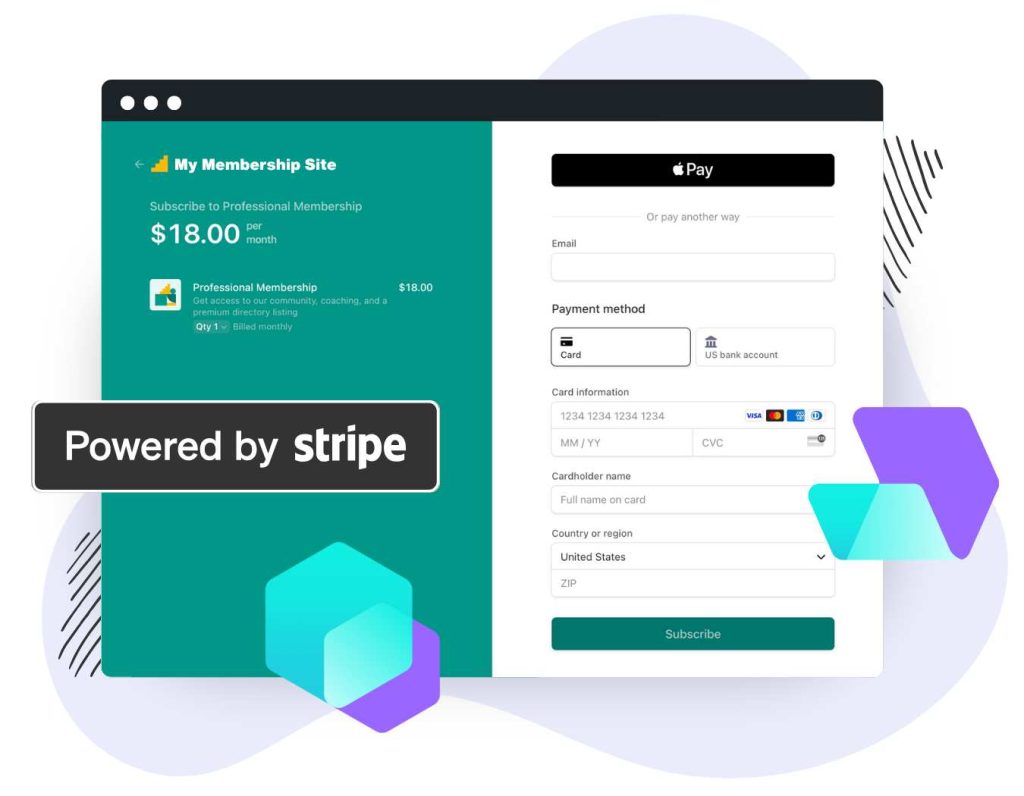
When users visit the Membership Checkout page on a site that is using Stripe Checkout, they will not see any credit card fields. Instead, users will see a button prompting them to complete checkout at Stripe.
When this button is clicked…
- PMPro will validate that all required checkout fields are complete and valid.
- If all of those checks pass, a new user account is created on the website, if the current user is not already logged in.
- In order to keep track of checkout data while the user is sent to Stripe Checkout, a new Order will also be created by PMPro in
tokenstatus. The order will include any relevant checkout information stored in order meta. - Finally, the user will be redirected to Stripe Checkout to complete their payment.
While this seems like many steps, it actually happens almost instantaneously.
- Once the user arrives at Stripe Checkout, they will be given the option to pay using any of the valid payment methods enabled in your Stripe account. If needed, users are also prompted to enter their billing address and are shown applicable tax on this Stripe-hosted checkout page.
- After the Stripe Checkout process is completed, users are redirected back to the Membership Confirmation page to await the completion of their purchase.
Processing a Stripe Checkout is instantaneous in most cases. Stripe does warn business that it can take up to several days for certain payment methods, such as bank debits, to be confirmed.
- For these delayed confirmation payment methods, the member will see a warning if they attempt to checkout for another membership level to help avoid situations where users unintentionally make multiple purchases.
- In cases where payments are not processed instantaneously, users will not be given a membership level until their payment is confirmed as successful. Users with a pending order status will not be able to access members-only content.
Stripe Checkout Settings
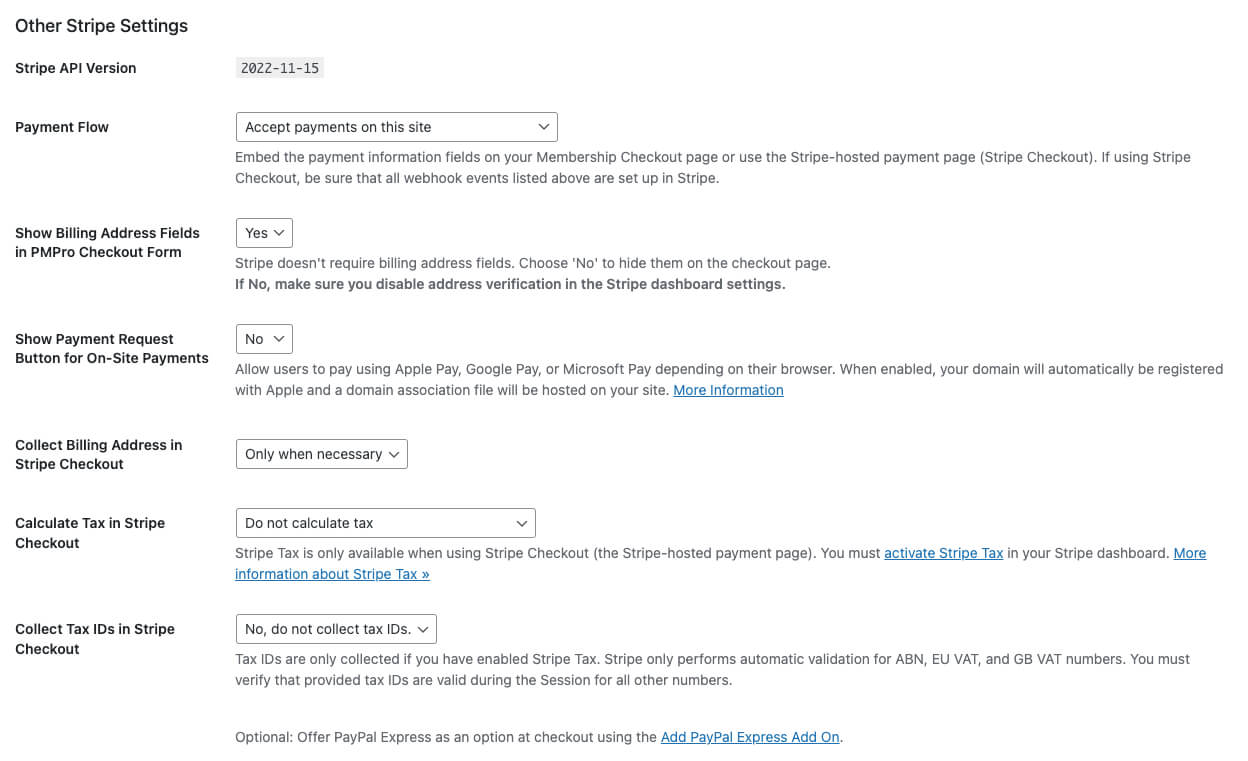
- Payment Flow: Select “Accept payments in Stripe (Stripe Checkout)” to use the prebuilt Stripe payment page and have users pay at Stripe.
- Collect Billing Address in Stripe Checkout: Select “Only when necessary” to only collect billing address when required by Stripe, or “Always” to have the user always enter their billing address.
- Calculate Tax in Stripe Checkout: Select “Do not calculate tax” to disable Stripe Tax. To use Stripe Tax, select “Membership price includes tax” to record tax-inclusive to the membership price or “Calculate tax on top of membership price” to have Stripe calculate tax exclusive of the membership price.
- Collect Tax IDs in Stripe Checkout: Select “Yes” to allow users to enter a VAT number or other relevant tax ID when using Stripe Tax or “No” to not collect this information.
Note: Some settings are omitted from these docs as they pertain only to sites using the Payment Flow: Accept payments on this site.
Developer Notes on Stripe Checkout
Stripe Checkout uses webhooks in order to notify websites about completed checkout sessions, successful payments, and failed payments. As a result, the event that triggers PMPro to finalize a checkout is not the user returning from Stripe, but rather receiving the checkout.session.completed webhook.
When this webhook is received, three things can happen:
- If the payment is successful, PMPro will run the steps necessary to complete the checkout on the website including changing the user’s membership level, changing the order status to
success, and running thepmpro_after_checkouthook so that any other custom checkout functionality can run. - If the payment fails, the order status will be changed to
error. - If the payment has not yet been processed, as is the case for delayed confirmation payment methods such as bank debits, the order status will be changed to “pending” and PMPro will wait for either a
checkout.session.async_payment_succeededorcheckout.session.async_payment_failedwebhook to be received.
Setting Up Stripe Checkout In Your Stripe Account
- Webhooks: In order to switch to using Stripe Checkout, the following webhook endpoints must be enabled:
charge.failedcharge.refundedcheckout.session.async_payment_failedcheckout.session.async_payment_succeededcheckout.session.completedcustomer.subscription.deletedinvoice.payment_action_requiredinvoice.payment_succeeded
- Branding: Customize the branding shown in Stripe Checkout, the Stripe Customer Portal, and on Stripe invoices.
- Payment Methods: Enable payment methods for use in Stripe Checkout. Provides information on the currencies supported by each payment method and the time needed for a payment to be confirmed.
- Stripe Checkout: Enable settings such as auto-completing addresses at checkout using Google Maps.
- Stripe Tax: Set the business information necessary to calculate tax, monitor tax thresholds, and tax registrations for regions where you would like to collect tax.
- Customer Portal: Define the actions that the user is able to take while in the Customer Portal. The “Pause subscriptions” and “Update subscriptions” options should be disabled to prevent users from manipulating their membership price.
Recheck Payment Function
You can verify if a payment made via Stripe Checkout has been successfully completed by navigating to Members > Orders and clicking on the “Recheck” button. This can also be helpful if your webhooks weren’t working at the time of checkout
Notes About Testing on a Local Setup
As the Stripe Checkout integration for PMPro relies on webhooks to trigger the completion of checkout, it is necessary to forward webhooks to any local machines being used to test this functionality. In order to do this, you will first need to install the Stripe CLI. From there, you can either forward events to your local machine using the command
stripe listen --forward-to [your webhook handler URL]or by using the Stripe Extension for Visual Studio Code.
Stripe Link: Autofill Payment Details
Stripe Link is a reusable payment method that auto-fills a customer’s payment and shipping details at checkout. If you have Link enabled in your Stripe account, customers are shown a checkbox to save their payment details linked to their phone number.
To verify that Link is enabled for your Stripe account navigate to Settings > Checkout and Payment Links in your Stripe Account Dashboard. Enable or disable your Link preference under the “Faster checkout” setting field.
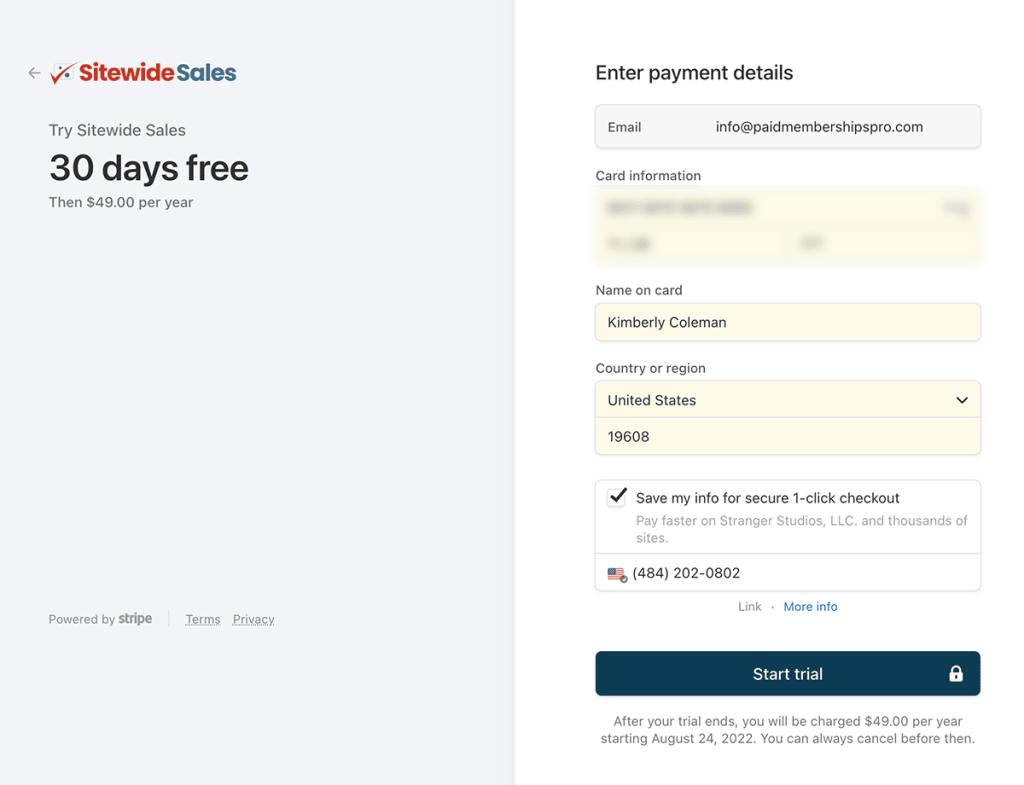
On future checkouts, your customers can complete payment with their saved information by authenticating with an SMS code. Payment and shipping information stored in Link is linked to their email address and phone number. Users can leverage their stored information on any site that accepts Link.
At this time, Link is only available to Stripe accounts in the United States that accept the local US dollar currency settlement.
Accept 48 Unique Payment Methods in Stripe Checkout
Stripe Checkout isn’t just for credit cards and wallets. Using this gateway opens up 48 additional international and custom payment methods, including bank debits, ACH, buy now pay later, credit cards, and more.
Our early users saw up to a 46% increase in sales after enabling local payment methods.
—via Stripe Checkout
The most popular additional payment methods offered with Stripe Checkout include:
- ACH Direct Debit
- Alipay
- Affirm
- Afterpay / Clearpay
- Apple Pay
- Bacs Direct Debit
- Bancontact
- Boleto
- EPS
- FPX
- Giropay
- Google Pay
- Grabpay
- iDEAL
- Klarna
- Link
- OXXO
- Pre-authorized debits
- Przelewy24
- SEPA Direct Debit
- WeChat Pay
View All Payment Methods Available via Stripe Checkout
- Bank Debits:
- ACH Debit
- BECS Direct Debit
- Bacs Direct Debit
- Pre-authorized debits in Canada
- SEPA Direct Debit
- Bank Redirect:
- BLIK
- Bancontact
- EPS
- FPX
- Przelewy24
- giropay
- iDEAL
- Bank Transfers:
- EUR bank transfers
- GBP bank transfers
- USD bank transfers
- Bank Transfers (Furikomi)
- Mexico bank transfers (SPEI)
- Buy now, pay later:
- Affirm
- Afterpay/Clearpay
- Klarna
- Zip
- Cards:
- American Express
- Cartes Bancaires
- China UnionPay
- Diners Club
- Discover
- Interac
- JCB
- JCBI
- Mastercard
- Meses Sin Intereses
- Visa
- eftpos Australia
- Cash-based voucher:
- Boleto
- Konbini
- OXXO
- Real-time payments:
- PayNow
- PromptPay
- Wallets:
- Alipay
- Apple Pay
- Cash App Pay
- Click to Pay
- Google Pay
- GrabPay
- Link
- PayPal
- WeChat Pay
Get Support From Our Team of Experts
Have a question about how to use this feature? Our Support Page outlines three ways to get support.
Our Max plans include hands-on help customizing your membership site and implementing new features. Upgrade to PMPro Max now »
Last updated on August 13, 2025

