Paid Memberships Pro supports two methods for authenticating your Stripe gateway: Stripe Connect (OAuth) and Restricted API Keys. Both are secure, Stripe-approved options — the right choice depends on your setup and preferences.
Use this guide to switch between connection methods in either direction: from Legacy API Keys to Stripe Connect, or from Stripe Connect to your own Restricted API Keys.
This is a Stripe Required Update
On September 30, 2024, Stripe updated security requirements to better protect merchants and their data.
Every site using Paid Memberships Pro and Stripe as their gateway must either use Stripe Connect or update their site to use Restricted API Keys.
Previously, sites could use legacy secret API keys. These keys provided full access to a Stripe account, similar to a username and password, and posed a major risk if exposed.
To mitigate this, Stripe is now requiring the use of Stripe Connect OAuth authentication or restricted API keys. This reduces risk by limiting the permissions granted, thereby minimizing the potential impact of compromised credentials.
Enhanced Security, Support, and Maintenance with Stripe Connect
Stripe Connect simplifies setup and improves the security of your payment gateway. When you connect Stripe through Paid Memberships Pro, we’ll be able to see the status of your account. Insight into account status will help us (and Stripe) resolve support requests faster.
With Stripe Connect, you no longer need to manually copy API keys into settings fields. Stripe’s OAuth connection handles authentication. With the OAuth connection, your membership site will always use the latest, most secure, and most fraud-resistant method to connect to Stripe and accept payments.
How to Switch from Legacy API Keys to Stripe Connect
- Navigate to Memberships > Settings > Payment Gateway in the WordPress admin.
- Sites using the Legacy API method will show a section titled “Stripe API Settings (Legacy)” on this screen. If you do not see this section, use the gateway setup steps here.

- To switch to Stripe Connect, click the “Connect to Stripe” button.
- The next screen will redirect you to Stripe and, optionally, prompt you to log in to your Stripe account.
- Log in, select the Stripe Account to connect, and click the “Connect” button.
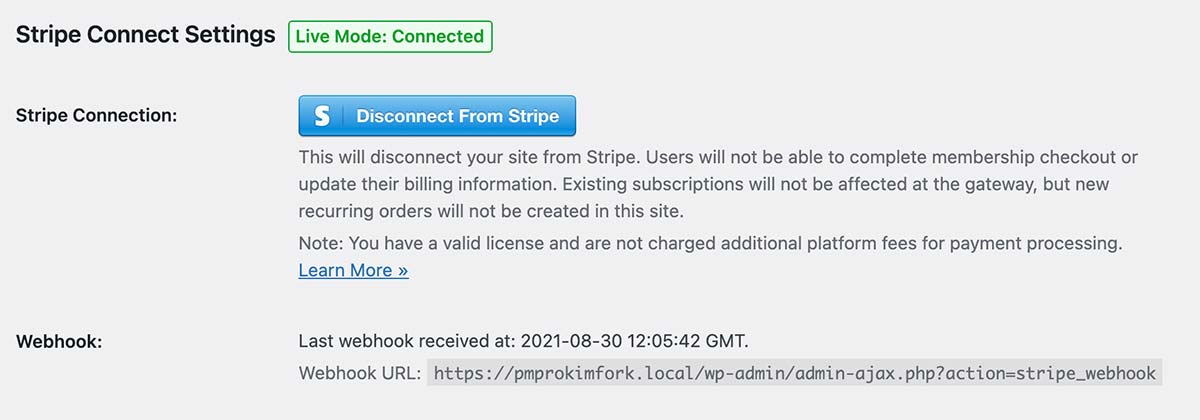
- Once redirected back to your WordPress admin, confirm that the Stripe gateway account is connected.
- The Legacy API keys will be securely and safely removed from your WordPress site.
- Save the settings.
If your webhook was already configured in the legacy version, no further action is needed. If you need to configure your Stripe webhook, follow the webhook setup steps here.
You can repeat these steps for the Stripe gateway in “Sandbox/Testing” mode. Note that you can connect to Stripe in Test mode using the same gateway account as your Live mode, or using a different Stripe account for each mode.
Stripe Connect Fees
There are no fixed monthly or annual fees when using the Stripe gateway.
Stripe charges 2.9% + $0.30 fee per transaction. Recurring payments, which use the Stripe Billing API incur an additional 0.7% fee per transaction. See https://stripe.com/us/pricing for details.
There is an additional 2% application fee per transaction for Stripe connected sites without an active license key.
You pay this fee directly to Stripe. Any questions about your payment gateway fees or to obtain reports for tax purposes should be directed to Stripe.
Stripe then pays Stranger Studios, the developers of Paid Memberships Pro, directly for aggregate fees collected. The fees are used to support the Connect server, Stripe gateway development, and the Paid Memberships Pro platform overall. Paid Memberships Pro application fees are not refundable.
This fee will not apply to members with an active license key for one of our paid membership plans, successfully validated in their site.
This fee will not apply to people who are using their own API keys to authenticate their site with Stripe.
Configuring Stripe Restricted Keys
If you cannot use Stripe Connect and must continue using API keys for your membership site setup, follow these steps to create a Stripe Restricted Key.
Restricted Keys are more secure than Secret Keys because they limit who can access the data (even if they have the API key).
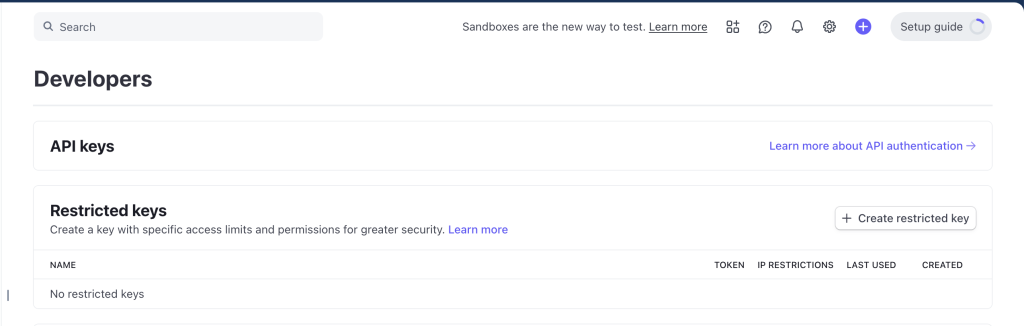
- Log in to your Stripe Dashboard and navigate to Developers > API keys.
- Locate the “Restricted keys” section and click the Create restricted key button.
- Select the option “Providing this key to a third-party application”. This creates a restricted key suitable for use with external applications like Paid Memberships Pro.
- Enter “Paid Memberships Pro” in the “Name” field and “https://www.paidmembershipspro.com” in the “URL” field.
- Ensure the “Customize permissions for this key” checkbox remains unchecked.
- Click the Create restricted key button.
- Stripe allows you to limit which IP addresses can use your Restricted Key to send API requests. If your site is hosted on a server with a stable, static IP address (such as a VPS), we recommend you enable this feature.
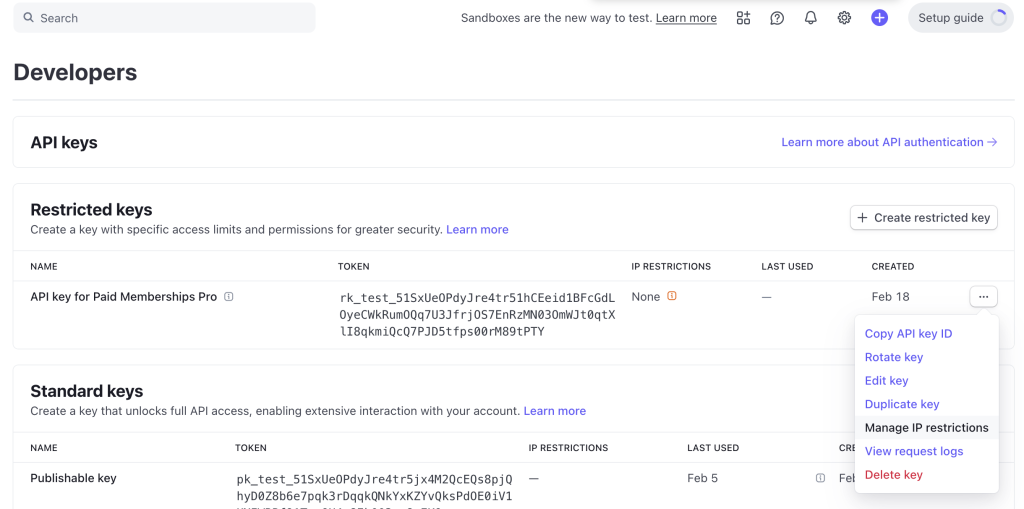
- In the Stripe Dashboard, locate the Restricted Key you just created.
- Click the “Manage IP restrictions” option for that key.
- Enter your server’s outbound IP address or IP range.
- Click Save changes.
Important: If your host uses dynamic IP addresses or a load-balanced infrastructure without fixed IPs, do not enable this setting. Doing so will cause Stripe payments to fail.
- After configuring the permissions, copy this key and save it in a safe place.
- Navigate to Memberships > Settings > Payments in your WordPress admin.
- Locate the “Payment Gateway Settings” section and select “Stripe”.
- Click the Edit Settings button.
- Here, you need to configure the Restricted Key you created earlier and click the Save settings button.
- After configuring the Restricted Key in Paid Memberships Pro, test a complete transaction cycle (checkout, subscription, cancellation, refund) to confirm it works correctly. Once you’re satisfied, delete any older keys from the Stripe Dashboard.
Key Security Best Practices
Protecting your API keys helps keep your business and customer data secure. Use these best practices to maintain a secure integration:
- Store your API keys securely and never share them publicly, including on support forums or code repositories.
- If you accidentally expose a key or notice unusual activity in your Stripe account, rotate the key immediately. To do this, create a new key in the Stripe Dashboard, update the settings in Paid Memberships Pro, and then delete the old key.
- Stripe may notify you if it detects a compromised key. It is your responsibility to act quickly and update your settings to keep your integration secure.
Get Support From Our Team of Experts
Have a question about how to use this feature? Our Support Page outlines three ways to get support.
Our Max plans include hands-on help customizing your membership site and implementing new features. Upgrade to PMPro Max now »
Last updated on July 7, 2026

