You log into your Stripe dashboard one morning and see hundreds (sometimes thousands) of $1 charge attempts, almost all declined. Stripe Radar is catching most of them, which is the good news. The bad news is that Stripe charges roughly $0.02 per Radar review for blocked card-testing attempts, and that quietly adds up. A 10,000-attempt overnight run is $200 nobody planned to spend. Your members are not seeing checkout problems and your bank is happy, but your Stripe bill is not.
This is a card testing attack. In this post, we will cover what is actually happening, how to figure out where it is coming from on your site, how to shut it down, and how to harden the site so it does not happen again.

Table of contents
- What is a Stripe Card Testing Attack?
- Where the Attack is Coming From
- Find Everything That Connects to Stripe
- Diagnose: Site vs. Direct-to-Stripe
- What Paid Memberships Pro Does for Onsite Checkouts
- How Stripe Connect Helps
- How Restricted Keys Help
- Find and Inspect Your Keys in Stripe
- Expire or Rotate a Key
- Disconnect and Reconnect Stripe Connect
- Scan for Malware
- Layered Defenses Recap
- Frequently Asked Questions
- Final Recommendations
- Related Resources
What is a Stripe Card Testing Attack?
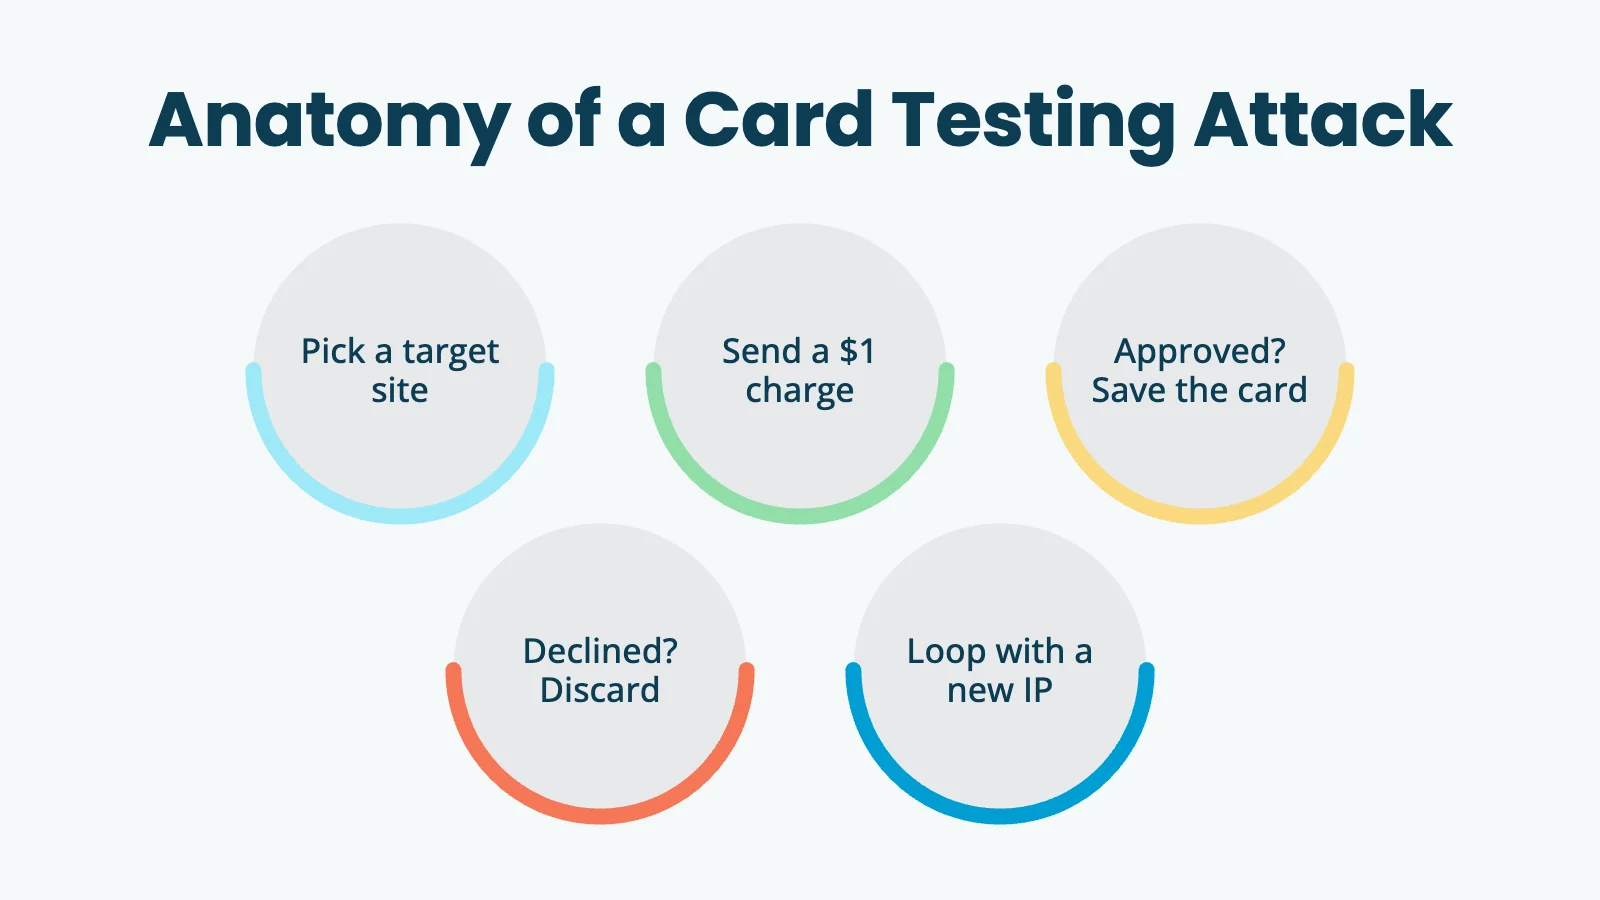
Carders are people who buy or steal lists of credit card numbers. Before they can sell or use those numbers, they need to know which ones still work. Hitting a real merchant’s payment endpoint with each card and watching whether the charge goes through is the cheapest way to validate them at scale. They are not trying to actually buy anything from you. The card testing process looks like this:
- Pick a target site that accepts Stripe.
- Send a small payment attempt (commonly $1, sometimes $0.50 or whatever your lowest level costs).
- If it goes through, the card works. Add it to the “live” pile.
- If it declines, throw the card out.
- Loop, with a different IP, browser fingerprint, or rotated card every few attempts.
Stripe’s own data shows the trend has shifted from random enumeration (guessing card numbers) toward verification attacks against dumps of already-stolen card numbers, which is why authorization rates on these attempts have actually gone up over the past couple of years. (Source: Stripe Radar response to card testing.)
Where the Attack is Coming From
There are three plausible entry points on a WordPress site. You can diagnose by elimination.

Your WordPress checkout
If the attempts are going through your normal checkout flow, you will see them in your plugin’s own order or entry log:
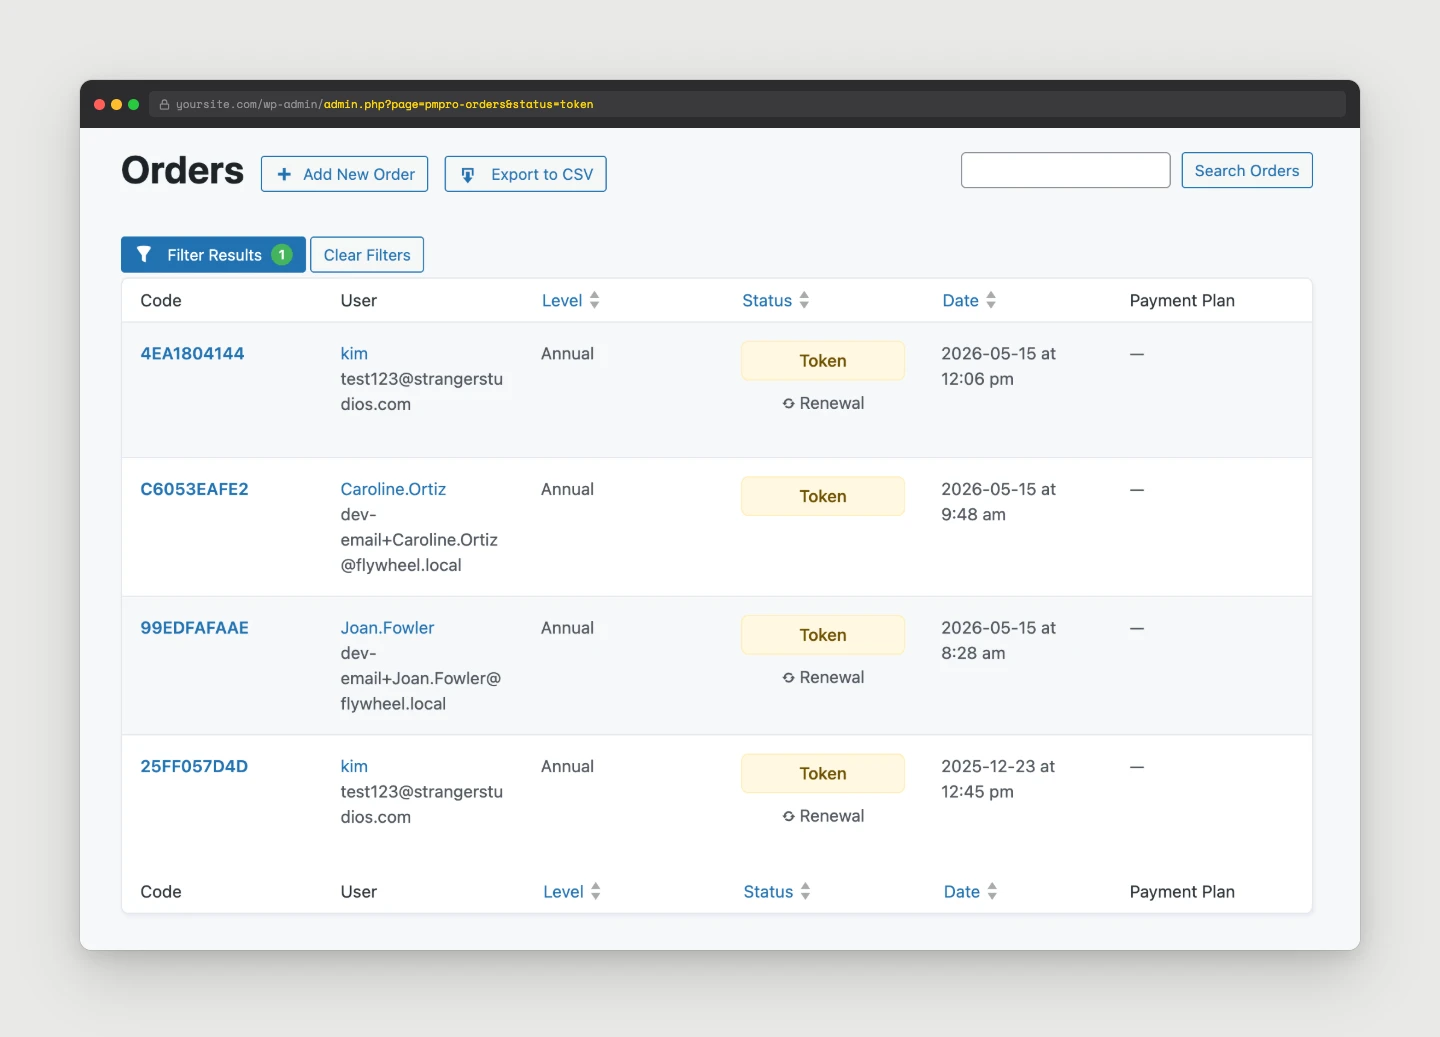
- Paid Memberships Pro: Go to Memberships > Orders and filter by status
error,review, ortoken. Look for a sudden spike of $1 attempts with random first and last names and rotating email addresses. - WooCommerce: Go to Orders > All and filter by “Failed” and a date range.
- Gravity Forms + Stripe Add-On: Go to Forms > Entries, filter by form, and sort by Stripe transaction status.
- Easy Digital Downloads: Go to Downloads > Payments > Failed.
If you see the spike in your plugin’s records, the attacker is going through your form. The fix is on your site.
Direct to Stripe via your publishable key
If the attempts appear in Stripe but not in any plugin’s order log, the attacker is calling Stripe’s API directly using your publishable key (pk_live_...). They never touched your site to make the charge. They only had to visit it once to scrape the key from your page HTML.
Stripe says publishable keys are “safe to expose outside your backend.” That is true in the strict sense. A pk_live_ key cannot fetch customer data or refund anything. But Stripe also acknowledges that card testers can use a publishable key to retry a large number of payments. (Source: Stripe docs on preventing card testing.) This is the most common quiet-but-expensive attack on small WordPress merchants.
Compromised plugin, theme, or admin
If you find unauthorized requests in your Stripe API logs from a server IP you do not recognize, or charges with unusual metadata, the attacker may have your secret key (sk_live_...). That is a much bigger problem. You will see it in Stripe’s API request logs. Search for requests not coming from your own server.
Diagnose: Site vs. Direct-to-Stripe
Here is a simple test you can run during or right after an attack window:
- Count attempted payments in your plugin’s order log during the attack window.
- Count attempted payments in your Stripe Dashboard under Payments, with the “Incomplete” and declined filters on, during the same window.
If the Stripe number is much higher than the plugin number, your publishable key is being used directly. If the two numbers match, the attacker is going through your site.
You can also tail the Apache or nginx access log on the site for POST requests to your checkout endpoints during the attack window. If there is no traffic spike there but Stripe shows attempts, the attacker is hitting Stripe’s API directly, not your form.
What Paid Memberships Pro Does for Onsite Checkouts
If you are using onsite Stripe Checkout, the integration where the card form renders on your own site instead of checkout.stripe.com, Paid Memberships Pro is in the loop on every payment attempt. That means it can fight back. PMPro ships a Spam Protection layer in core (added in version 2.7). It is enabled by default for new installs. Confirm it is on at Memberships > Settings > Security.
How it works: PMPro keeps a 15-minute rolling counter, per IP address, of “spammy” activity. The events that count are:
- A failed payment at checkout
- A failed billing-info update
- An invalid discount code submission
- A failed WordPress login
When the same IP racks up 10 of these events inside 15 minutes, PMPro flips that IP to “spammer” and blocks checkout, billing updates, discount code checks, and even login attempts until the window rolls off. The relevant code lives in includes/spam.php.
That 10-in-15-minutes default is sane for normal sites, but loose for a site actively under attack. You can tighten both numbers in wp-config.php:
// Block after 3 spam events instead of 10.
define( 'PMPRO_SPAM_ACTION_NUM_LIMIT', 3 );

// Use a 1-hour window instead of 15 minutes.
define( 'PMPRO_SPAM_ACTION_TIME_LIMIT', 3600 );
Two honest caveats:
- Tracking is per-IP. Spam Protection catches the noisy attackers, a single IP hammering your checkout, and stops them fast. Card-testing services that rotate through residential proxies can stay under the threshold per IP. Spam Protection is the floor, not the ceiling. Pair it with Cloudflare Turnstile or reCAPTCHA on the checkout form and a bot filter or rate-limit at the edge.
- Offsite Stripe Checkout skips this layer. With Stripe-hosted Checkout (Connect plus Checkout Session), the failed-card attempts happen on
checkout.stripe.comand never reach your WordPress install, so there is nothing for thepmpro_checkout_processing_failedhook to fire on. That is the trade-off: you do not get PMPro’s IP blocker, but you also do not get the API requests, the Radar review fees, or the publishable key being scraped from your HTML.
If you want Akismet’s comment-spam scoring applied to checkout form data on top of Spam Protection, install the Akismet Integration for Paid Memberships Pro Add On. It is free and works alongside the Akismet WordPress plugin.
How Stripe Connect Helps
Stripe Connect is the OAuth-based way to link a Stripe account to a third-party platform. Paid Memberships Pro, GiveWP, and many other WordPress plugins use Connect by default. Here is how Connect changes the attack surface compared to manual API keys:
- Your secret key never lives in WordPress. With Connect, the plugin does not ask for
sk_live_…. The platform (in our case, PMPro) is authorized via OAuth to act on your account, and the platform’s secret key, held by the plugin author and not by you, is what actually makes API calls on your behalf. If your WordPress database is dumped, the attacker does not getsk_live_…because it was never there. - The plugin can use Stripe-hosted Checkout. With Connect, the plugin can create a “Checkout Session” server-side and redirect the buyer to
checkout.stripe.com. The publishable key never has to appear in your page HTML at all. Stripe’s hosted page handles it. If the customer never sees a publishable key on your site, no carder can scrape it. - You can disconnect and reconnect. If something gets weird, you can revoke Connect in your Stripe dashboard under Settings > Connected Accounts, then reconnect from your plugin. New scoped tokens, fresh OAuth flow, and the attacker’s stale keys are dead.
Connect does not make your publishable key “secret.” It is still public by design. But it lets the plugin use Checkout-flow integrations that do not expose the key in your page HTML in the first place.
How Restricted Keys Help
If you are not using Connect, for example if you are integrating Stripe from custom code, a Zapier workflow, or a third-party service that asks for a key, use a restricted key (rk_live_…) instead of your secret key.
- A restricted key has a permissions matrix you set at creation time. You can grant only
readon Payments and nothing else. - If the restricted key leaks, the attacker gets exactly the access you granted, and nothing more.
- Restricted keys can be rotated individually without touching anything else.
- Stripe’s current recommendation is to use restricted keys wherever possible and save secret keys for the few server-side operations that truly need full account access. (Source: Stripe documentation on restricted API keys.)
If you have an old Zapier connection that is still using a full secret key, replace it with a restricted key scoped to just the resources Zapier needs. Same with Make, n8n, and any other automation.
Find and Inspect Your Keys in Stripe
Inside your Stripe dashboard:
- Developers > API keys. You will see every standard key (publishable, secret) and every restricted key. Each row shows the last-used time and last-used IP. If a key shows recent use from an IP you do not recognize, treat it as compromised.
- Developers > Logs. Filter by API method, key used, IP, and date range. A sudden burst of
POST /v1/payment_intentscalls from an IP outside your server is the smoking gun for a leaked publishable key. - Payments > All payments, with the Incomplete and Failed filters on. Group by card brand and country. Card-testing runs usually have a very different country distribution from your normal traffic.
- Any individual charge > Logs. From the Payments list, open one of the suspect charges, scroll down to the Logs section on that charge’s detail page, and click the
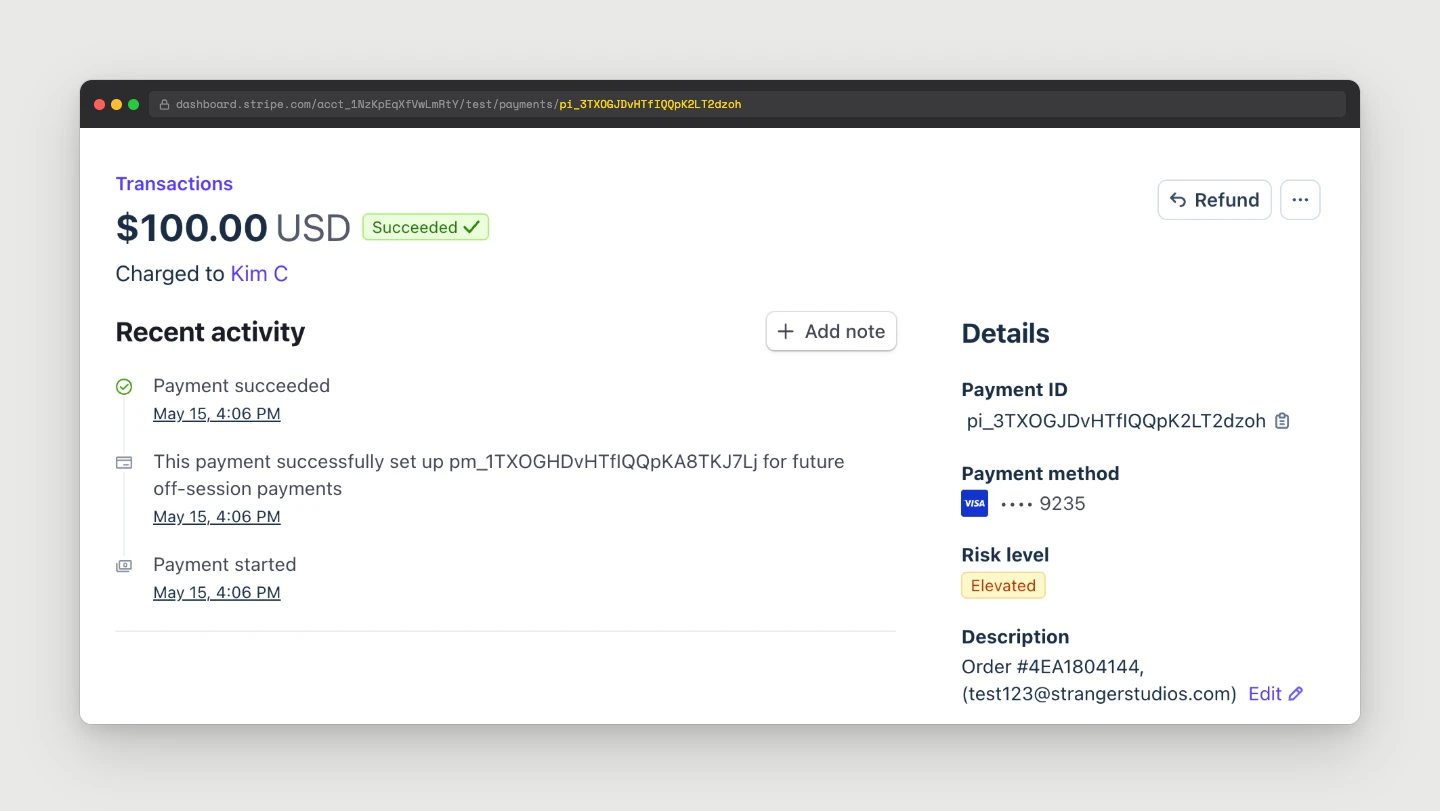
payment_intentlog entry. The expanded view shows the Application and API Key that created the charge. This is the fastest way to identify which key (or which connected app — for example, “Paid Memberships Pro,” “Gravity Forms,” a Zapier integration) is being abused, so you can rotate the right one instead of rolling everything. - Radar > Reviews and Radar > Early Fraud Warnings. Stripe is doing the work. The question is whether you are paying for it because the attacker is volume-attacking your endpoint, not because your business is growing.
Expire or Rotate a Key
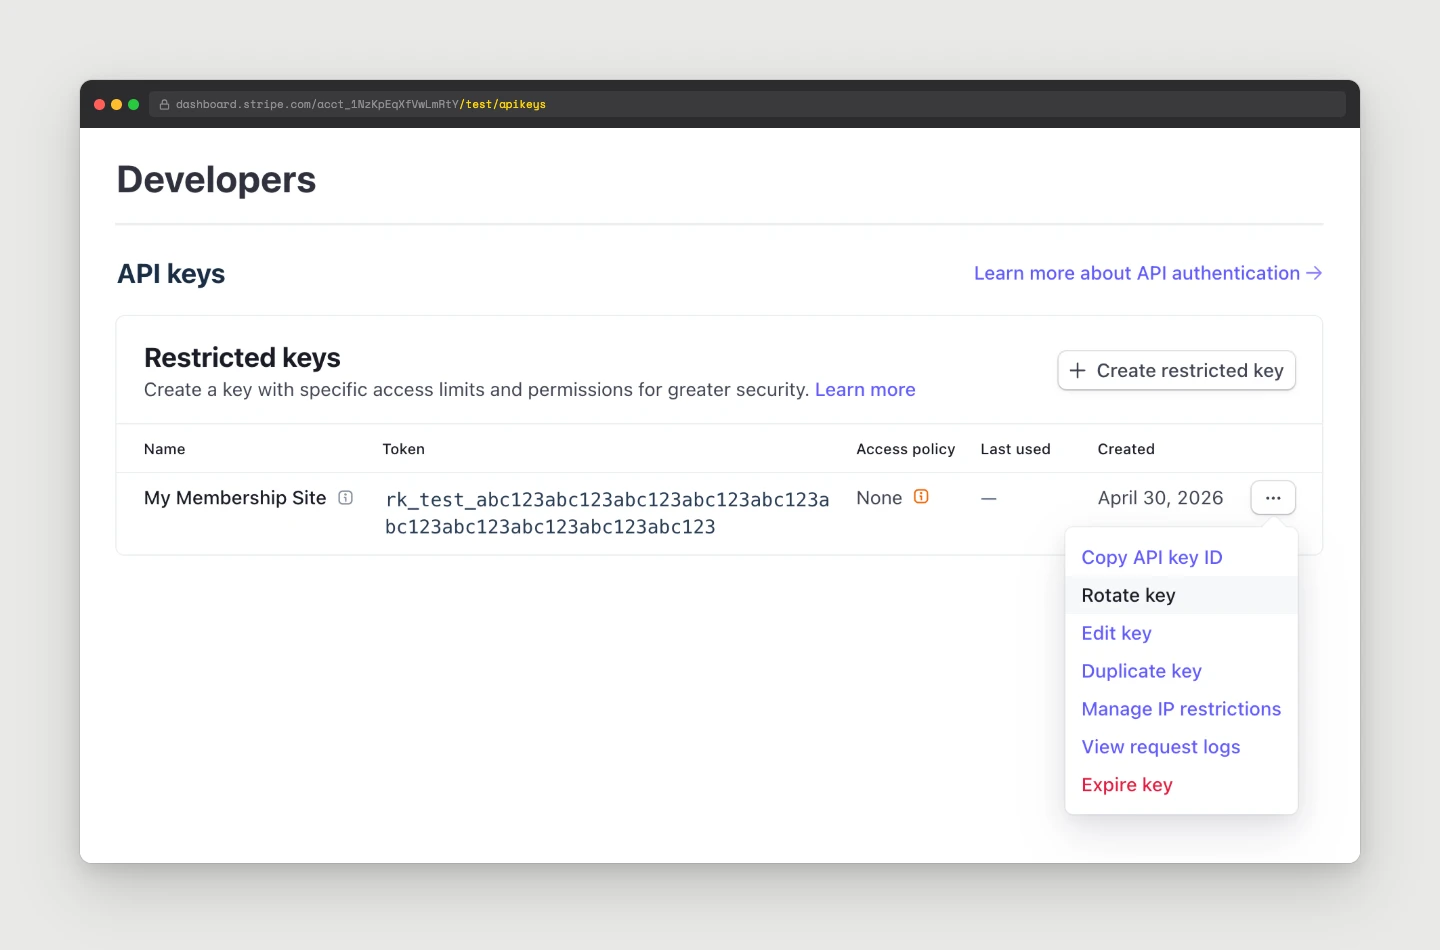
Stripe does not have a “delete” button for standard keys. The flow is:
- Go to Developers > API keys, open the overflow menu on the key you want to retire, and click Rotate key.
- Stripe creates a new key and asks how long the old key should remain valid: Immediately, in 1 hour, 24 hours, etc.
- Choose Expire now if you have already updated every integration using that key. Otherwise, choose a grace window (24 hours is common), update all integrations during that window, then rotate again with Expire now to kill the old key for sure.
- Save the new key value somewhere safe before closing the dialog. Stripe only shows it once.
- Update every place the old key was used. This is where the inventory you made earlier earns its keep.
For restricted keys, the same flow applies, but Stripe will also let you straight-up delete them. If a restricted key is not used anywhere anymore, delete it.
Disconnect and Reconnect Stripe Connect
If you are using Connect (PMPro, GiveWP, etc.) and you suspect the connection is compromised, you can disconnect:
- Go to your Stripe Dashboard > Settings > Connected accounts (or Authorized applications).
- Find the platform (for example, “Paid Memberships Pro”).
- Revoke access.
- In WordPress, go back to the plugin’s settings page and click Connect Stripe again. You will be sent through Stripe OAuth and a fresh set of credentials will be issued.
- Check Stripe Dashboard > Developers > Webhooks. Confirm every webhook endpoint you expect is still there and pointing at your site.
- In each plugin that uses Stripe webhooks, re-verify the signing secret. Gravity Forms Stripe stores it per-feed. PMPro stores it under the gateway settings. WooCommerce Stripe stores it under the connection settings.
- Make a test transaction (Stripe’s test mode is fine) and confirm the webhook fired and the plugin processed it.
If you skip this step, a real customer’s successful payment might not register in WordPress until you fix the webhook, even though Stripe charged the card. That is the same failure mode as duplicate-checkout bugs. Easy to miss, expensive to ignore.
Scan for Malware
If the attacker had your secret key, the question becomes how they got it. Common answers:
- A theme or plugin file was modified to exfiltrate options to a remote URL.
- An admin account was compromised, and someone copied the key from the Stripe gateway settings page.
- An external service you gave the key to (a backup tool, a Zapier connection) was breached.
- Your wp-config.php or
.envwas readable by an attacker who got code execution on the box.
Run a full malware scan on the WordPress install. Tools that work:
- Wordfence (free or paid): file scan and real-time signature matching.
- Sucuri SiteCheck (external scan), plus the Sucuri scanner plugin for an internal scan.
- For Paid Memberships Pro Hosting customers, ask the team to run our internal scan against the droplet. There is an SOP for it.
- On the server:
find /var/www -name "*.php" -newer /etc/passwdto spot recently-modified PHP files outside your normal release flow. Look at the admin user list for any account you do not recognize.
If the scan finds anything, treat the entire Stripe key surface as compromised, and roll every key, not just the one you noticed in the logs.
Layered Defenses Recap
In rough order of bang-per-buck:
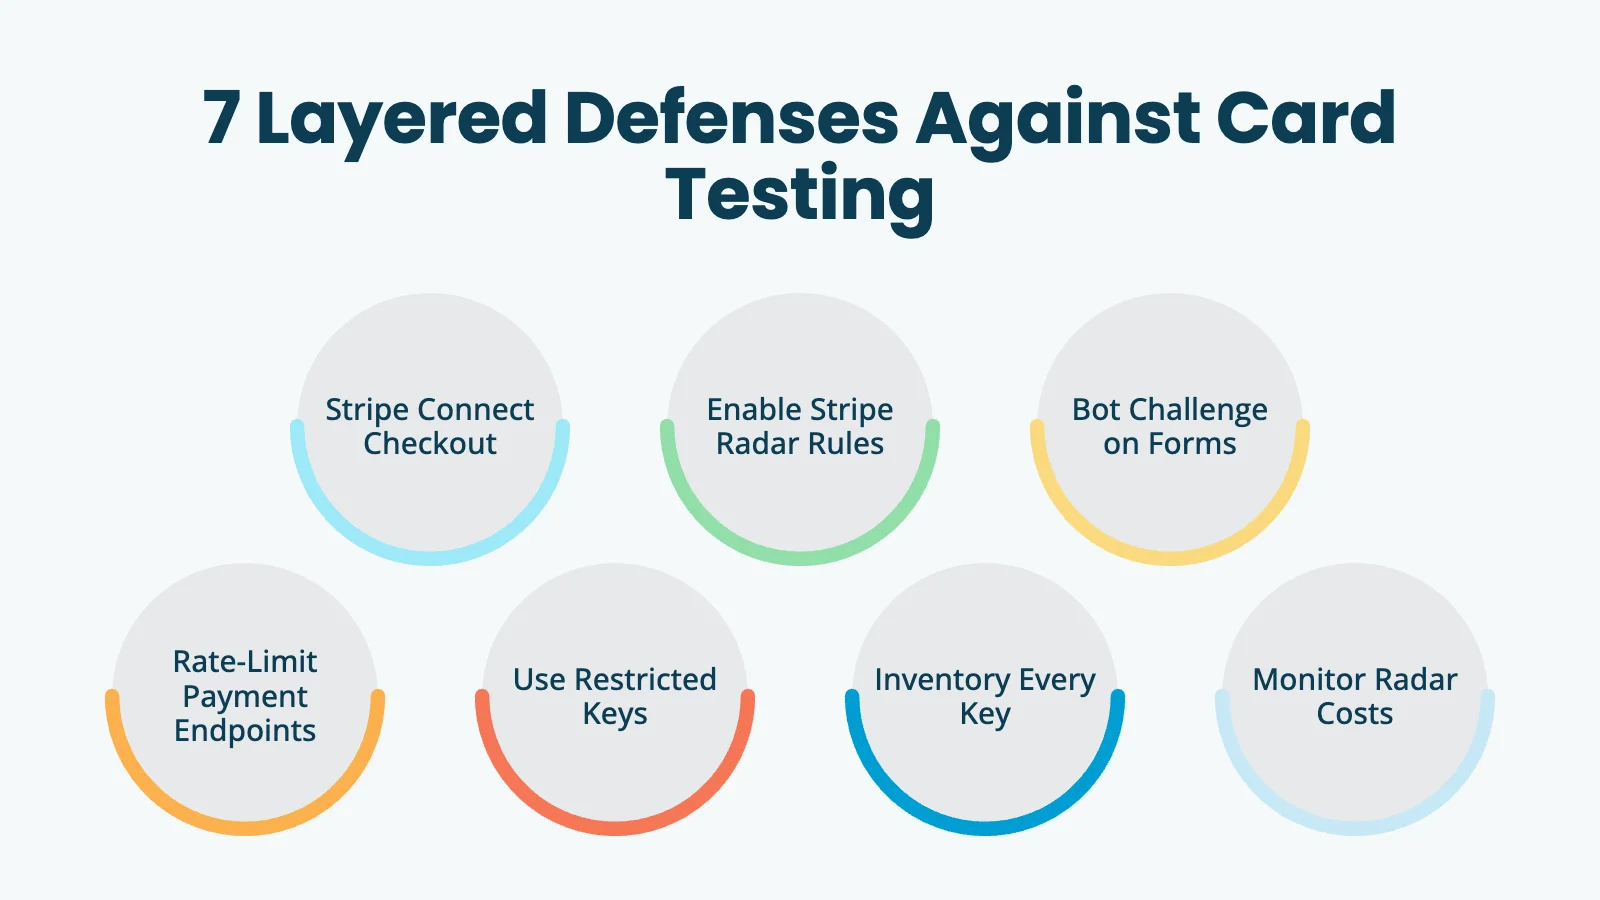
- Use a Connect-based plugin with Stripe Checkout. An off-site flow means the publishable key is not in your page HTML and your secret key is not in your database.
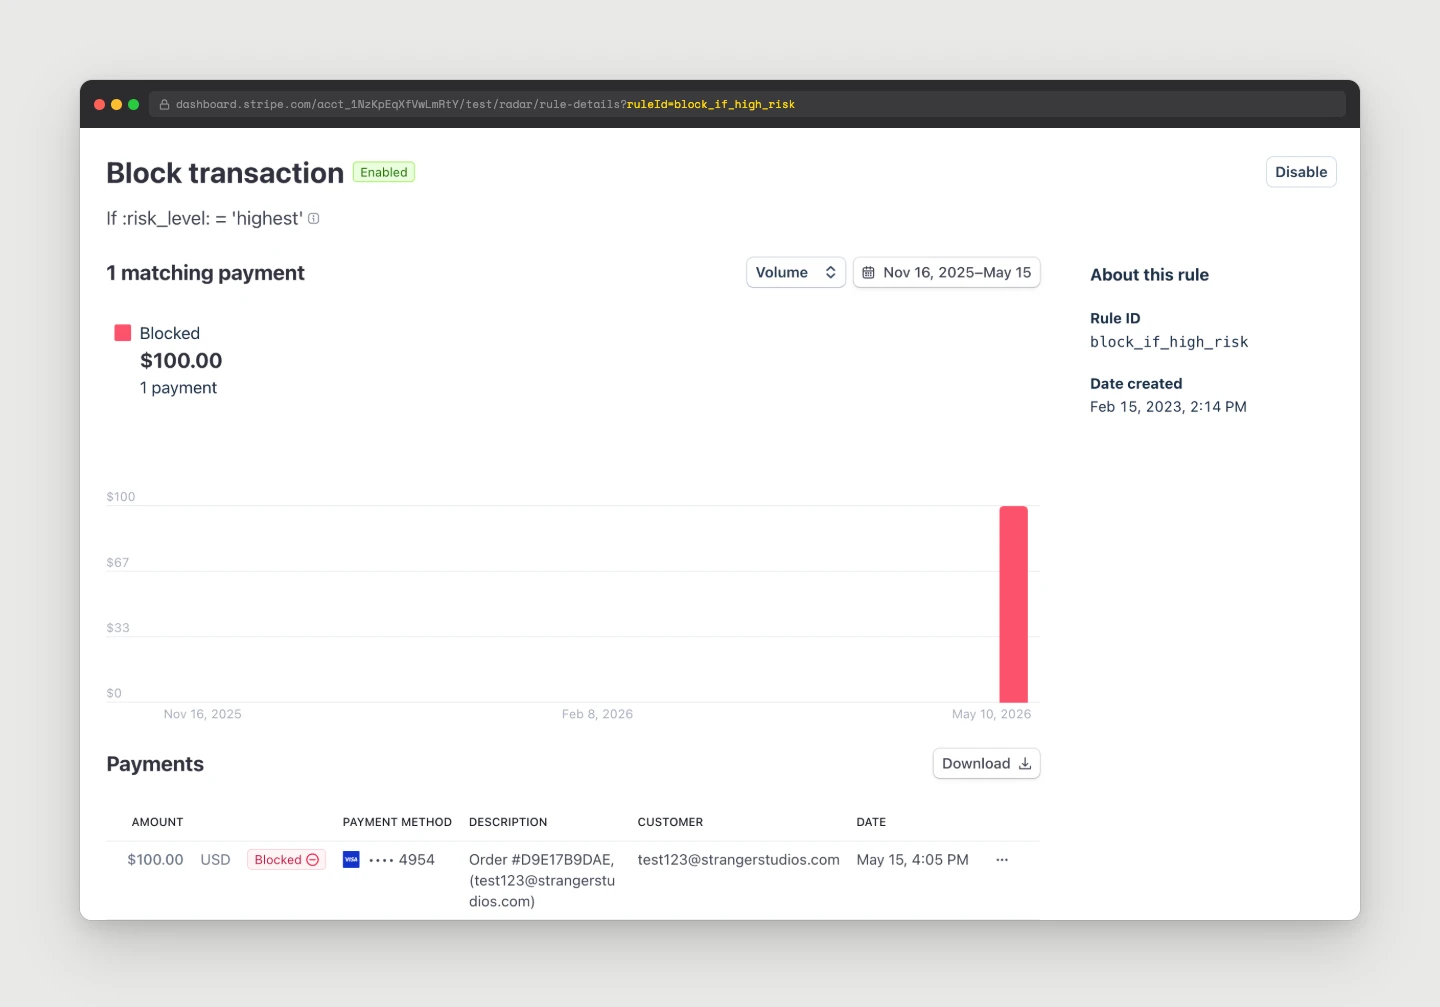
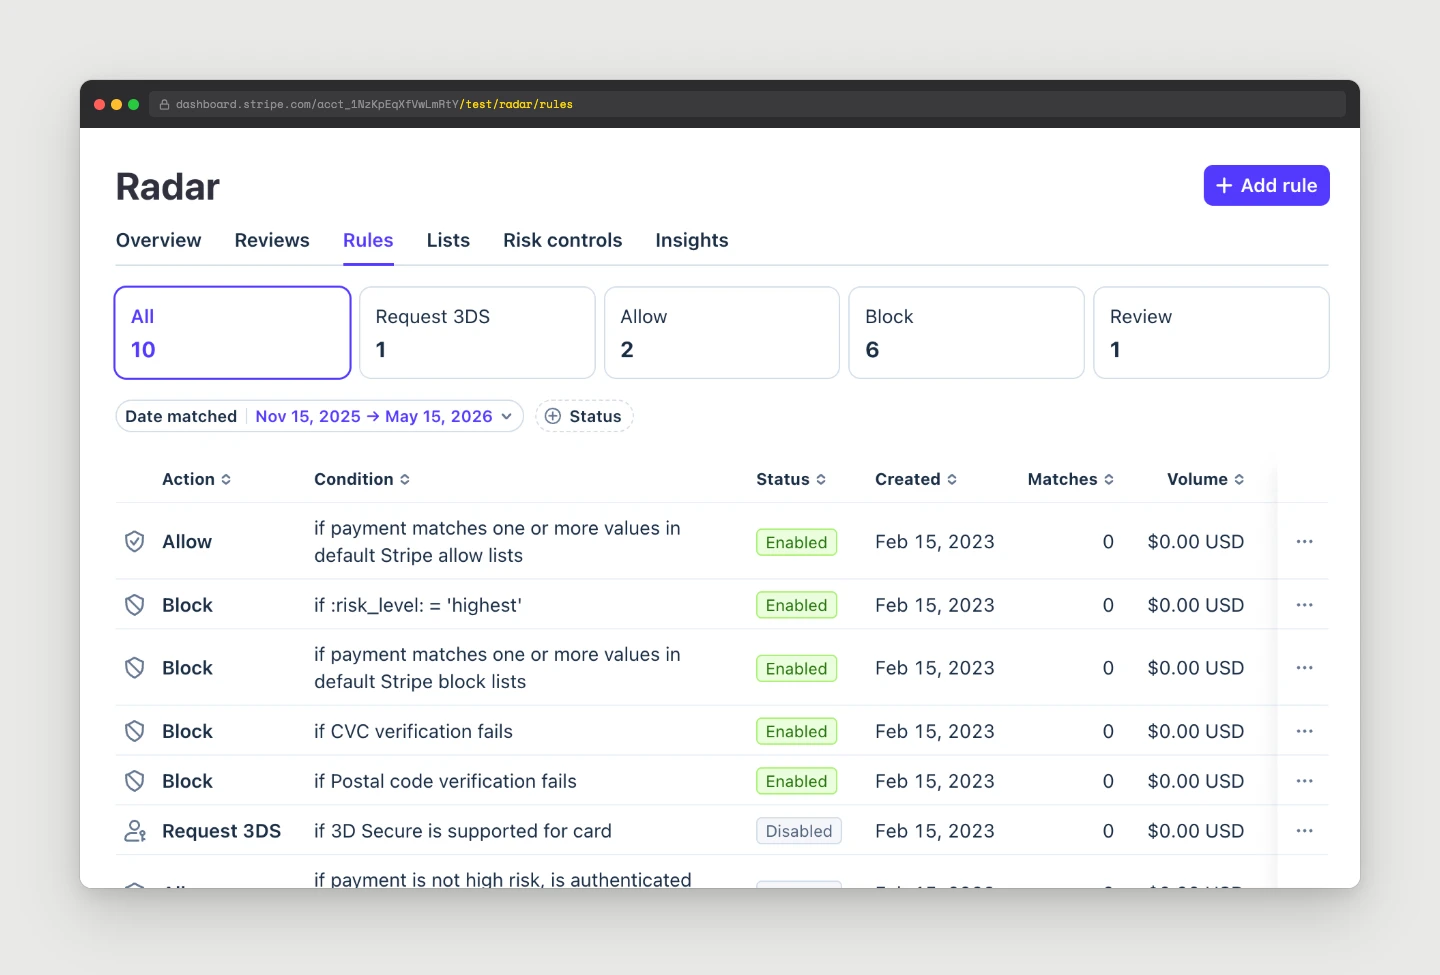
- Enable Stripe Radar’s canned rules. “Block if card tested at multiple merchants in a short window” is free and very effective. Add 3DS challenges for low-dollar attempts.
- Put a bot challenge on your forms. Cloudflare Turnstile or Google reCAPTCHA on every checkout or payment form. Most WordPress payment plugins have first-class support for these. If not, Cloudflare Bot Management at the edge will catch most of it.
- Rate-limit payment endpoints. A single IP attempting 50 checkouts in a minute is never legitimate. Use Cloudflare or your WordPress firewall plugin at the edge. For onsite Stripe Checkout, also enable PMPro’s built-in Spam Protection at Memberships > Settings > Security, and tighten
PMPRO_SPAM_ACTION_NUM_LIMITandPMPRO_SPAM_ACTION_TIME_LIMITinwp-config.phpif you are under active attack. - Use restricted keys for everything that is not core payment processing. Zapier, Make, n8n, accounting integrations. All of them should use scoped
rk_live_…keys, neversk_live_…. - Keep the inventory. Know every place a key lives. When something goes sideways, you can rotate confidently.
- Monitor Stripe Radar costs. The $0.02-per-review fee is small until it is not. A sudden spike in Radar reviews is the alert.
Frequently Asked Questions
Stripe Radar reviews every payment attempt for fraud, including the ones it blocks. The fee is roughly $0.02 per review. Normally that is invisible because your real volume is the dominant cost. During a card testing run, the volume of blocked attempts can be 1,000x your normal traffic, which is what makes the bill jump.
Not necessarily. If the attacker is only using your publishable key (pk_live_…), they are abusing your endpoint, not your account. Your account is “safe” in the technical sense, but you are paying the Radar review fees. If you see API calls from IPs you do not recognize using your secret key, that is a real compromise and you should roll keys immediately.
Only if you have evidence that the Connect credentials themselves are compromised. For a pure publishable-key attack, the fix is bot defenses and rate limits on your checkout, not disconnecting. If you do disconnect and reconnect, verify your webhooks afterward. That is where most sites get bitten.
Paid Memberships Pro integrates with Stripe via Stripe Connect by default, which means your secret key is not stored in your WordPress database and the checkout uses Stripe-hosted Checkout. That eliminates two of the three attack surfaces described in this post. You should still pair it with a bot challenge and rate limits at the edge to defend the third (direct publishable-key abuse).
Go to Stripe Dashboard > Developers > API keys and check the last used IP for each key. Any key showing recent activity from an IP that is not your server is suspect. Cross-reference with Developers > Logs to see what API methods that key has been calling. For a single suspicious charge, open it from Payments, scroll to the Logs section on the charge, and click the payment_intent log — the Application and API Key fields show exactly what created the attempt.
Final Recommendations
Card testing attacks are not going away. The fundamentals (Connect-based integration, Stripe-hosted Checkout, restricted keys, edge-level bot defenses, and an honest inventory of where your keys live) handle most of them quietly. When something gets through, the playbook is straightforward:
- Find which entry point is being abused (site checkout, publishable key, or secret key).
- Roll the affected keys with Expire now.
- Scan for malware if the secret key looks compromised.
- Disconnect and reconnect Stripe Connect to issue fresh credentials.
- Re-verify your webhooks. This is the step where most people get bitten. Do not skip it.
If you are running Paid Memberships Pro and have not yet switched your Stripe integration to Stripe Connect, do that next. It removes your secret key from your WordPress database and pushes the publishable key off your page HTML. That alone eliminates the two most common attack surfaces.
Related Resources
- Comparing Payment Gateways for Paid Memberships Pro
- How to Debug IPN and Webhook Activity for Integrated Gateways
- Protect Your Membership Site from Spam and Abuse with reCAPTCHA
- What to Do When Stripe Closes Your Account: A Membership Site Owner’s Playbook
References
Free Download: The AI-Powered Membership Site Blueprint
Download the free guide: Learn how to plan, build, and grow a membership site using AI as your strategic partner: from buyer persona to launch and beyond.


