A national association with twelve chapters can run beautifully on a handful of membership levels. A national association with two hundred chapters cannot run the same way. Somewhere between those two numbers, the way you model “chapter” in your membership site has to change.
This is the part of association site planning that trips people up, and the good news is that there is no single right answer. Size is where most people start, but it is not the whole story. What really decides your setup is how your chapters work: how many you have, yes, but also how independent each one needs to be, whether content is locked to each chapter or shared across the organization, and who needs to log in and manage it all.
Table of contents
- Can Paid Memberships Pro handle an association with chapters?
- Start With How Your Chapters Work
- Model Chapters With Membership Levels and Level Groups
- When a Custom User Taxonomy Fits Instead
- When Each Chapter Needs Its Own Site
- Building Blocks That Work at Any Size
- Choosing Your Starting Point
- Frequently Asked Questions
- Wrapping Up
Can Paid Memberships Pro handle an association with chapters?
If you’re reading this, you may still be deciding between Paid Memberships Pro and an all-in-one association management platform. Both can run a chaptered association. The real question is what you want to optimize for.
- All-in-one association software is turnkey. It bundles membership, events, email, and more into one subscription. The trade-offs are cost and control: you usually pay per member, you fit your organization into the platform’s structure, and you do not own the system.
- Paid Memberships Pro is a free, open-source plugin for WordPress. You own your site and your data, there are no per-member fees, and you can model chapters to match exactly how your association works. The trade-off is that you assemble the pieces yourself, or bring in our help to do it.
So yes, this works, and real associations run their chapters on Paid Memberships Pro today. In the rest of this guide, we will walk through how to model chapters with membership levels, when a custom user taxonomy is the better fit, when a chapter deserves its own site, and the building blocks (officer access, member directories, and admin tools) that work no matter which structure you choose.
If you want the wider build-versus-buy view first, our Associations Hub is the place to start.
Start With How Your Chapters Work
Before you pick a tool, answer three questions about your chapters. Your answers point to the right structure far more reliably than a chapter count does.
- How do members relate to chapters? Does each member belong to exactly one chapter, or can they belong to several? Are there leadership and committee roles layered on top of plain membership?
- How is content protected? Is restricted content gated per chapter, so Region 4 members only see Region 4 material? Or is most content shared across the whole association, with “chapter” acting more like a roster label?
- Who administers each chapter? Does national staff handle everything, or do local officers need to log into WordPress and manage only their own chapter’s members and content?
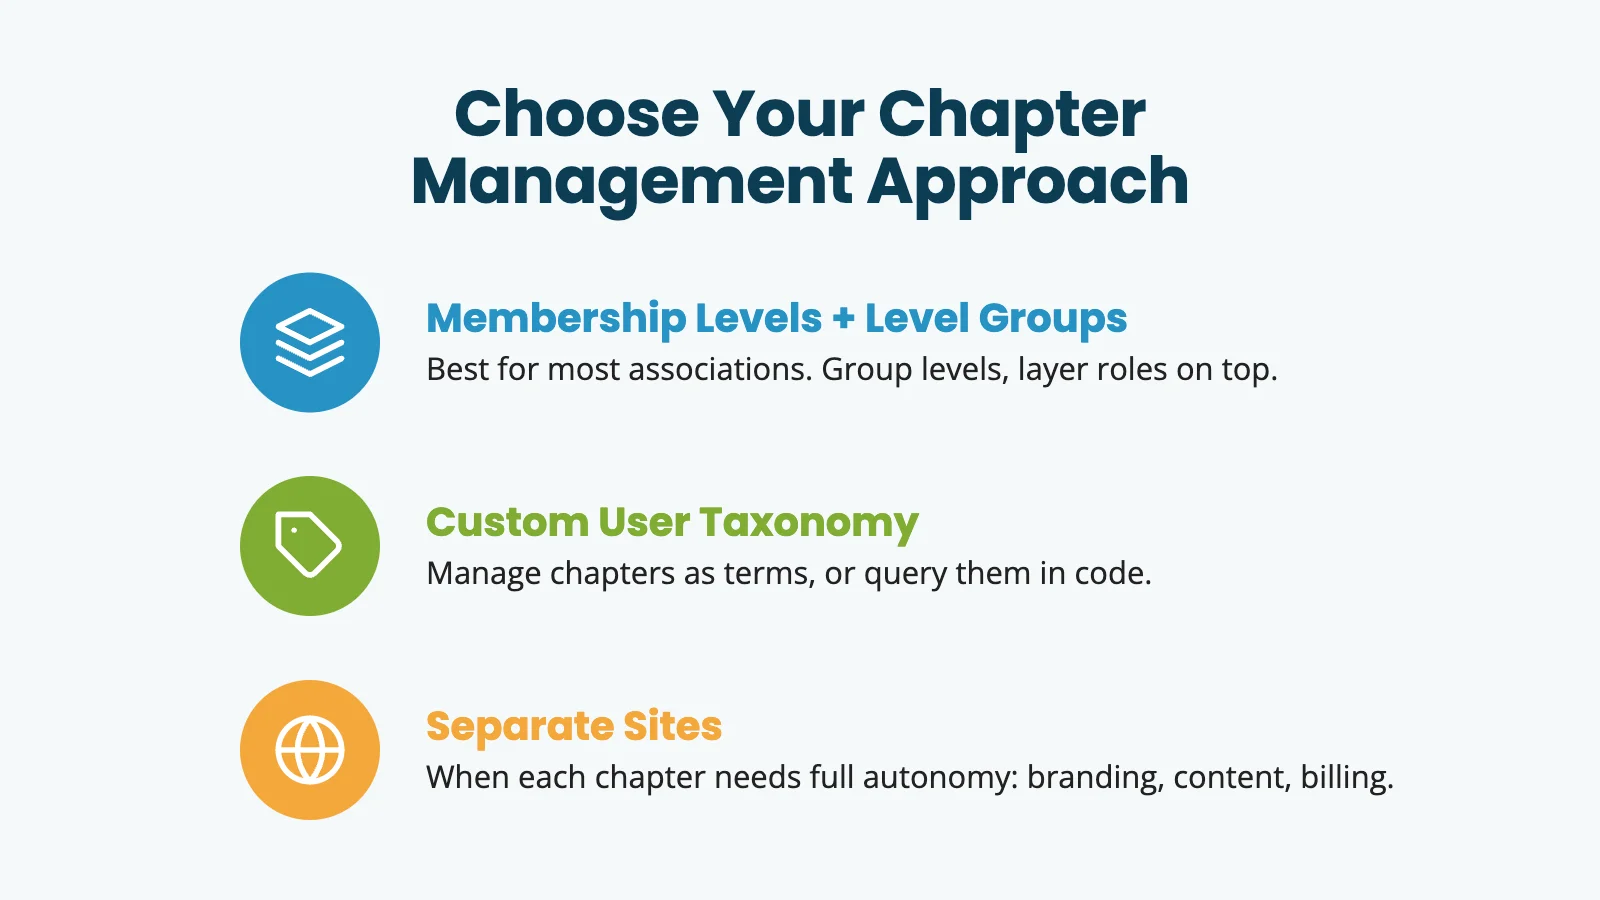
Most associations can run on membership levels, and levels scale further than people expect. A custom user taxonomy is the better fit when you would rather manage chapters as terms. And when a chapter needs to be its own thing entirely (its own branding, content, and billing), that is a question of autonomy, not size. Let’s consider each setup in turn.
Model Chapters With Membership Levels and Level Groups
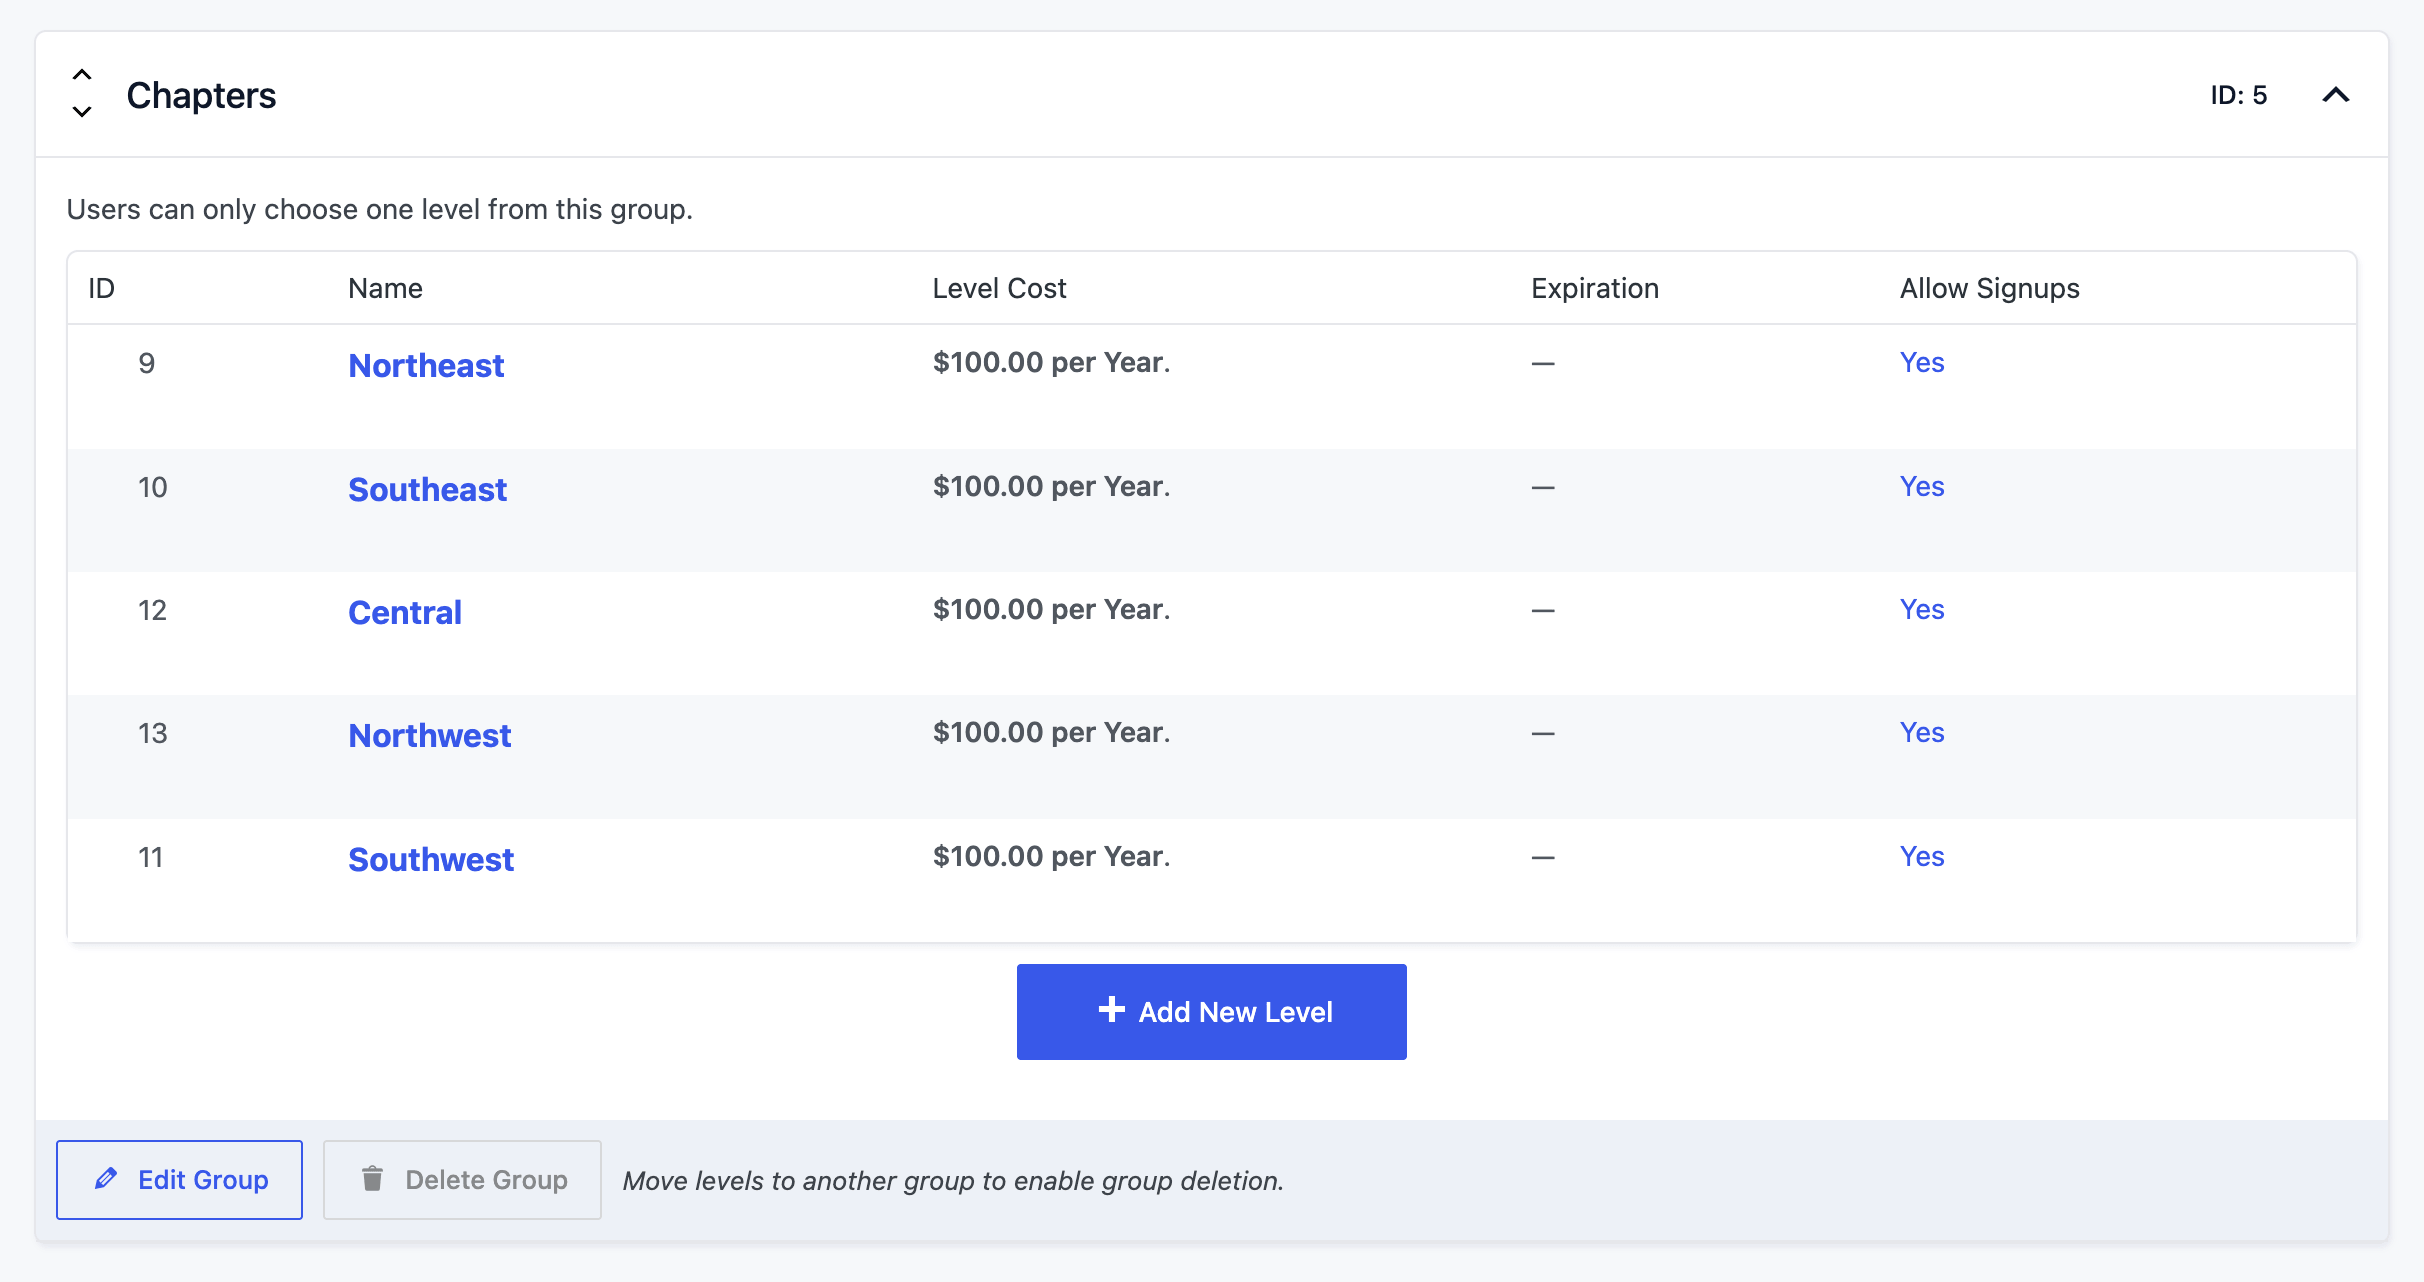
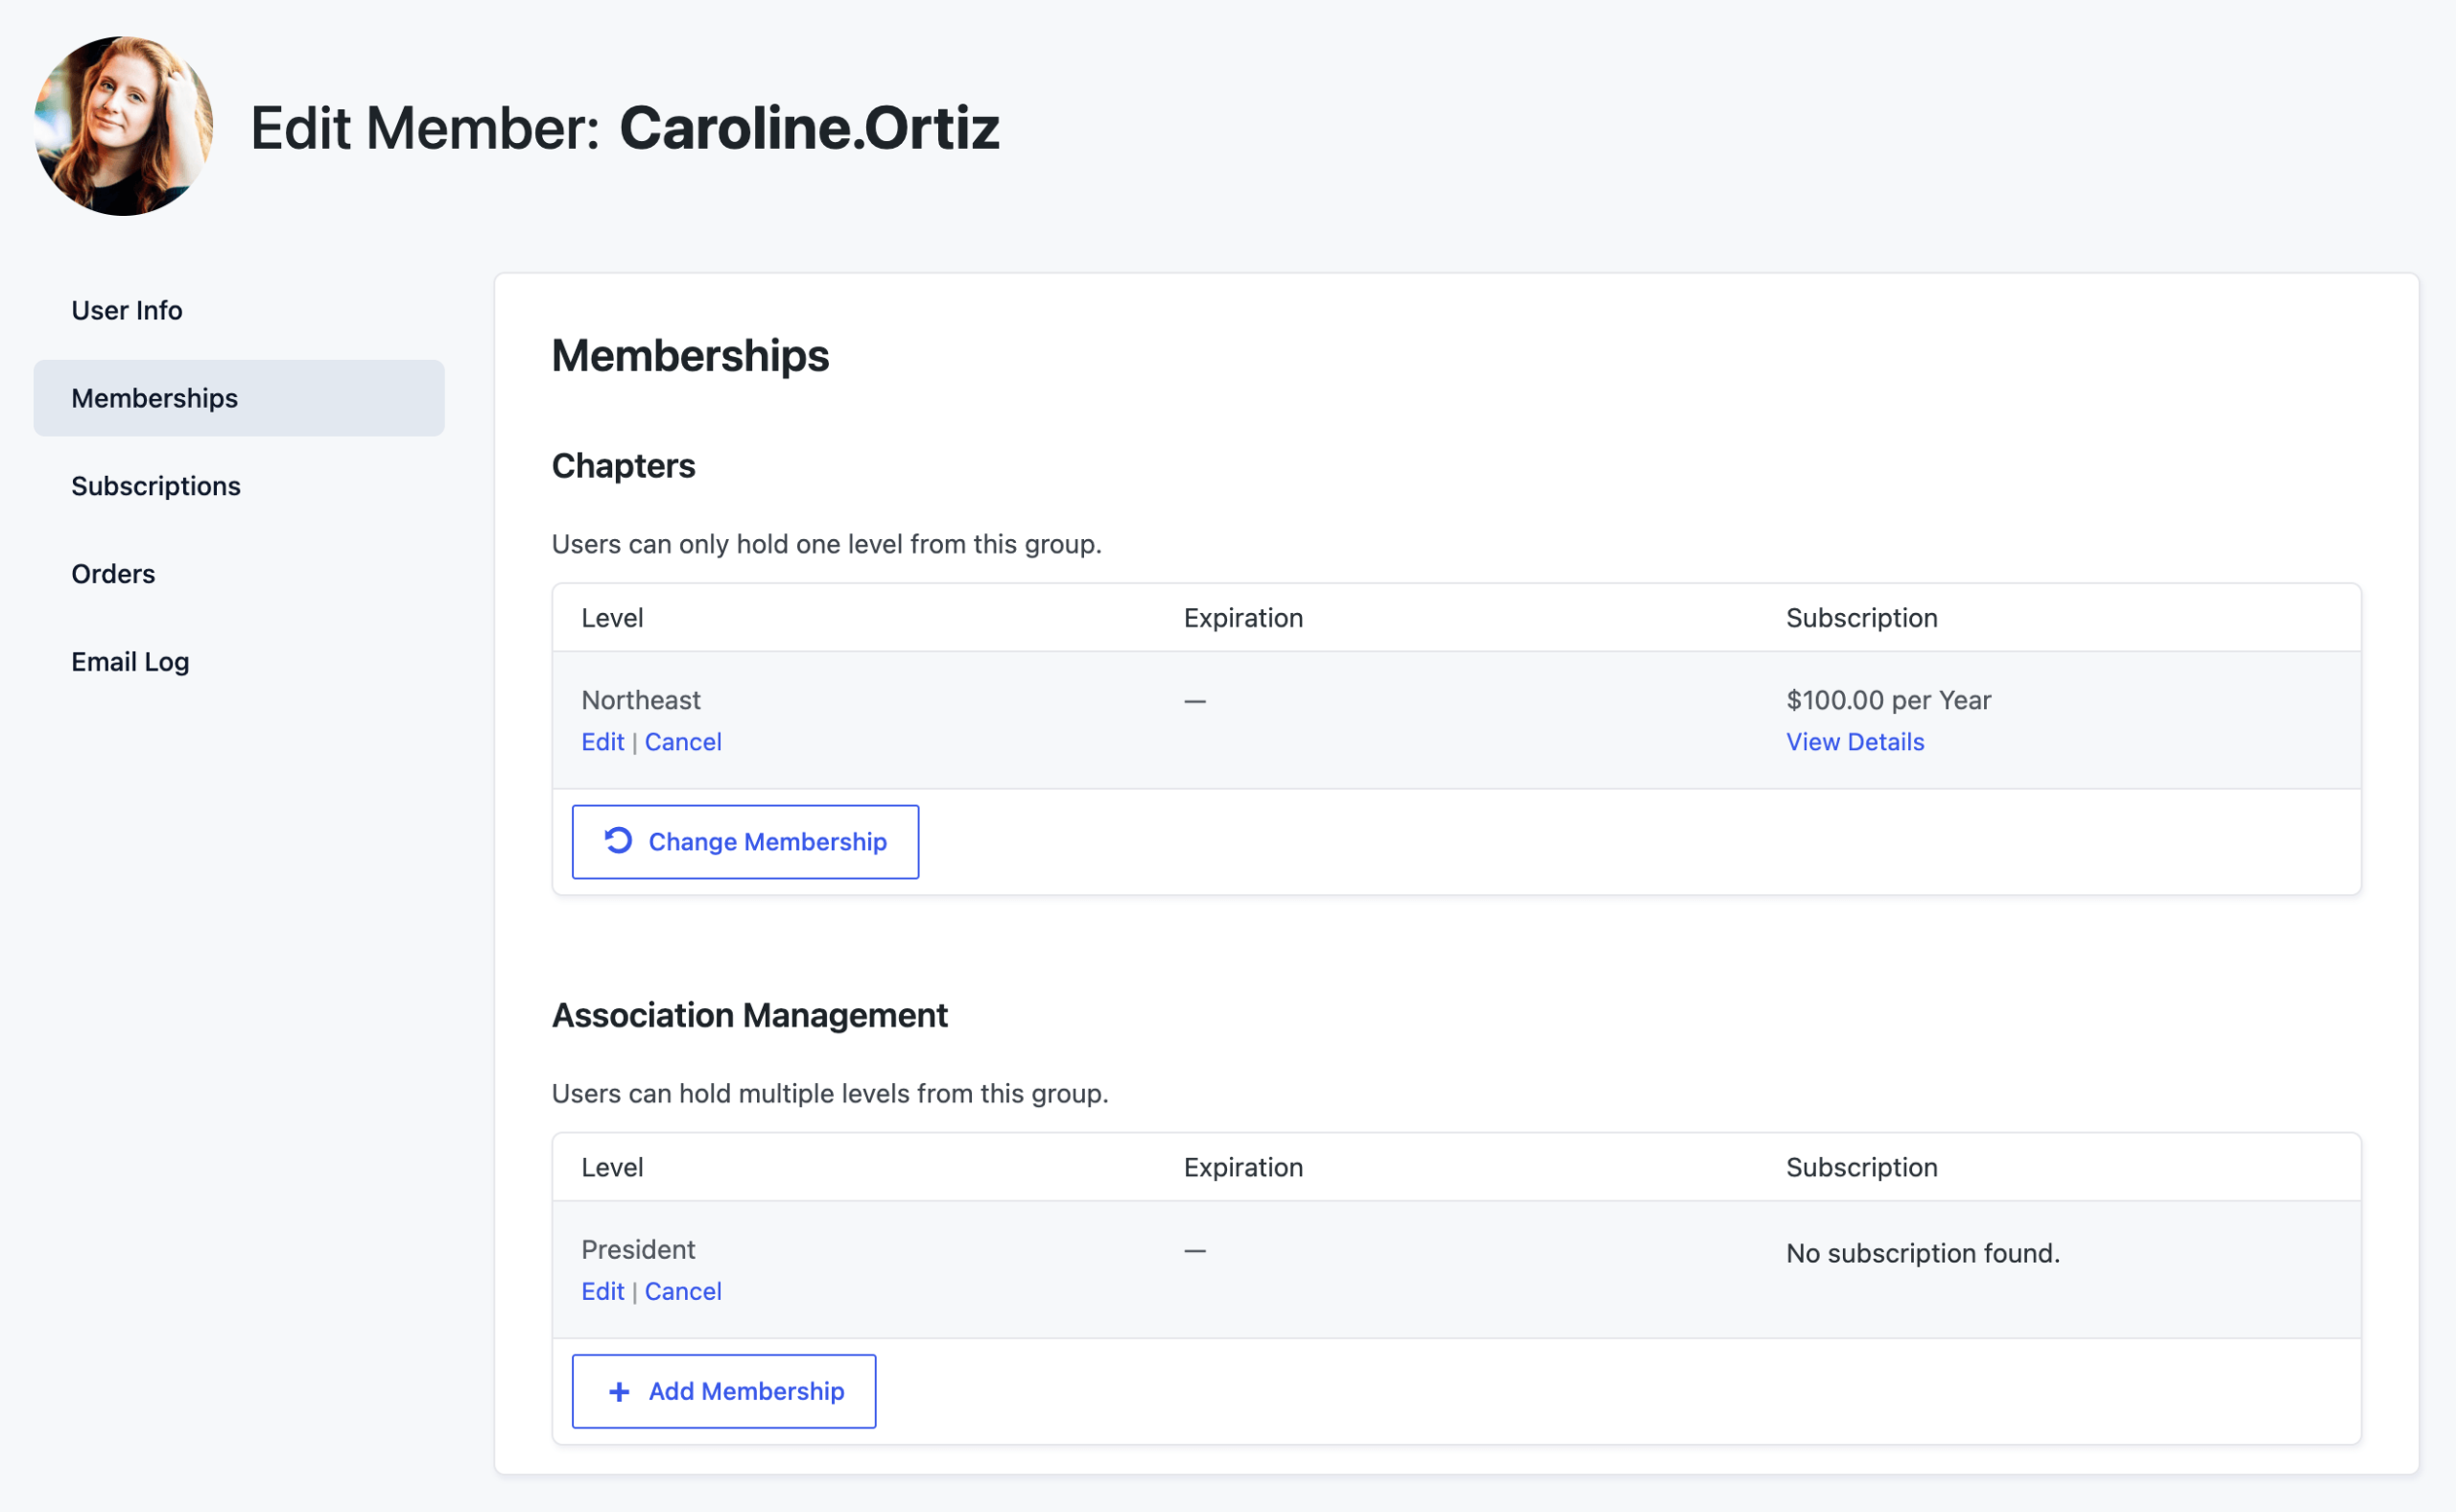
For most associations, membership levels are the right starting point. Each chapter becomes its own level, and you use that level to restrict the chapter’s content. The trick to making this scale is Level Groups, which control whether a member can hold one level from a group or several.
The pattern uses two kinds of groups:
- Put all of your chapter levels in one Level Group set to not allow multiple selections. A member picks one chapter, and that is their chapter. (If members can belong to more than one chapter, set this group to allow multiple selections instead.)
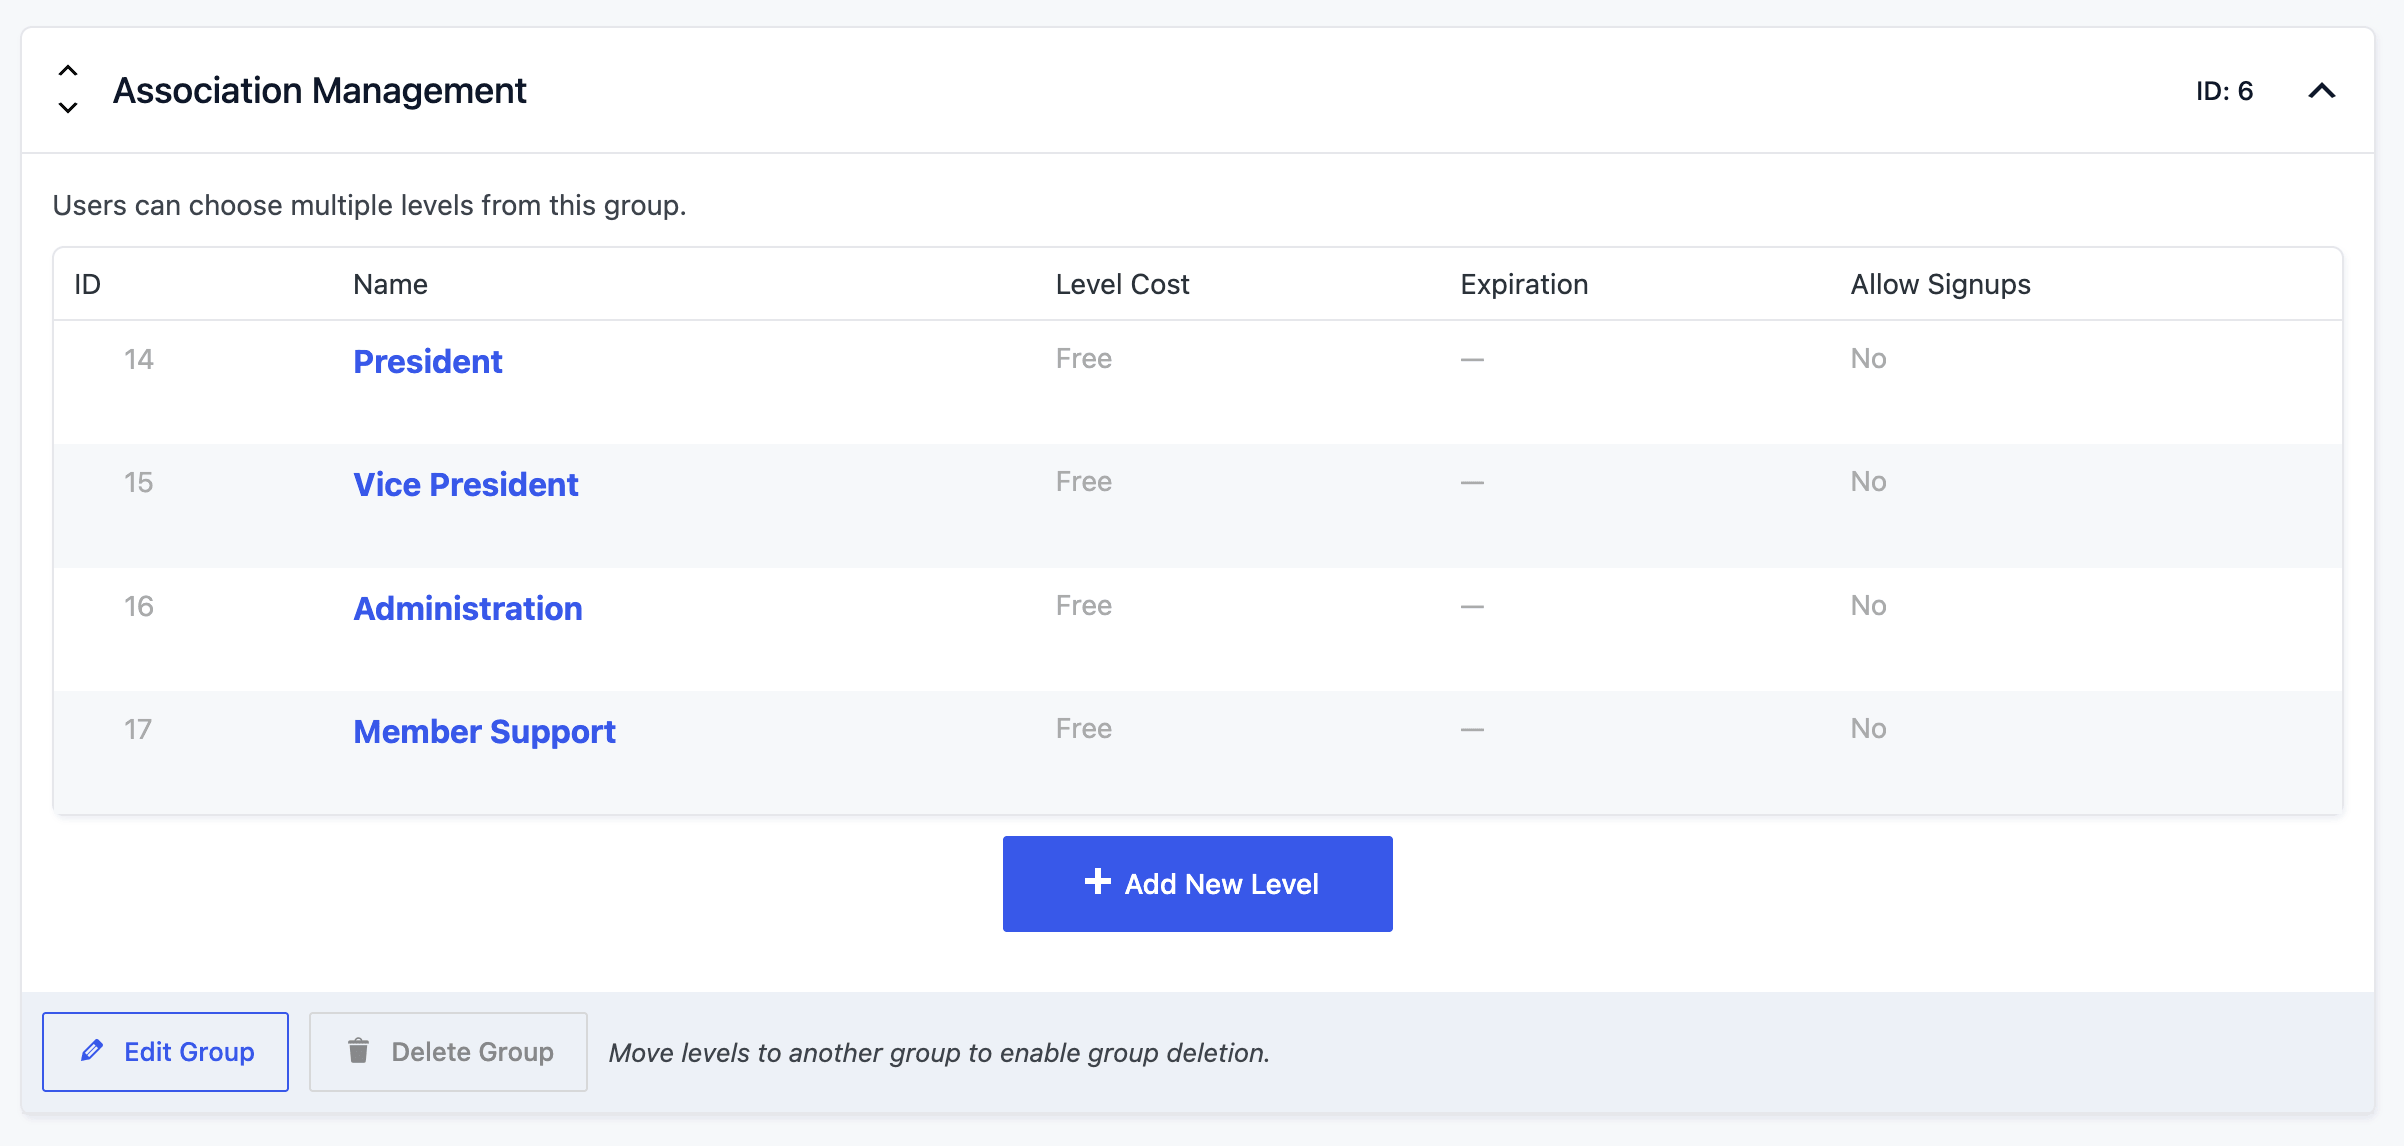
- Put leadership, committee, and other roles in separate groups that do allow multiple selections, so a member can hold those alongside their chapter.
Here’s the part that keeps your level list from exploding: your leadership position levels do not need to be per-chapter. You do not need a “Chapter A President” level and a “Chapter B President” level and so on. Create one “Chapter President” level. If a member belongs to Chapter A and also holds the Chapter President level, they are Chapter A’s president.
- The chapter comes from their chapter level.
- The leadership role comes from the president level.
- One president level covers every chapter in the association.
Levels work well here for a few reasons:
- Paid Memberships Pro restricts content by level natively. You do not need any custom code to gate chapter pages.
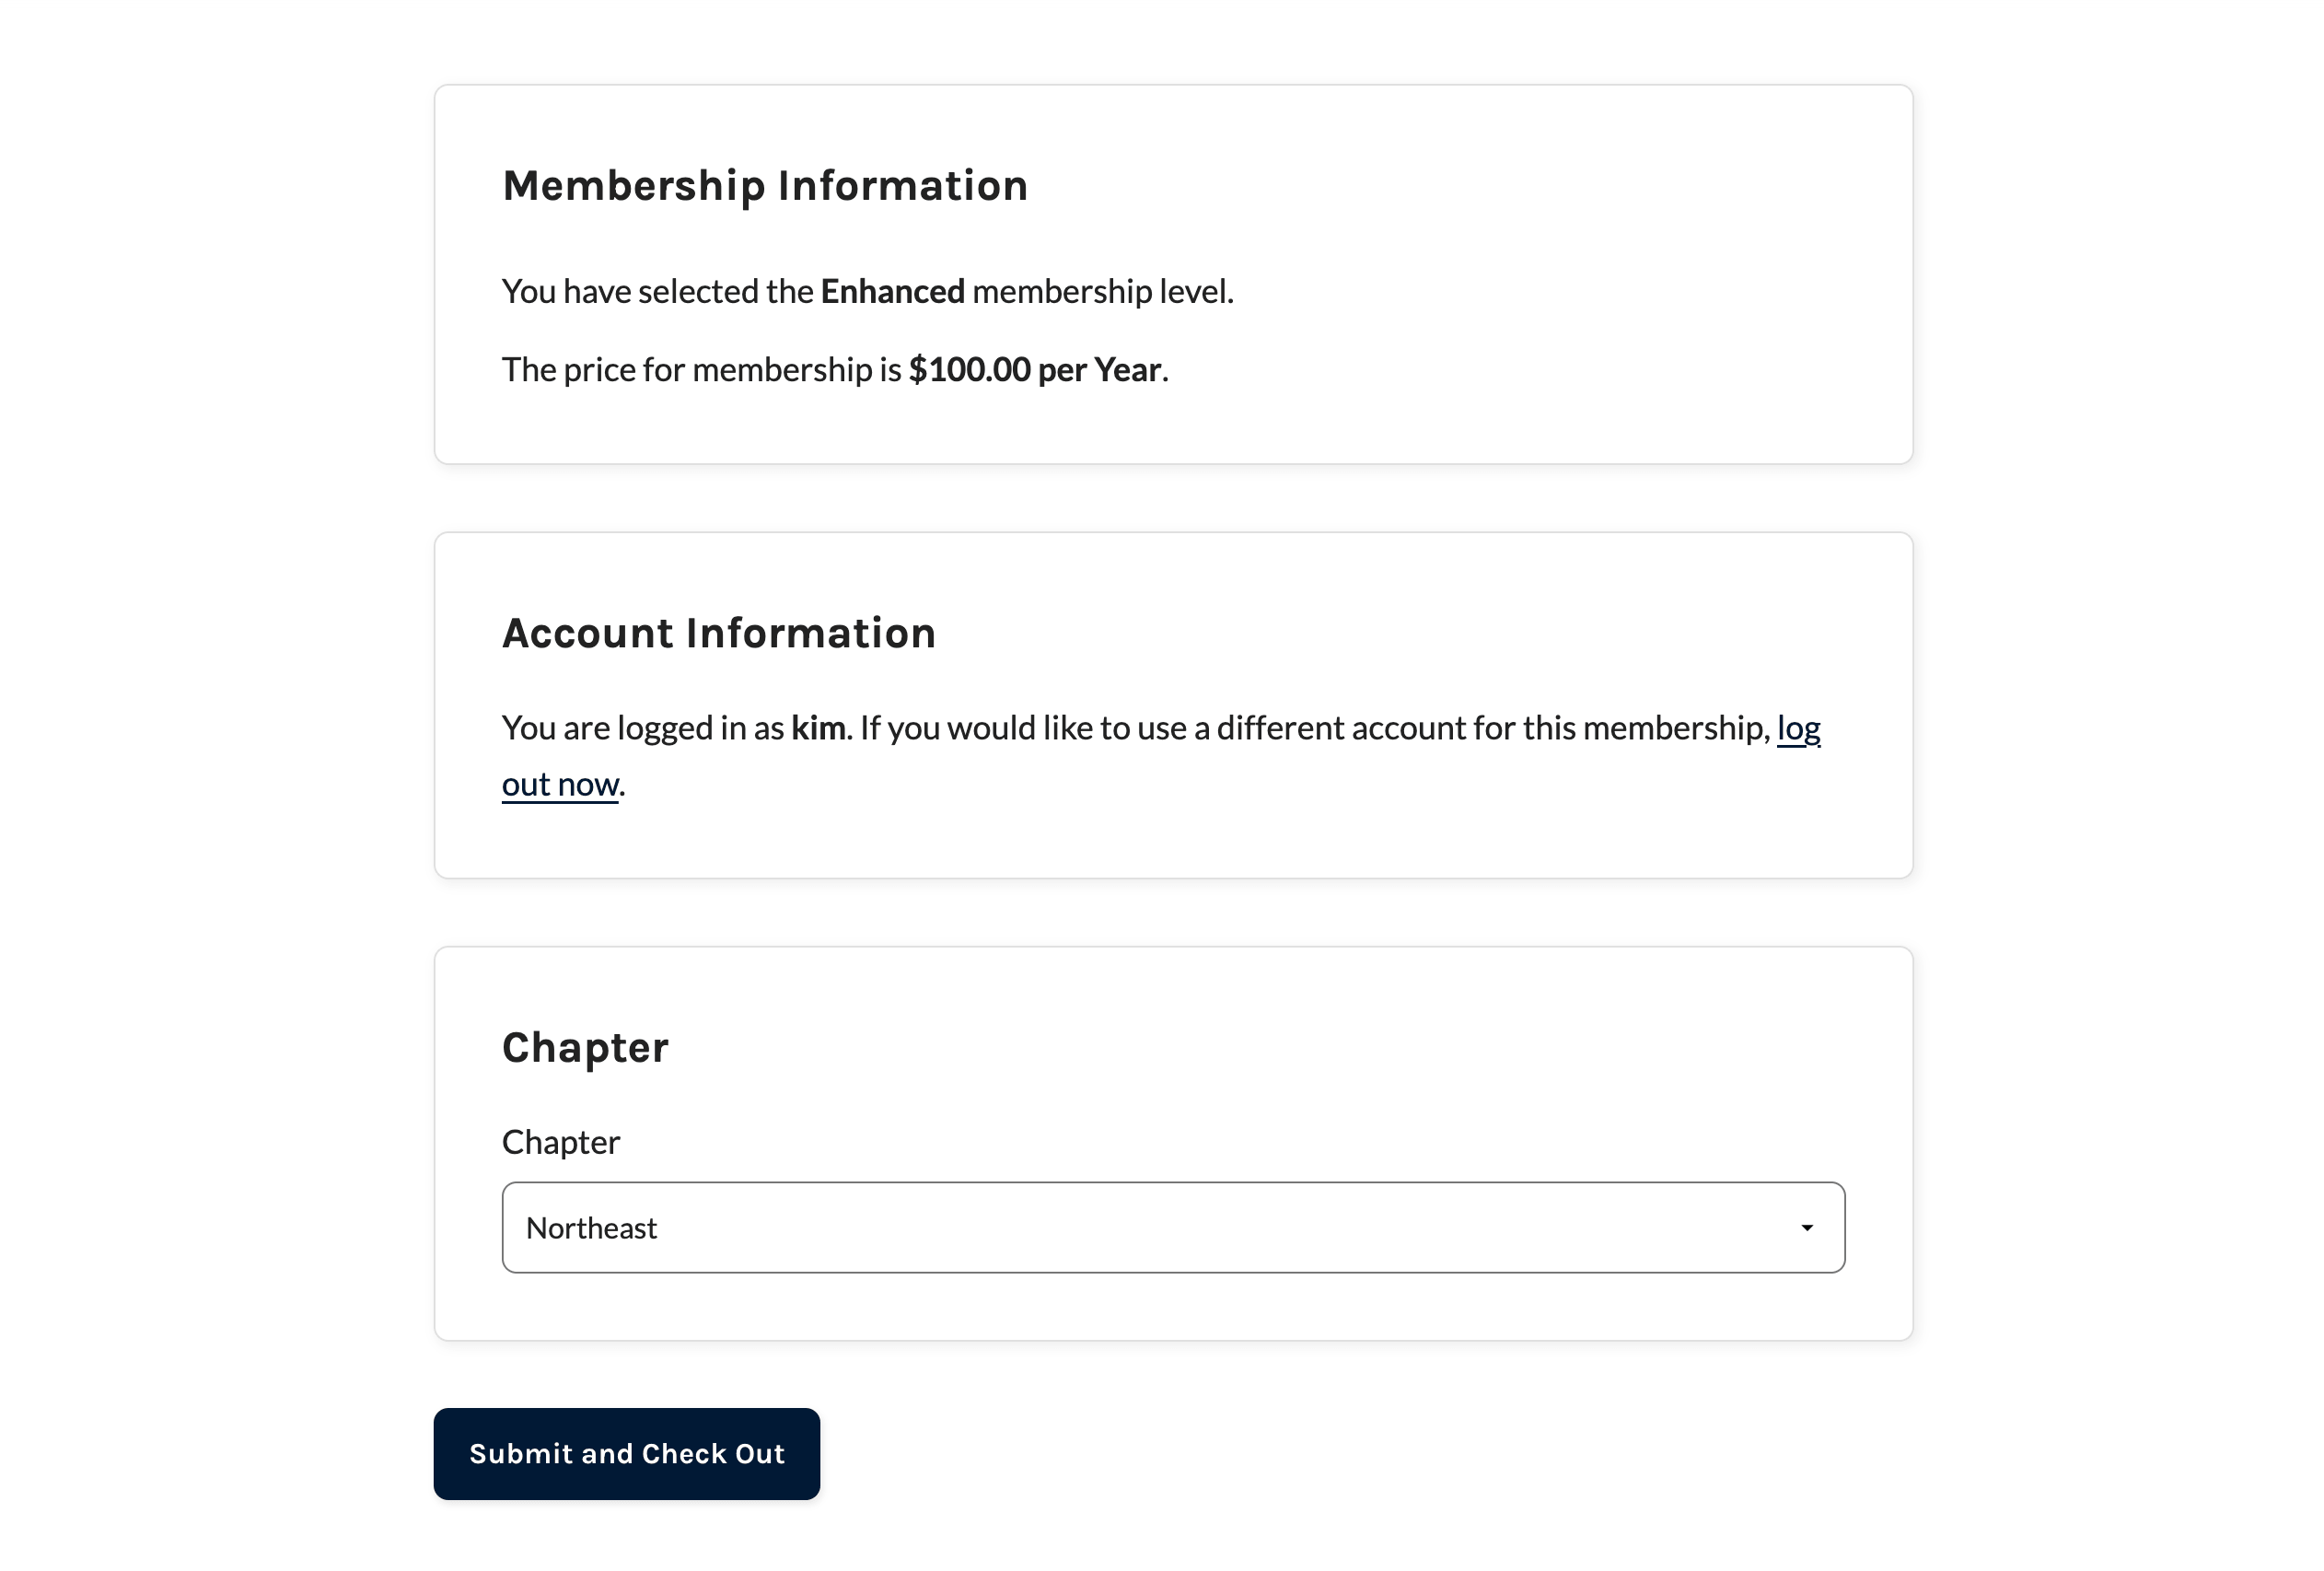
- Checkout is simple. Your member picks the chapter they belong to, and that selection is the level.
- Per-level user fields make it easy to collect chapter-specific information at checkout, like a unit number or local meeting day.
- Reporting and renewals work out of the box. The standard PMPro reports and emails already know how to filter by level.
Here’s how to set it up:
- Go to Memberships > Settings > Levels and click Add New Group. Create a Level Group for your chapters and set it to not allow multiple selections.
- Next, go to Memberships > Settings > Levels and click Add New Level within your chapters group. Name the level after the chapter, for example “Northeast Chapter” or “Chapter 12 – Austin”. Set a price if the chapter collects dues, or leave it free if membership is assigned by an admin rather than selected at checkout.
- Repeat these steps for each chapter. Each level gets its own checkout page automatically.
- Now, create one or more separate groups for leadership and committee roles, set to allow multiple selections.
- Create the levels within these groups based on the leadership positions in your association. Most associations will manually assign these additional levels, so be sure to check the box to “Disable signups” in Other Settings.
You can now restrict chapter-specific content by editing any page or post and checking the chapter’s level in the Require Membership meta box. Members without that level see the restricted-content message instead of the page body. You can also restrict content for specific leadership or committees.
As your chapter list grows, the part that feels tedious is not the levels themselves. It’s restricting content page by page when you add or change your chapter structure.
The good news is that with PMPro you do not have to gate every page by hand. Our guide on bulk methods to restrict access covers faster ways to protect whole groups of content at once, which is what makes the levels approach comfortable even with a long chapter list.
You can run a lot of chapters this way, there really is no limit. So if you’re feeling hung up on the number, just let that feeling go. The outcome you’re solving for isn’t “as few levels as possible.” Your goal is to pick the right chapter model for your association. So here’s option 2: a custom user taxonomy.
When a Custom User Taxonomy Fits Instead
Some associations would rather manage chapters as terms than as levels. A custom user taxonomy paired with User Fields lets you keep one “Member” level (or a few tiers) and store the chapter as a term attached to the user. You collect it with a single “Chapter” dropdown at checkout and query members by term.
This approach earns its keep when:
- You want to add, rename, or retire a chapter without touching your membership levels. A new chapter is one new term.
- You want to be able to use the core WordPress function
get_objects_in_term()to pull a chapter roster anywhere you need it, not a custom meta query. - You manage chapters from a familiar WordPress screen (Users > Chapters) rather than from your levels list.
Here is how to set it up:
- Add our chapters user taxonomy field recipe (below). It registers a “Chapters” taxonomy on the WordPress user object and adds a “Chapter” select to your User Fields, with options built from your taxonomy terms so the dropdown always matches the chapters you have created. One detail matters: pass the taxonomy to the field when you create it. That is what tells Paid Memberships Pro to save the choice as a chapter term on the user rather than as plain user meta.
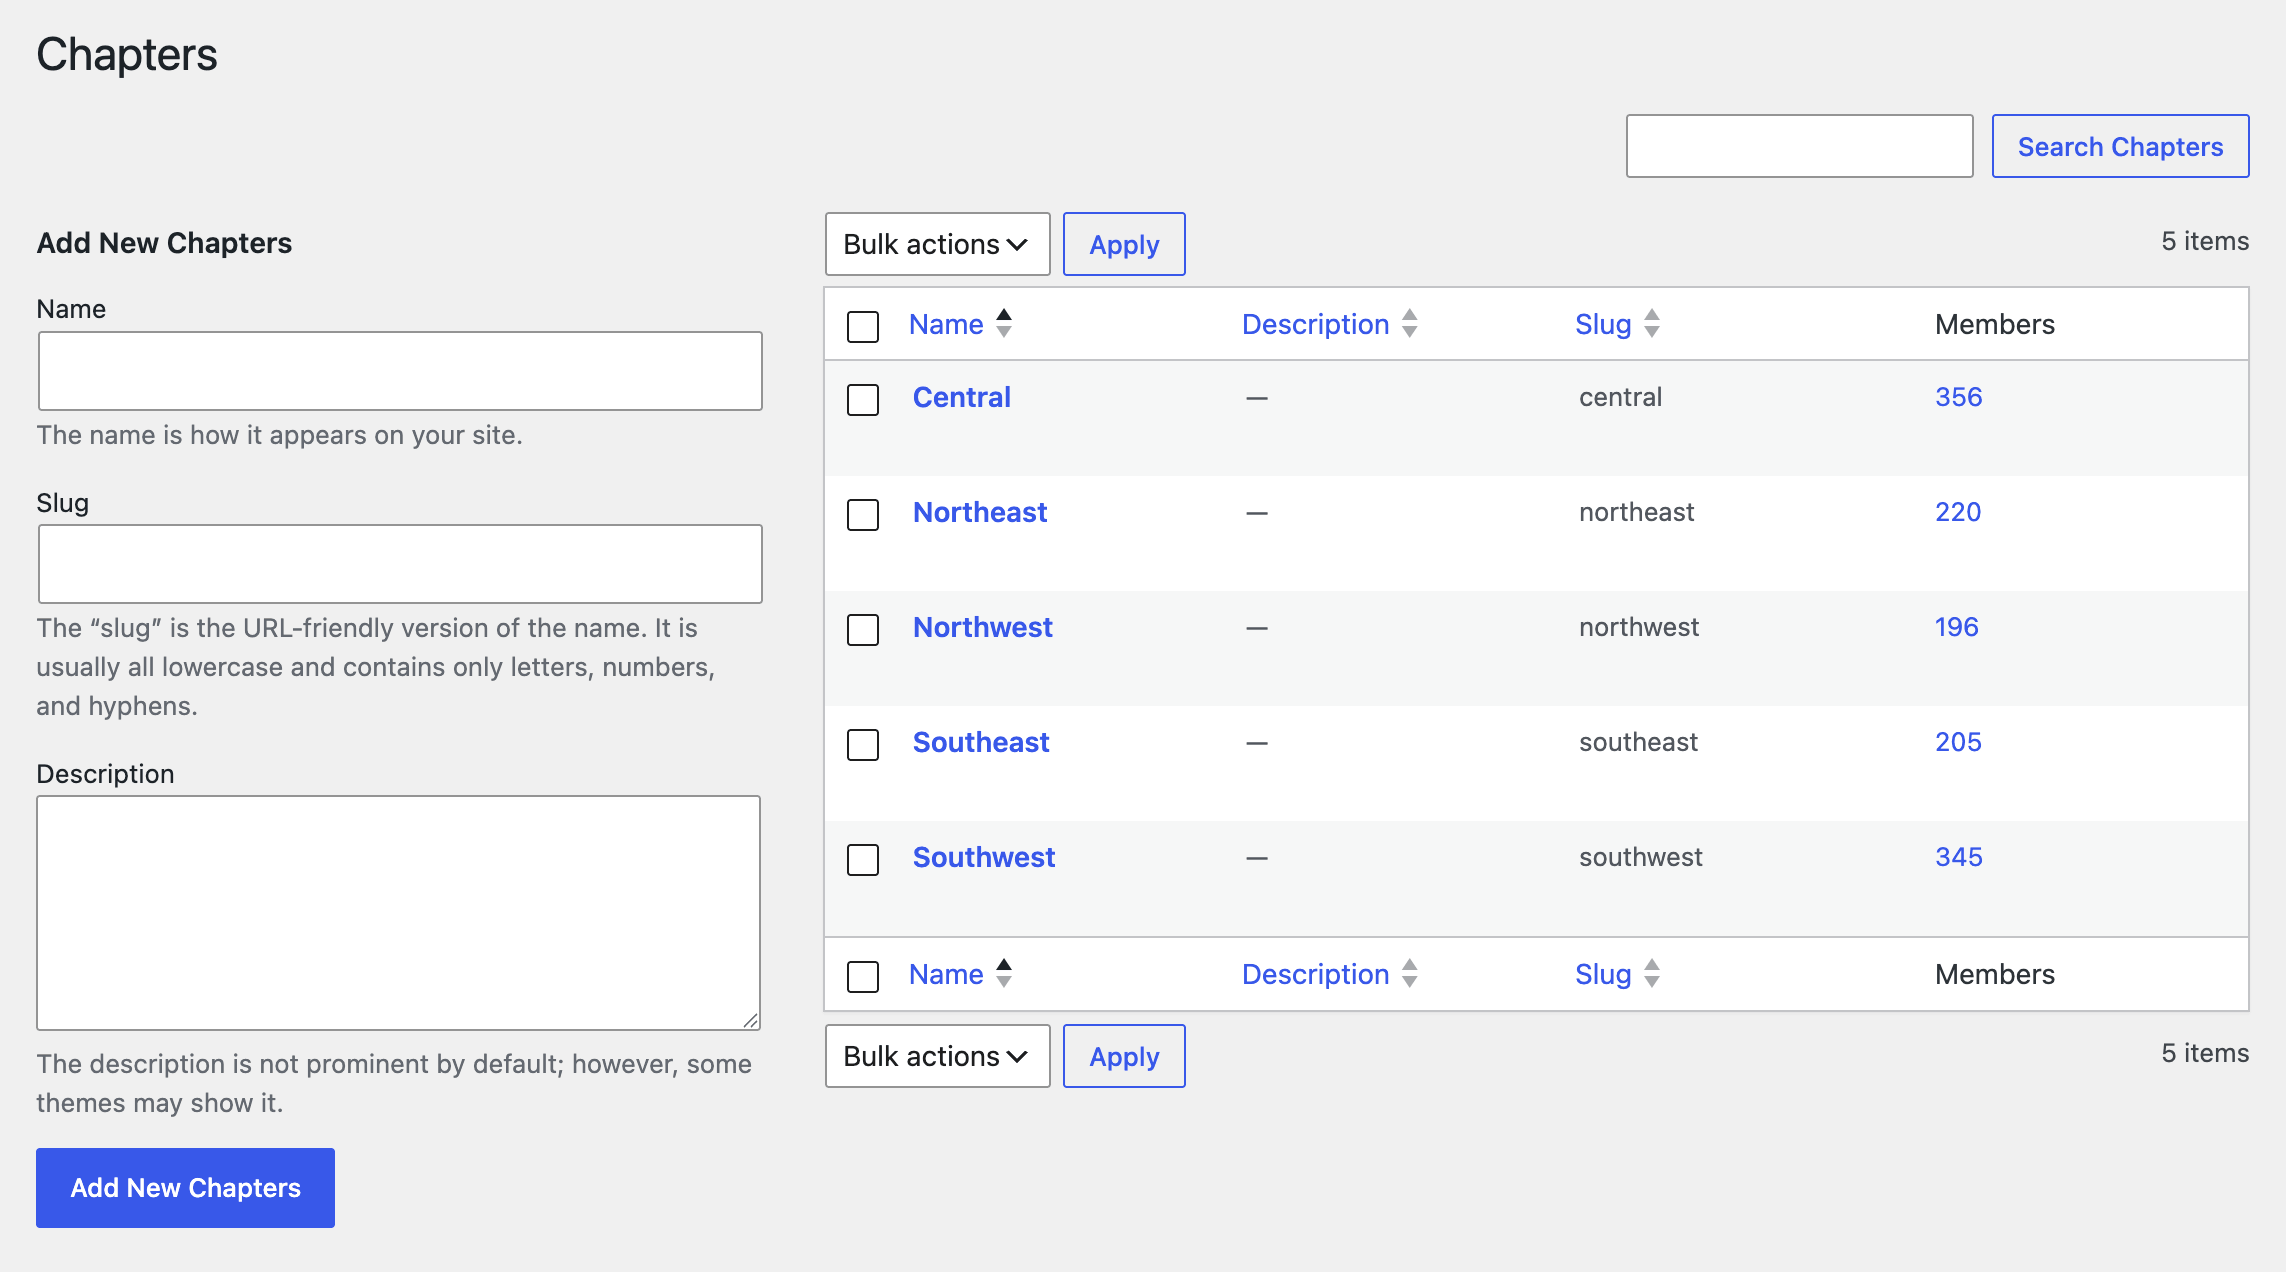
- Go to Users > Chapters and add your chapters as terms. This is where you manage chapters from here on. Adding, renaming, or retiring a chapter happens here, with no changes to your membership levels.
Code recipe: Chapters User Taxonomy Recipe
Once the snippet is active, the chapter dropdown appears on your checkout form and on member profile pages. New chapters added at Users > Chapters show up in the dropdown on the next page load, with no other changes needed.
Treat this, and every code recipe in this guide, as a starting point rather than a finished product. The sky is the limit here. Your developer, or the AI coding assistant of your choice, can take these recipes the rest of the way to fit your association.
To restrict content by chapter with this model, layer a chapter check on top of PMPro’s level-based restriction:
- Use the
pmpro_has_membership_access_filterhook to add chapter-aware logic to the access check. - Use post meta on each restricted post or page to record which chapter terms can see it.
- Combine the two so a “Region 4 Members Only” post is gated by both the member’s level (they are a paid member) and the member’s chapter term (they belong to Region 4).
Our guide on protecting posts with a custom taxonomy and term walks through a similar pattern for content taxonomies and is a good companion read for the access-filter side of this approach.
The big win is what happens when you add chapter number 47. It is one new taxonomy term. No new level. No new restriction rules to write. The same is true for chapter mergers, splits, and renames. You are editing a term, not refactoring your membership structure. The trade-off is that you are writing (or copy-pasting) some PHP, and your restriction rules now key off the taxonomy instead of the level. Pick the model your team can support six months from now.
When Each Chapter Needs Its Own Site
There is a different option that does not belong on the levels-versus-taxonomy spectrum, because the question it answers is not “how do I organize chapters” but “how independent does each chapter need to be.” Give each chapter its own site when each chapter needs real autonomy, regardless of how many chapters you have.
This makes sense when each chapter wants its own branding and theme, publishes its own news and events, handles its own billing (sometimes with its own payment processor), and national mostly wants a rollup view. This is the “federated” model: national sets the standards and provides the platform, and each chapter runs its own show. There are two ways to build it.
One WordPress Multisite Network
Run all the chapter sites inside a single WordPress Multisite network. Each chapter is a site on the network, sharing core files, themes, and plugins, while keeping its own content. The Paid Memberships Pro Multisite Membership Add On fits here: a member of the main site can be granted access across the network, so a national membership is reflected at the chapter level without separate accounts.
Fully Independent Sites per Chapter
At the most autonomous end, each chapter runs its own standalone Paid Memberships Pro install on its own domain, with its own levels, branding, and billing, and the national organization handles reporting separately. EANGUS is a live example: each state chapter operates its own PMPro site at its own address, with the national association tracking chapter membership against goals. It is maximum autonomy, at the cost of maintaining many separate sites.
Wiring independent sites together (shared logins, cross-site membership, and a true national rollup) is its own project and is beyond the scope of this post. It is on our list for a future article. If that is what you need now, open a support ticket and we can point you in the right direction.
The honest trade-off with either flavor is operational. A site per chapter is wonderful for a handful of chapters. At a hundred, it is a lot to maintain. You will need someone (or a small team) handling updates, theme consistency, gateway support, and the inevitable “my chapter’s site is broken” tickets. It is fully doable, and it is a real commitment. If you are weighing it, our guide on setting up a membership website with WordPress Multisite is the place to start.
Building Blocks That Work at Any Size
Three pieces of functionality come up in almost every association chapter setup, no matter which model you choose. These are the building blocks you can layer onto levels, taxonomies, or separate sites.
Chapter President and Officer Access
Most associations have content meant for chapter leadership only, and some leaders also need to do real work in the WordPress admin. These are two different needs.
For officer-only content, use the leadership-level pattern from earlier. Create a “Chapter President” level in its own Level Group set to allow multiple selections, and assign it on top of the member’s chapter level. Restrict president-only content to that level. Because the role is not per-chapter, one president level serves every chapter. To set it up:
- Create a “Chapter President” level at Memberships > Settings > Levels. Set it to free and disable self-signup in the level’s Other Settings. This is admin-assigned, not a self-serve membership.
- Restrict president-only content to this level via the Require Membership meta box, the same way you restrict any chapter content.
- Assign the level to an officer by editing their user profile and adding the president level alongside their existing chapter level. They now hold two memberships: their chapter and their leadership role.
For backend access scoped to their own chapter, the need is different. A chapter president who logs into wp-admin should see only their own chapter’s members, not the whole organization. There is no chapter-scoped view out of the box, but you do not have to build one from scratch. The approach is the same either way: define a chapter_leadership capability, assign it to your officers, and scope what they see to their own chapter. How you scope it depends on whether you model chapters as levels or as a taxonomy.
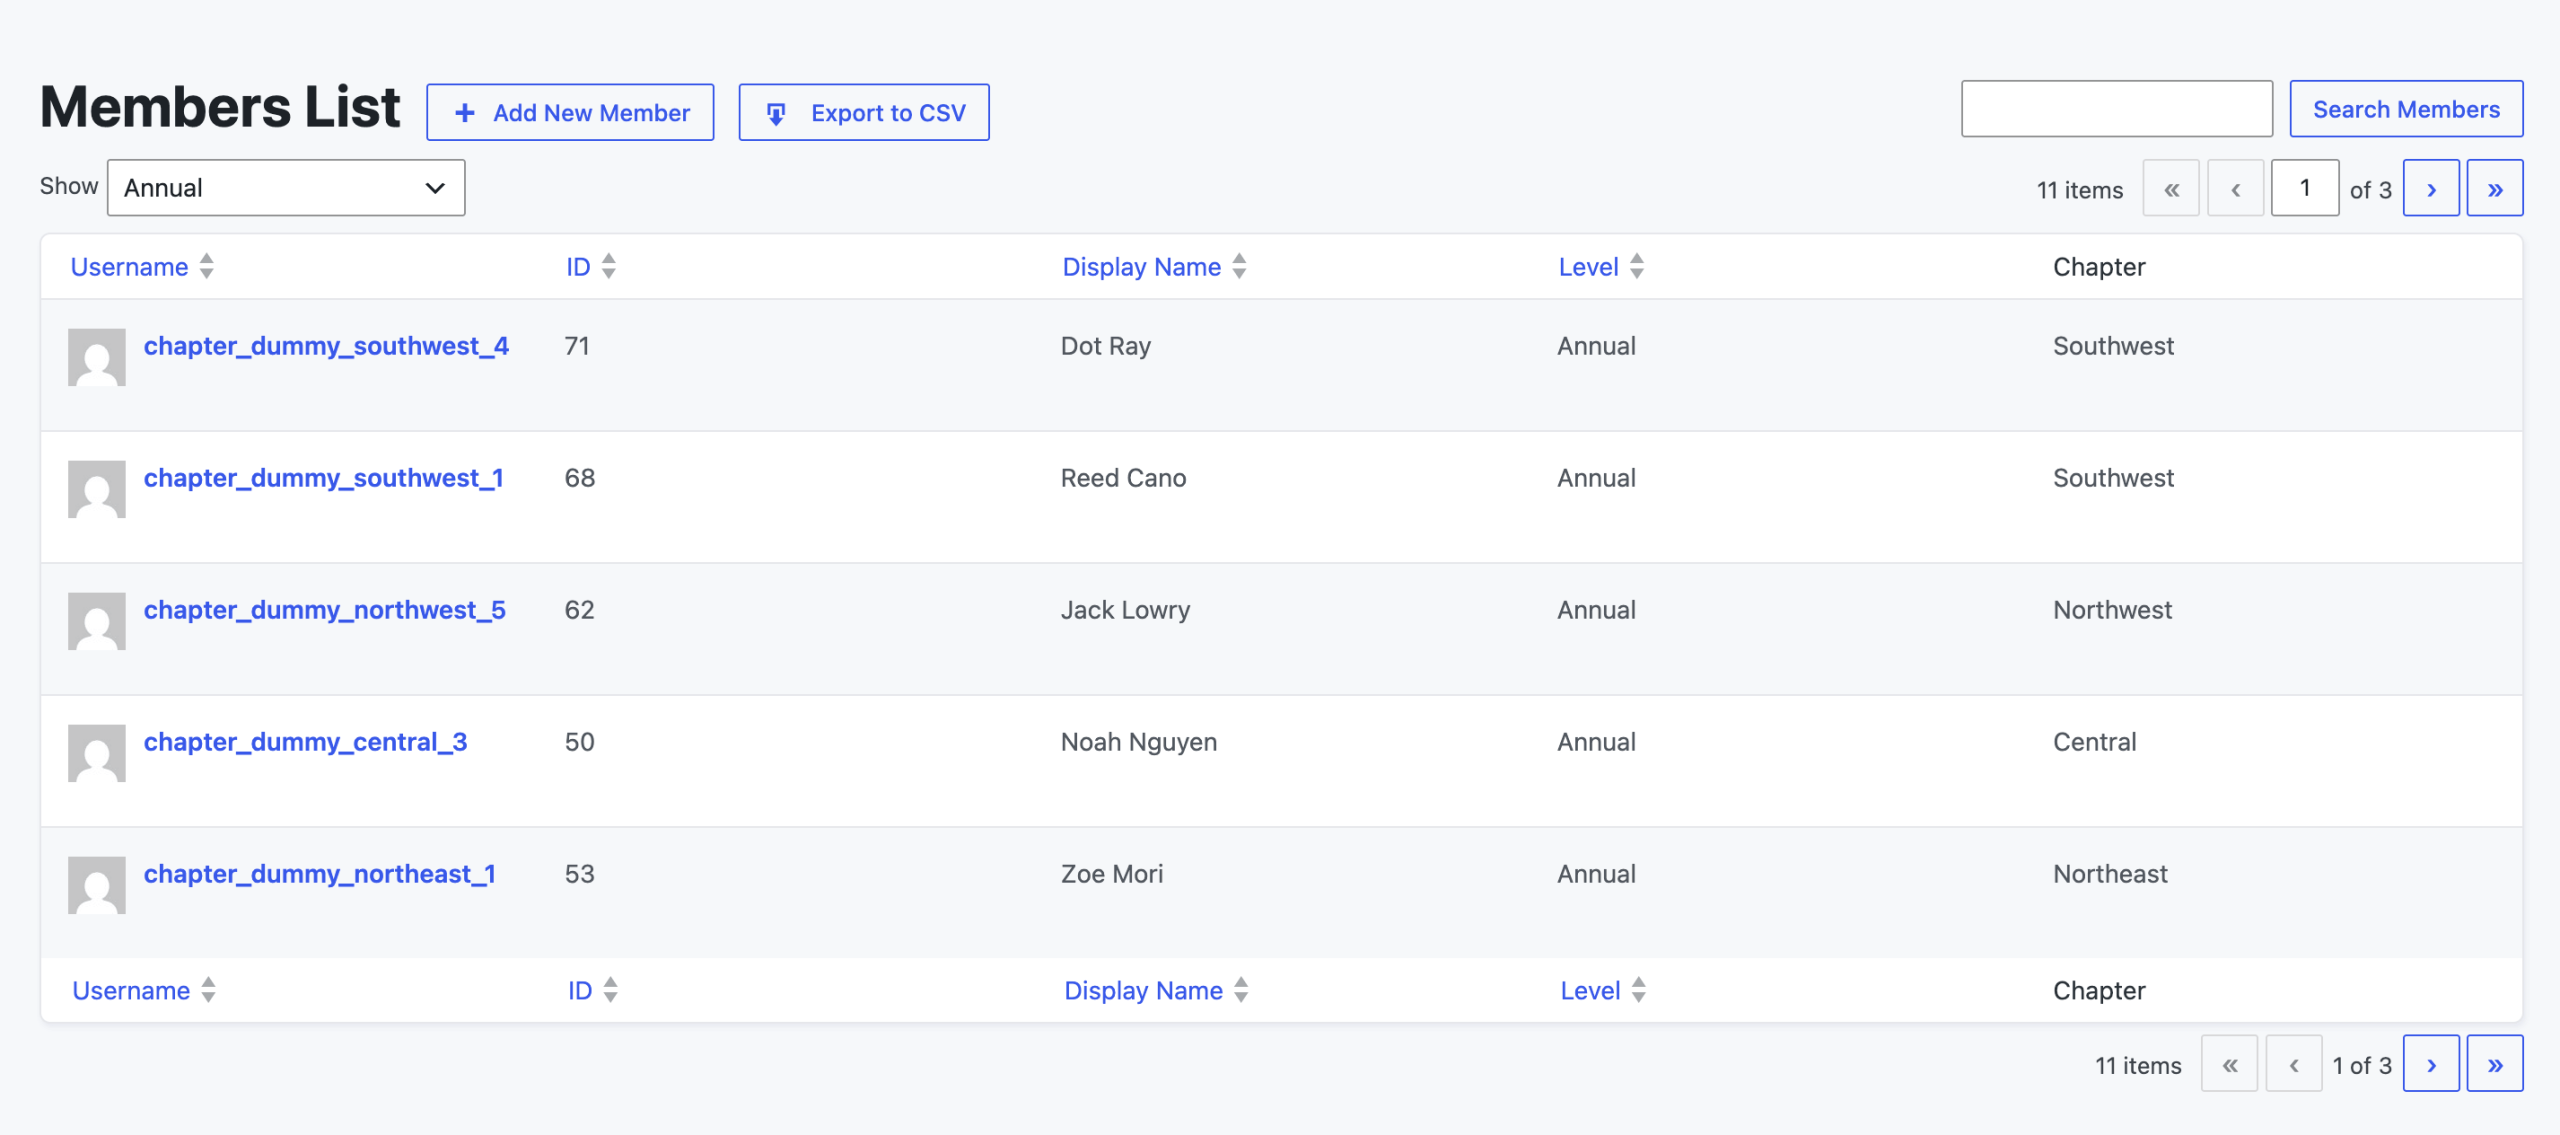
If chapters are membership levels, scope the native Members List. Paid Memberships Pro builds that list (and its CSV export) through the pmpro_members_list_sql filter, so you can inject a restriction that limits the results to the level (or levels) the leader belongs to. Because the filter runs on both the screen and the export, and the restriction lands on the base query, a leader cannot widen it by editing the level filter in the URL. Grant the leader the pmpro_memberslist capability so they can open the list, and they see only their own chapter.
Our recipe to scope chapter leaders to their level on the Members List does exactly this.
Code Recipe: Give Chapter Leaders Access to Members of Their Chapter via PMPro Members List
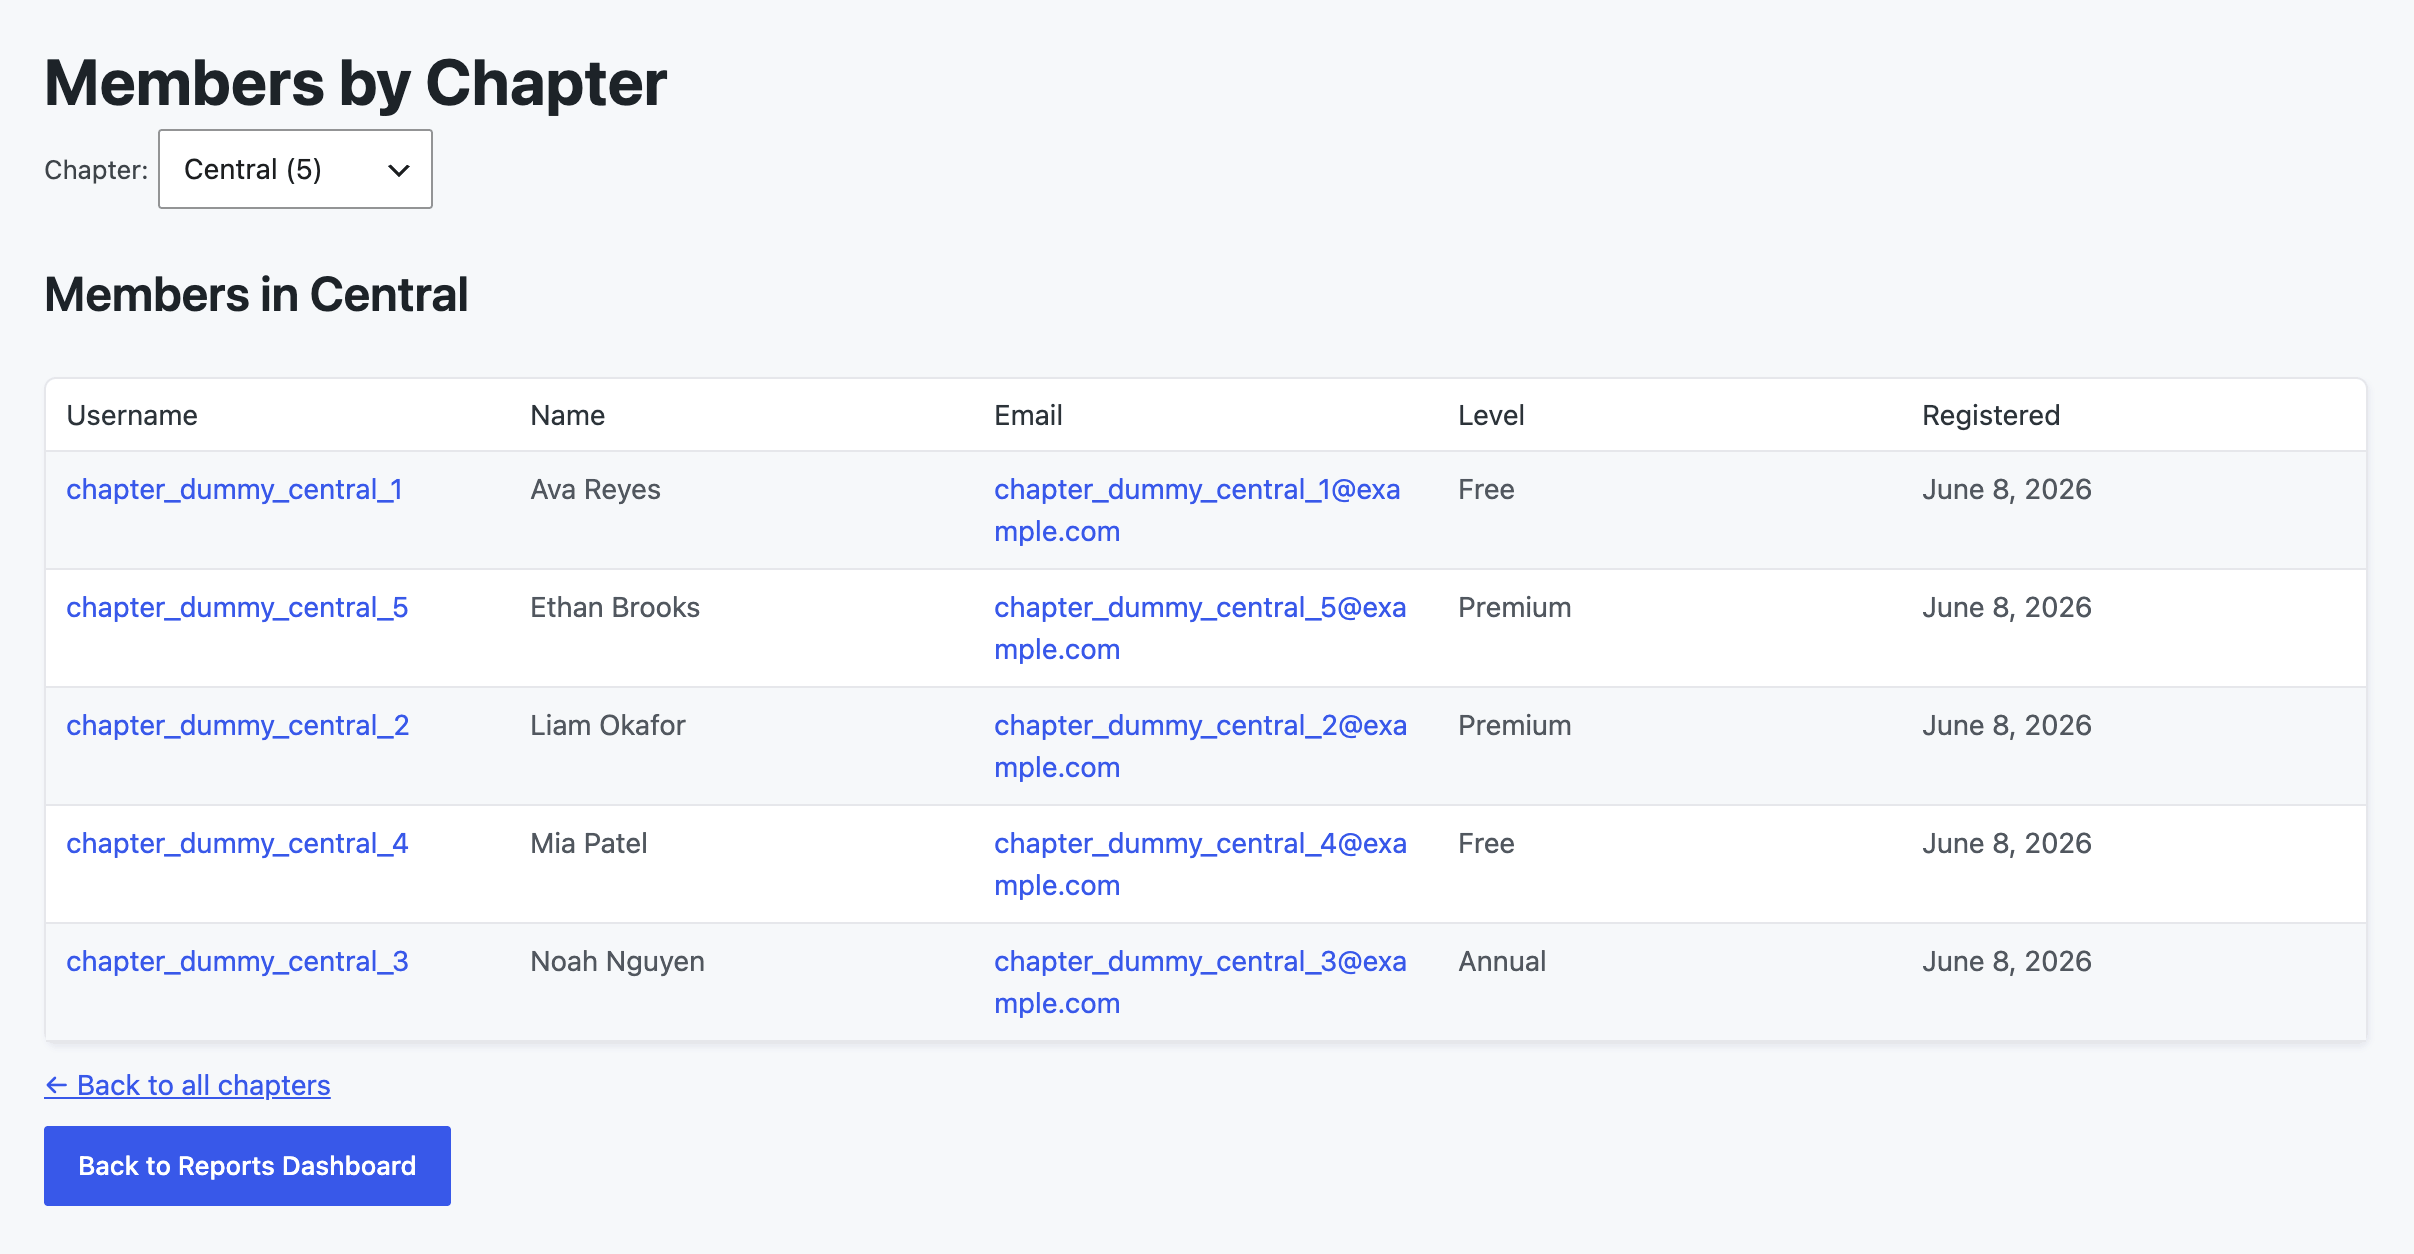
If chapters are a custom user taxonomy, scope a report instead. Build a Members by Chapter report, then pair it with a recipe that scopes the report to each leader’s chapters: it grants pmpro_reports, hides every other report, and limits the report’s queries to the chapter term (or terms) the leader belongs to. The leader opens Memberships > Reports and sees only their own chapter’s roster. Either path keeps a chapter president in their own lane, with no separate login and no separate site.
Code Recipe: Custom Report to Show Members by Chapter
Code Recipe: Give Chapter Leaders With Unique Capability Access to Custom Report of Members in Their Chapter
Per-Chapter Member Directories
The Member Directory and Profile Pages Add On does most of the work here. Configure one directory page per chapter (or one filtered directory) and you have a local roster for every chapter in the association.
The mechanics depend on your model:
- With levels per chapter, add the
[pmpro_member_directory levels="X"]shortcode to a directory page, replacing X with the chapter’s level ID from the Memberships > Settings > Levels screen. Create one directory page per chapter and restrict each page to the matching level, so members see only their own chapter’s roster. - With a custom user taxonomy, a single directory page with a chapter-term filter covers all chapters at once. Our guide on allowing users to filter results in your member directory covers the filtering pattern. If you want dedicated per-chapter pages instead, create individual directory pages and pre-filter each by term.
You can also control which profile fields show up based on the viewer’s level. Our guide on hiding or showing fields on member profiles based on membership level shows how to surface a president’s phone number to fellow officers while keeping it private from the general directory.
Surfacing Chapter on the Members List
This is the small change with the biggest day-to-day payoff for your admin staff. Add a “Chapter” column to the Members List in the WordPress admin so you can segment, sort, and filter by chapter without opening every record. Our code recipe to add a custom column to the Members List and Users admin pages shows how. Adjust it to show the chapter level name (levels approach) or the chapter taxonomy term (taxonomy approach).
The same column also helps when exporting your Members List for an email blast to one chapter or a printed roster for a regional meeting.
Choosing Your Starting Point
If you are planning a new association site, here is the short version of the advice we give people on calls. Notice that none of it starts with counting chapters.
- Start with how members relate to chapters. One chapter per member? Use a single-select chapter Level Group. Several chapters, or layered leadership roles? Allow multiple selections, and keep official positions as shared levels rather than per-chapter ones.
- Decide who maintains the site. If a non-developer manages it and is comfortable adding levels, stay on levels. If you would rather manage chapters as terms, or you need to query members by chapter in code, the taxonomy model is worth the PHP.
- Decide who administers each chapter. If local officers need backend access scoped to their own members, plan for the chapter-leadership capability on a single site, or separate sites if they need full control.
- Reach for separate sites only when chapters need real autonomy in branding, content, or billing, and budget for the operational support that comes with it.
There is no version of this where you “do it wrong.” Pick the model that fits how your chapters work and the team you have today. Membership levels are not a beginner’s choice you will outgrow. A custom user taxonomy is not over-engineering. Separate sites are not overkill. Each fits a different shape of association, and Paid Memberships Pro supports all of them.

Paid Memberships Pro is The Most Trusted Association Management Software
The right association management technology fits perfectly, so your time can be spent building relationships and serving members.
With robust free tools like Paid Memberships Pro, you can run your association as a very lean business, spending less than a few hundred dollars per year.
Frequently Asked Questions
Yes. With membership levels, put your chapter levels in a Level Group set to allow multiple selections, so a member can hold more than one chapter level. With a custom user taxonomy, assign multiple terms to the same user.
Create a “Chapter President” membership level in its own Level Group and assign it on top of the member’s chapter level, then restrict president-only content to that level. To let a president see only their own chapter’s members in the WordPress admin, give them Members List access through that level and add a filter that limits the list to their chapter. Both directions are covered in the building blocks section above.
Visit the Associations Hub for our full guide to building and managing an association website with Paid Memberships Pro. It links to learning materials, case studies, and the planning workbook.
There is no magic number. Membership levels scale further than most people expect once you organize them with Level Groups, so the decision is not really about count. Switch to a custom user taxonomy when you would rather manage chapters as terms than as levels, or when you need to query members by chapter in code. If adding a new chapter still feels like a quick task, you do not need to switch.
Wrapping Up
This guide covered the structural choices. There is a second layer of association questions we will cover in future posts: chapter-level renewal and retention reporting, custom admin roles so a president sees only their own roster, syncing chapter membership to your email platform, and the join-model question of “chapter as a membership” versus “join the parent organization and then assign a chapter.” If a chapter or employer needs to buy and assign memberships in bulk for its members, the Group Accounts Add On handles that today.
Ready to get started? The code in this guide is meant as a launch point. Your developer, or the AI coding assistant of your choice, can extend these recipes to fit your association. If you would rather hand it off, open a support ticket for guidance on the custom-code pieces, or visit the Associations Hub for additional planning resources and case studies.
Free Download: The AI-Powered Membership Site Blueprint
Download the free guide: Learn how to plan, build, and grow a membership site using AI as your strategic partner: from buyer persona to launch and beyond.


