If you run a WordPress website and you want to sell subscriptions to a paid newsletter, you’ll need the right set of tools to create and manage your newsletter content and notify your customers by email. For this workflow, we recommend using MailPoet and Paid Memberships Pro if you want maximum control over what content gets sent, who receives it, and when.
In this post, we will walk you through how to send a newsletter in WordPress by setting up a “post notification” email in MailPoet that works seamlessly with your content restrictions and member accounts in PMPro.
While everything in this guide is possible using the free MailPoet plugin, we’ve also included a section on the differences between MailPoet Free vs. Premium.
Video Tutorial: How to Send Newsletters in WordPress with MailPoet
Part 1: Set Up MailPoet and Paid Memberships Pro
1. Install MailPoet on Your Website
MailPoet is a free WordPress plugin that allows you to design newsletters right in the WordPress admin. With MailPoet, you can automatically email your members every time you publish a new blog post.
To install MailPoet from your WordPress dashboard:
- Go to Plugins and select Add New.
- Next, search for “MailPoet” and click Install.
- Once the plugin is finished installing, click Activate.
2. Install Paid Memberships Pro on Your Website
Paid Memberships Pro is the most complete membership plugin for WordPress, allowing you to restrict content, charge for access, and customize your memberships to the needs of your business.
If you haven’t already, be sure to install Paid Memberships Pro and complete the initial setup steps before proceeding.
3. Install the Paid Memberships Pro MailPoet Integration
Now, to use MailPoet with Paid Memberships Pro, you’ll also need to install our integration plugin. Follow the same process as before:
- Go to Plugins and select Add New.
- Next, search for “Paid Memberships Pro MailPoet” and click Install.
- Once the integration plugin is finished installing, click Activate.
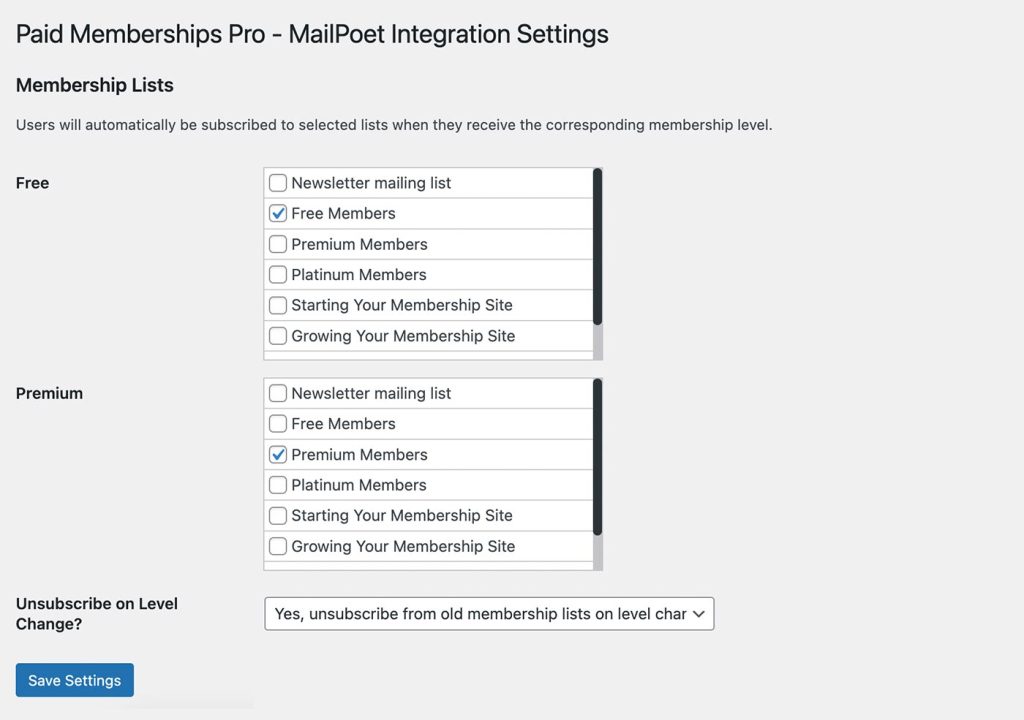
Install the MailPoet Integration for PMPro and configure the settings for membership levels and lists.
4. Segment Your MailPoet Audience with Lists
Once both plugins are installed and activated on your site, you’ll see MailPoet appear on your WordPress dashboard menu. Here, you’ll be able to segment your audience by setting up a mailing list for each of your membership levels.
For example, if you want to send a newsletter exclusively to your beginner subscribers, you can do that by setting up a list for your beginner level. You can also send a newsletter to multiple lists at once.
All of this is customizable within MailPoet.
To begin:
- Navigate to MailPoet, then Lists, then +New List.
- Create your ‘Beginner’ level list.
5. Assign Your PMPro Members to Your MailPoet Lists
Now, go back to Memberships > PMPro MailPoet. If you’re already using any of our other email integrations, this page will look familiar to you.
On this screen, you can assign your members to specific lists based on their membership level—even if they don’t have a membership level. You can also configure lists that site visitors can opt into.
For example, you could offer options for opting in or out of:
- A free newsletter
- An individual membership feature
- Certain types of content
Note: If you are setting this up on an existing membership site that already has members, see this guide on how to perform a one-time import of members to your MailPoet lists.
6. Test Your Signup & Checkout Process
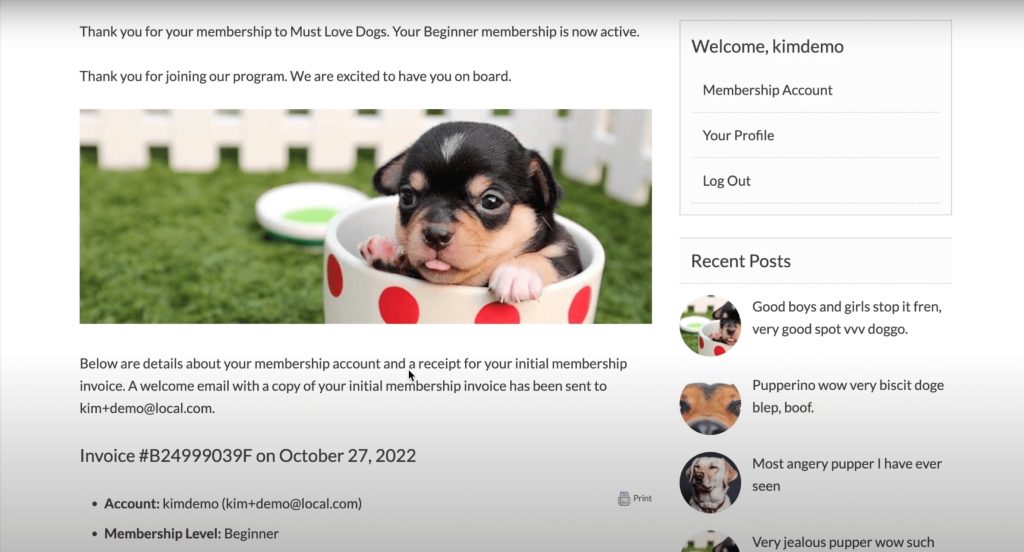
Once you have your beginner level list set up, you’ll want to test it to make sure that everything is working properly. You can do this by signing out of your site and signing up with a new account as a beginner member.
To check out as a beginner member, you can use demo checkout information. When the checkout is complete, you’ll see the membership confirmation page:
Since you completed a test payment, you should see your account as signed in when you go into MailPoet. Check to be sure your subscription is set up correctly, and note that there is an option in MailPoet to require a double opt-in if you want that.
With a paid membership level, you may or may not choose to have a double opt-in for email subscriptions. However, if the main purpose of your membership is receiving this newsletter, it’s very important to confirm that:
- The person definitely wants to receive this newsletter
- Their email address is the correct one to send it to
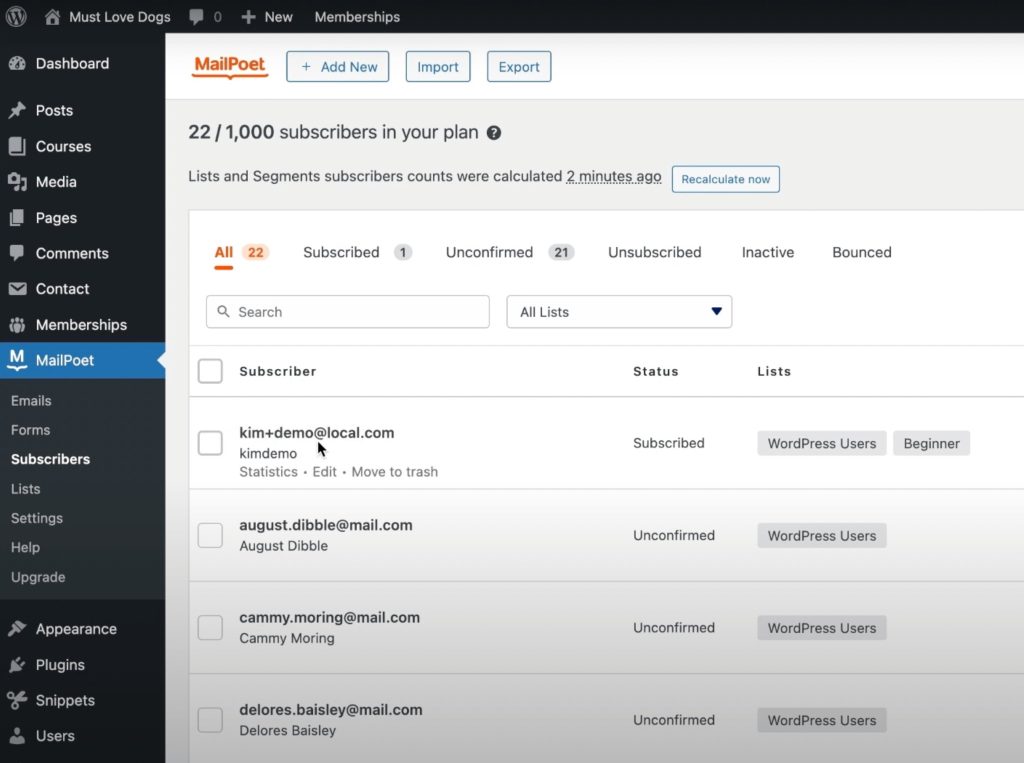
You can always make changes to accounts that join your lists in MailPoet. To do this, first log into your site as an Admin.
Next, go to your lists in MailPoet. There will be a default list of all registered users of your site called “WordPress Users,” but you’ll want to look at the beginner list that the user in question just subscribed to.
Confirm that the user you created is now showing a ‘Subscribed’ member on the list:
Part 2: Set Up Post Notification Emails in MailPoet
So, you’ve set up MailPoet, you have your subscriber list configured, and a new user has registered. Now you need to create a paid newsletter on your membership site and deliver that newsletter to the subscriber.
MailPoet makes it easy to automatically email your members every time you publish a new blog post or on a specific schedule you set. Let’s talk about how to set it up so that every time you publish something to your WordPress membership site, it gets automatically sent to the subscribers through Mail Poet.
By default, MailPoet emails are sent through your WordPress site, but this isn’t always reliable. Since newsletter emails have additional requirements than transactional emails (bounces and unsubscribes, for example), it’s wise to use an email service with newsletters in general.
Fortunately, MailPoet also offers their own native email sending feature that’s less expensive than some hosted services like Kit or MailChimp. This is a good option if you want to offload that responsibility, have a better deliverability rate, and benefit from some reporting as well.
1. Choose Your Post Notification Email Settings
To set up your automatic newsletter, navigate to MailPoet > Emails and click Setup for the Latest Post Notifications. You’ll want to decide who will receive it, when, and at what frequency (weekly or monthly, for example).
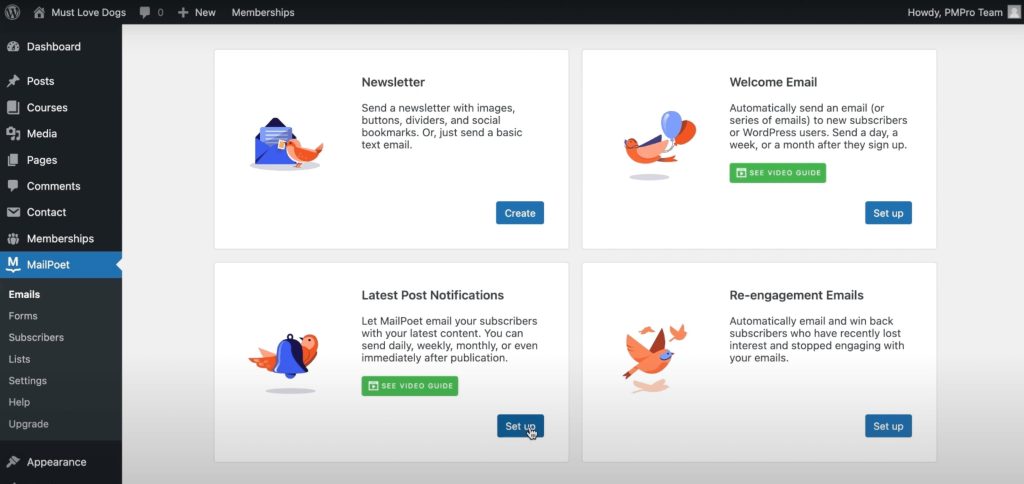
I’ve selected “Immediately” to better show how the process works. Now, the email is set to go out immediately after a post in our desired category is published.
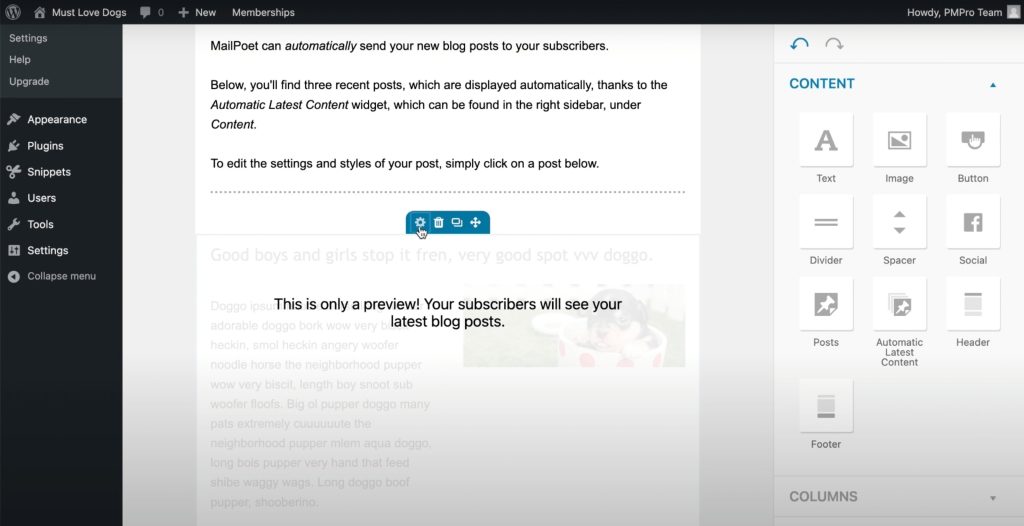
2. Design Your Email Layout
MailPoet has a bunch of predesigned layouts that you can customize. Simply select the layout you want and it will be automatically populated with a preview of the content that your subscribers will see—in this case, your latest blog posts.
You can change the layout, graphic elements, and the content you want to be included in the email. Click the settings icon (⚙️) to make changes, including specifying how many posts you want to include.
A common choice for a paid newsletter business, is to send an email every time a new blog post is published
Because many of our paid newsletter customers at PMPro are offering things like daily stock tips, daily affirmations, and news updates, they want their emails delivered to their members as soon as possible.
You can choose what works best for you.
A Quick Word About Newsletter Engagement
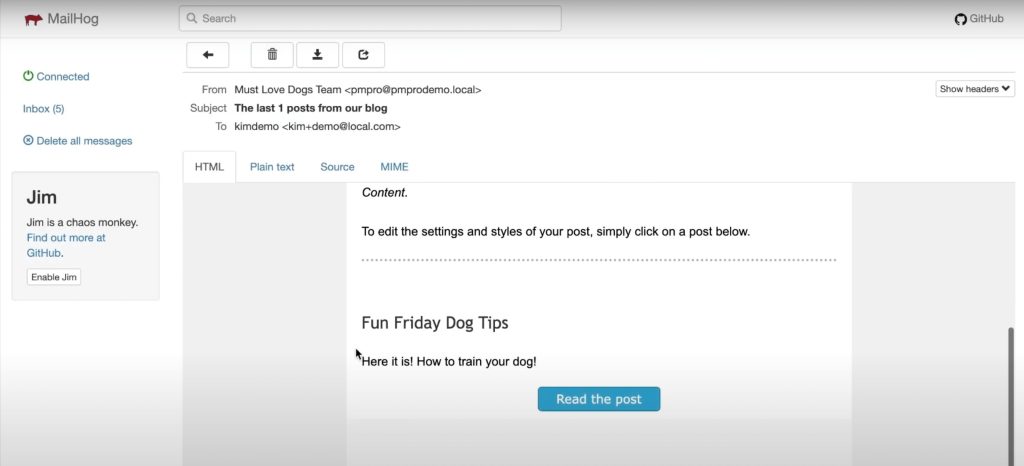
In the example below, you’ll see that the email only shows an excerpt from the post, so the subscriber has to go back to the site to read the full post. This is a great way to boost your engagement, click-through rate, and the deliverability of your emails.
However, it’s common for paid newsletters to include the full content of a blog post. The only problem with this is that it’s harder to monitor engagement. This is because open rate has become a fairly unreliable statistic for email.
To explain: Some email programs even pre-open emails or prevent the open rate from being tracked—or, they might give you data, but it doesn’t represent how people are actually engaging with your content. So, if you link subscribers back to your membership site in order to read the full piece of content, you’ll be able to find out more about what’s resonating with them.
Remember: If you only provide an excerpt in your email, you’ll have to make sure it’s compelling if you want to get people to click through to your site.
Want extra engagement? Consider offering a comment section for members only. This gives subscribers a place to interact further with your content and each other.
3. Limit by Post Category
MailPoet allows you to limit by a category of posts, so you can easily send automatic emails based on a category of posts that you’ve restricted to members only.
For example, you might have a “Premium” category that’s restricted to users at a specific membership level. In this case, you can set up post notification emails to go out any time a new post gets published in the “Premium” category.
4. Personalize Your Emails
MailPoet also allows you to personalize your emails by using shortcodes either in the subject line, the body of the email, or both. For example, you could make the subject line of your email the same as the title of a blog post, or include the subscriber’s name in the subject line and/or body.
5. Choose the Email Addresses for Sending and Replying
Once your newsletter is ready to go, first designate the email address that you want your email to come from (Sender). Then, designate the email address that you want your subscribers to be able to reply to (Reply-to).

So let’s say you wrote a large blog post and you’re ready to publish it. Under Lists, simply select the category for the post that corresponds to the correct post notification email (newsletter).
Once you publish your post, the email will be automatically sent to the audience you designated.
Comparing MailPoet Plans: Free vs. Premium
All of the instructions and opportunities in this guide are possible using the MailPoet plugin available via WordPress.org. The plugin offers both free and premium versions, each catering to different needs and requirements. Below, we’ll outline the key features and differences between MailPoet Free vs. Premium.
Features of MailPoet’s Free Plan
- Basic Newsletter Creation: The free version allows users to create and send newsletters to a limited number of subscribers. You can design newsletters using a drag-and-drop editor, incorporating images, text, and social media links.
- Subscription Forms: MailPoet Free offers basic subscription form creation, allowing you to add sign-up forms to your website and collect email addresses from visitors.
- Automation: With the free version, you can set up basic automatic welcome emails to be sent to new subscribers as well as new post notification emails.
- Standard Email Templates: MailPoet Free provides access to a selection of pre-designed email templates that can be customized to suit your brand.
- Subscriber Management: You can manage a limited number of subscribers and create basic segments to target specific groups within your audience.
- Delivery and Sending: The free version utilizes the MailPoet sending service, which may have sending limits, and the delivery speed may vary based on the number of subscribers.
- Support: MailPoet Free users have access to community support through WordPress forums and documentation.
Features of MailPoet’s Premium Plans
- Detailed Email Engagement and Commerce Analytics: Gain valuable insights into how your subscribers interact with your emails. Track important metrics like open rates, click-through rates, and unsubscribe statistics. Additionally, for WooCommerce users, you can access data on how your email campaigns drive purchasing behavior, including total revenue, number of orders, and products purchased.
- Google Analytics Integration: Seamlessly associate website visits with your email marketing campaigns through Google Analytics. This integration allows you to monitor the effectiveness of your email campaigns in driving traffic to your website and track user behavior beyond email interactions.
- Property and Behavior-Based Subscriber Segmentation: Take your targeting to the next level with advanced subscriber segmentation. You can create segments based on various subscriber properties and behaviors. For example, you can target subscribers who haven’t engaged with your newsletters recently or focus on customers from specific countries who haven’t made recent purchases. This level of granularity enables you to send highly targeted and relevant content to different segments of your audience, increasing the effectiveness of your email marketing campaigns.
- Remove MailPoet Branding: One final feature of the MailPoet premium plans is that you can remove all MailPoet branding from your emails and newsletters.
When comparing MailPoet Free vs. Premium, know that the free Starter plan is a great tool for any site that require basic newsletter functionality.
However, upgrading to MailPoet Premium is a worthy investment to enhance your email marketing efforts and connect more effectively with your audience. The plugin is still significantly less expensive than a third party email marketing platform. Consider your specific needs and budget when deciding whether MailPoet Free vs. Premium is best suited for your WordPress site.
What Are You Waiting For?
Running a membership site in combination with a paid newsletter is a particularly effective way to increase your revenue and boost engagement around your content. Plus, it’s simple to do when you use WordPress to create your content, Paid Memberships Pro to restrict it, and MailPoet to send your emails.
Adding a newsletter to your existing membership site? Is a newsletter is the primary thing you want to sell? PMPro has all the tools to help you earn a reliable income without breaking the bank.
We always say, “Own the land your business is built on,” and with paid newsletters this could not be more relevant. With robust free tools like WordPress and PMPro, you can run your paid newsletter on a site you fully own and manage.
We know that a WordPress site has tons of moving parts. Choosing the right plugins, themes, hosting, third party services, design assets, and more can feel overwhelming.
Paid Memberships Pro is the most robust membership plugin to sell paid newsletters. Learn exactly what you’ll get — the plugins, the support, and the training — when you sell paid newsletters on WordPress.
Free Download: The AI-Powered Membership Site Blueprint
Download the free guide: Learn how to plan, build, and grow a membership site using AI as your strategic partner: from buyer persona to launch and beyond.


