Want to hear from your audience? A contact form is an essential element of any website that allows users to easily connect with the website owner or business. In this guide, we’ll go over how to create a contact form on your WordPress site without needing any code.
Your contact form gives users a chance to offer feedback and, as the admin, gives you a chance to interact with your subscribers. If your WordPress site offers membership perks, then contact forms are even more of a must-have.
Let’s explore why contact forms are so important and how to create one with no code.
Table of contents
- Which WordPress Form Plugin Should I Use?
- Key Features of a WordPress Forms Plugin
- How To Add a Contact Form to WordPress With Ninja Forms
- How to Prevent Contact Form Spam
- How To Configure Form Confirmations and Notifications
- How to Add the Contact Form to a WordPress Page or Post
- Contact Forms and Membership Sites
Which WordPress Form Plugin Should I Use?
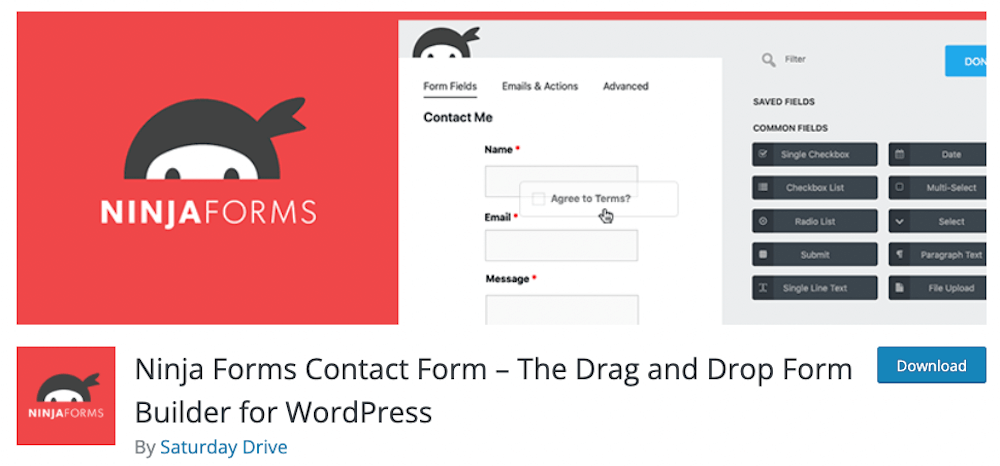
First, you’ll need to choose a plugin to use for your contact form. There are several options available, but we recommend using Ninja Forms. It’s a drag-and-drop form builder that allows you to easily create and customize your own contact forms.
Ninja Forms offers a very robust and totally free core plugin you can download from the WordPress.org plugin repository. We love the simple and intuitive form builder that makes it easy to create forms visually. But don’t let that simplicity fool you. Ninja Forms offers loads of form types and advanced customizations, too.
Key Features of a WordPress Forms Plugin
When considering which form plugin to use, here are a few important features that a membership site must look for:
- Forms can be easily embedded into your posts, pages, or widget areas using your preferred page builder or the WordPress Block Editor.
- You can pre-fill form fields with logged in user data. This helps streamline form submission for your logged in members. Bonus points if you can extend the form data to include the user’s membership level. This feature helps you route important form submissions to the right person in your team, for example, if you have a premium membership tier that gets expedited response times.
- Does the forms plugin offer additional extensions to integrate through platforms like Zapier? For our own team here at Paid Memberships Pro, we use custom forms in our internal team site to automate data sent to Google Sheets and Trello.
While we’ll use Ninja Forms in this example, these same steps will work with other forms plugins, too. Most contact form plugins for WordPress have a similar process for building forms and setting up confirmation emails.
Now let’s show you how you can use Ninja Forms to set up a “Contact” page on your WordPress site.
How To Add a Contact Form to WordPress With Ninja Forms
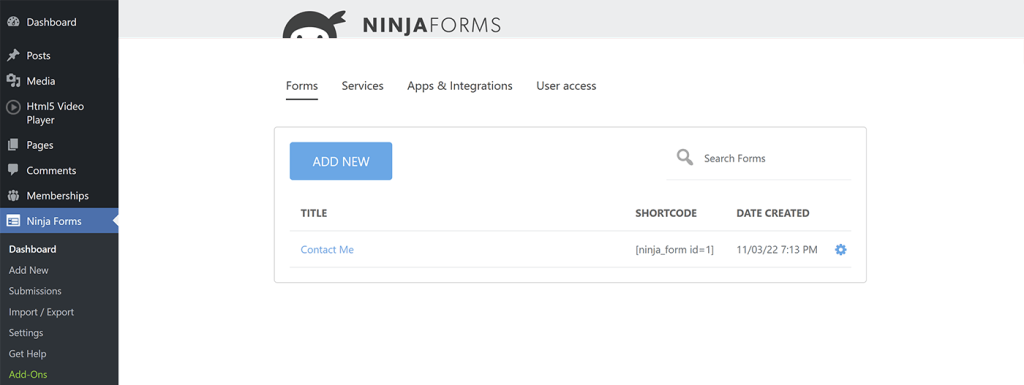
- First, install and activate Ninja Forms on your WordPress site. You can find it under your Plugins > Add New screen by searching for Ninja Forms. When you find it, click “Install” and then “Activate.”
- Once you’ve installed and activated Ninja Forms on your WordPress site, you can design how your form will look. Go to the Ninja Forms settings and click the “Add New” button to create your form with the form builder. You can use the “Contact Us” template or create your own form.
- In the Form Builder, click the “+” circle in the lower right-hand corner to bring up the list of available fields. From the list, select a field then drag and drop it onto your form.
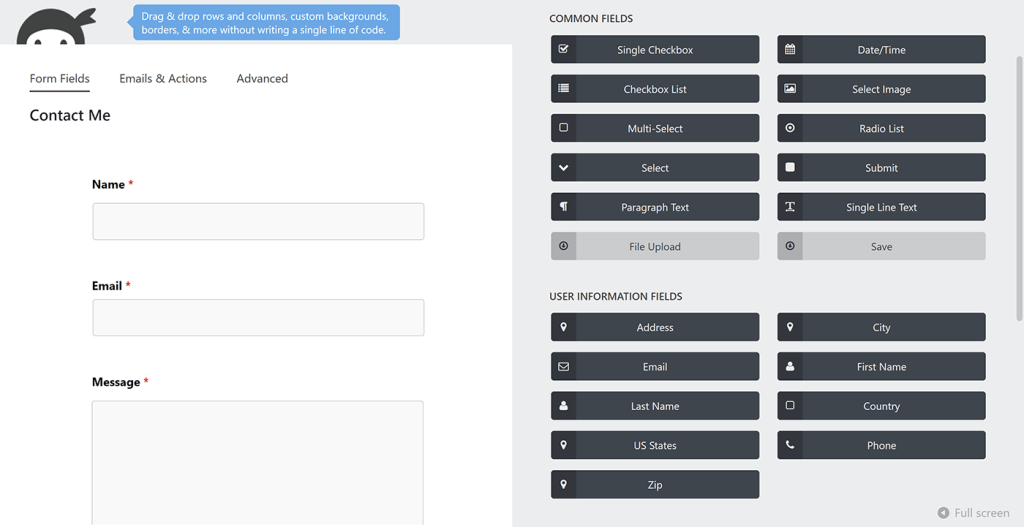
- Every contact form needs to include essential fields such as name and email. You may also choose to add other fields such as location or open-ended questions for users to introduce themselves.
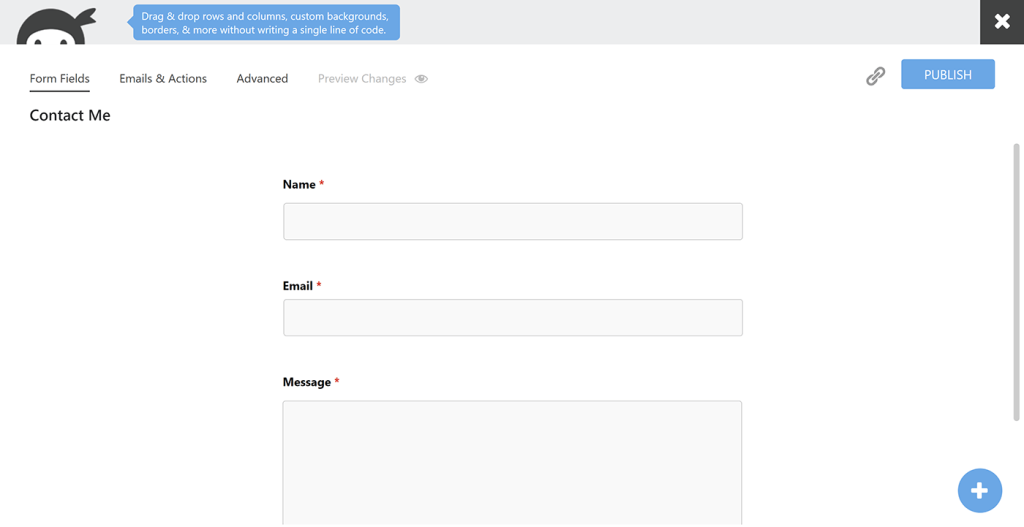
- For more advanced forms, consider customizing the form’s appearance by using the “Styles” tab on the form builder. This allows you to change the font, colors, and other design elements of your form to match your website’s branding.
How to Prevent Contact Form Spam
To prevent spam submissions, Ninja Forms also supports form protection through a few methods.
- A “honeypot” field on your form. This is a hidden field that bots will fill out, but legitimate users will not see or interact with. When the honeypot field is filled out, Ninja Forms will automatically block and discard the submission.
- Insert the reCAPTCHA field. Configure Google reCAPTCHA to automatically detect and block suspicious form submissions. To enable reCAPTCHA in Ninja Forms, you’ll need to first create your Google reCAPTCHA account and obtain keys for your site. Then, navigate to Ninja Forms > Settings > Advanced Settings screen in the WordPress admin to connect to reCAPTCHA.
- Use a custom “Anti-Spam” field. For this field option, add a challenge question to your form that only a human—not a bot—could successfully complete. It’s best to use a question that can be validated by the form, like a simple math problem.
Check out Ninja Form’s complete guide on preventing form spam in this companion guide.
How To Configure Form Confirmations and Notifications
When someone fills out a contact form, you decide where you view it. Ninja Forms collects completed forms in the “Submissions” page under their tab on your WordPress dashboard, but you can also get an emailed copy. By default, Ninja Forms notifies you and the submitter via email every time a form is submitted.
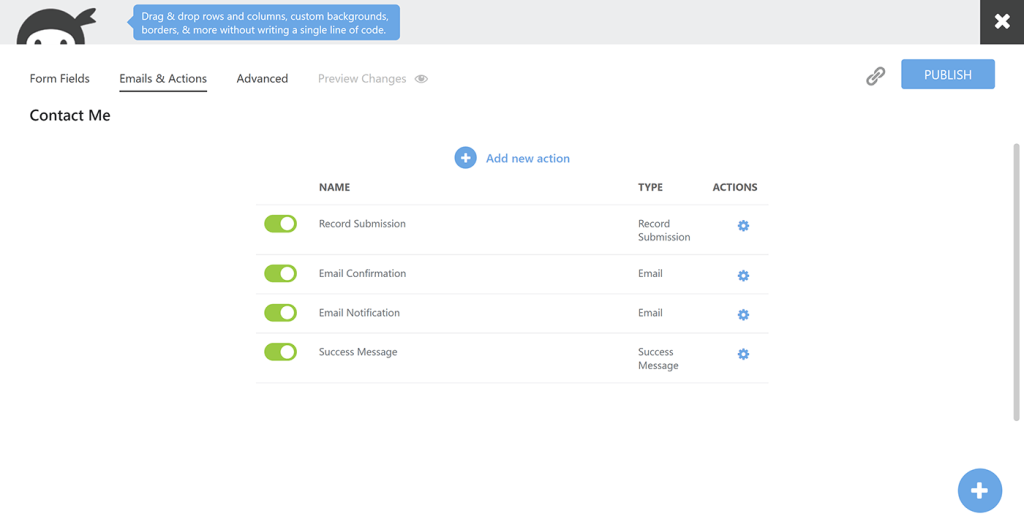
You may easily customize the notification and confirmation settings in the “Emails & Actions” tab on the Form Builder. From there, you should see four switches for enabling or disabling actions taken with a completed form.
- “Record Submission” stores each form in your Ninja Forms dashboard, allowing you to select certain fields to include or exclude as you wish.
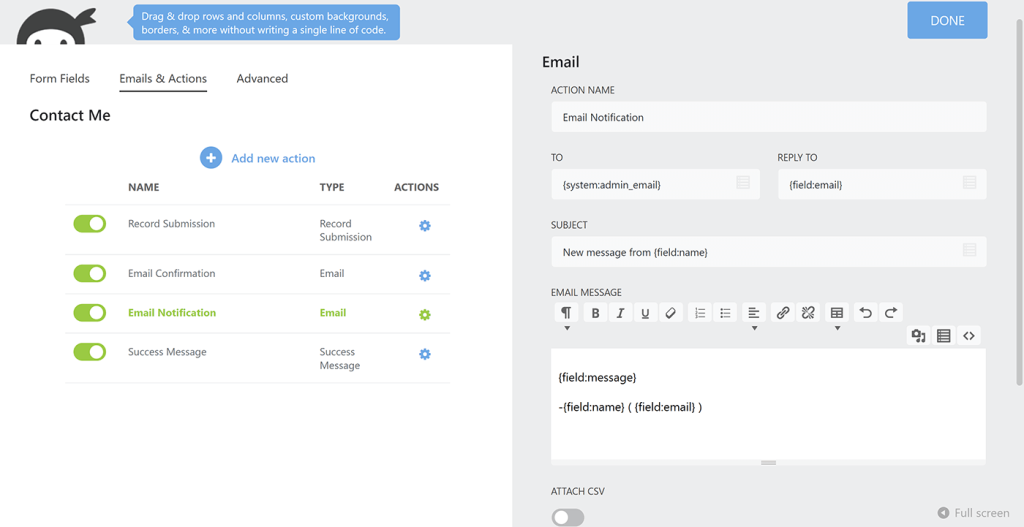
- “Email Confirmation” is the email the user receives to confirm that their submission went through. This is a good opportunity to provide them with an email address for your site as well as a personalized “Thank You” message.
- The “Email Notification” delivers a copy of the completed form to you. By default, Ninja Forms sets it to the email of your WordPress site admin, though you can enter a different address. This is the fastest way to see new forms as soon as they’re submitted.
- “Success Message” is your site’s confirmation that your user sees upon submitting their form. This is usually a simple “Thank You” message, but you might include an invitation to check out other features on your site.
These settings can be customized through the “Emails & Actions” tab in the Form Builder for each form at any time. You can also use the “Add new action” button for additional prompts such as donations or file requests. If you are using any Ninja Forms extensions, there may be additional actions available on your form.
How to Add the Contact Form to a WordPress Page or Post
Once you’ve customized and configured your contact form, you can add it to your WordPress site in a few ways. Here’s how to insert the contact form on a new page.
- If you haven’t done so already, create a new page on your WordPress site to act as your “Contact Us” page.
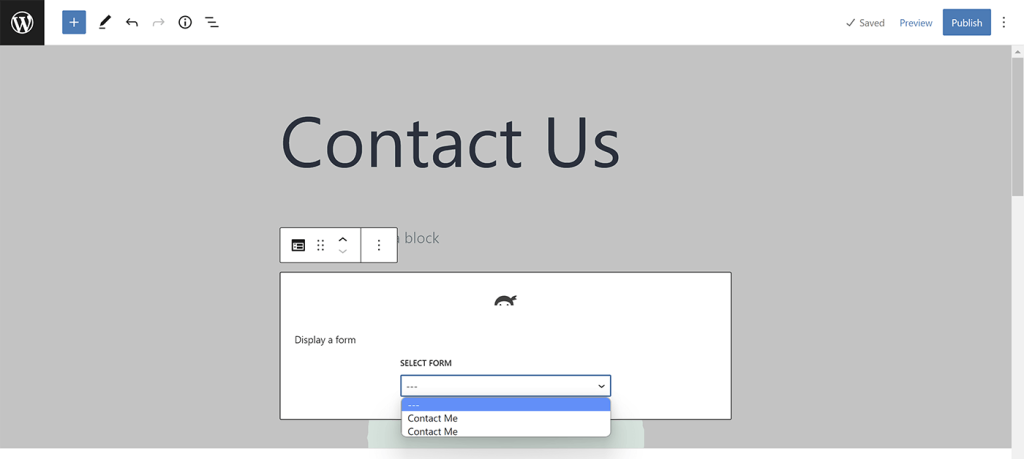
- For this demo, we use the WordPress Block Editor to insert our Ninja Form in the post content.
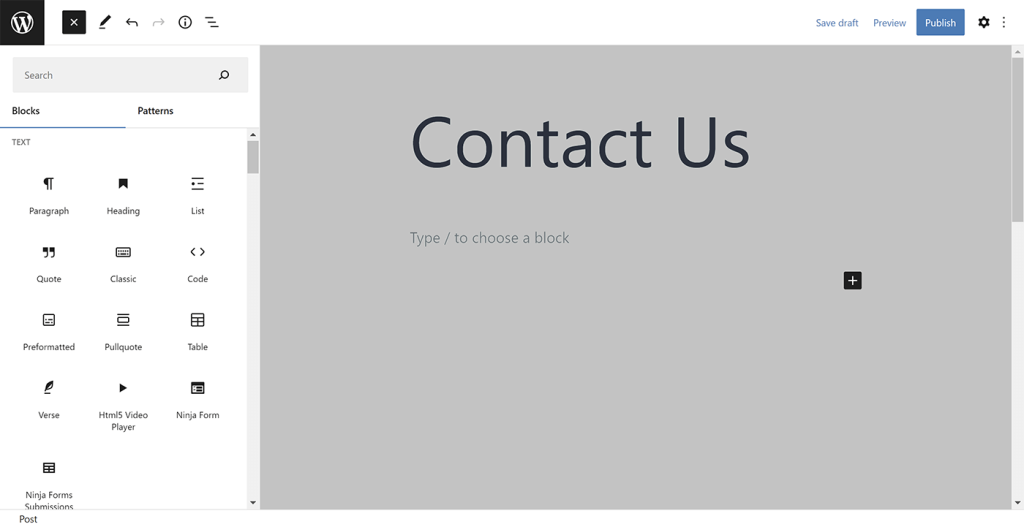
- In the WordPress Block Editor, select the Ninja Forms block to add to your page. Use the drop-down list to select your form and it will be added to your page.
- With the page published, your contact form is now ready to use!
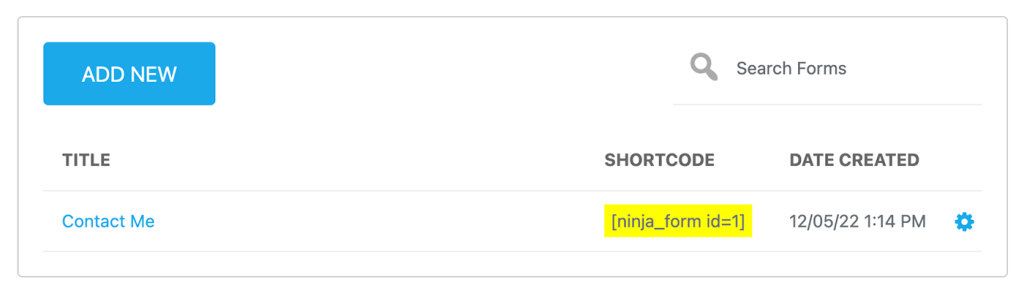
If you’re using another builder, you can insert the form using the shortcode provided by Ninja Forms. Just navigate to Ninja Forms > Forms to see your list of available forms and the corresponding shortcode. You can add a form’s shortcode to any post or page on your site, or use a widget to display the form in a sidebar or footer.
Contact Forms and Membership Sites
Creating a contact form on your WordPress site is an essential element for allowing users to connect with you. By using a plugin like Ninja Forms, you can easily create and customize your own contact form without needing any code.
But membership sites can take advantage of even more ways to improve the member experience with forms.
One common method we see is a contact form visible only to paying members. To do this, check out this guide for restricting content with Paid Memberships Pro. Most people chose to protect their forms by adding them to members-only pages or by placing the form within the Membership Required block.
If you’d like to see the user’s membership level included in the contact form, check out our code recipe that adds a hidden “Membership Level” field to your contact forms.
Remember that your forms plugin isn’t just for contact forms. Here are a few other articles to get you started with forms in your WordPress membership site:
- Adjust the membership cancellation process with your custom cancel request form.
- Add a custom form to help members communicate with one another from their public member profile page.
Lastly, check out our information on adding custom user profile fields to your membership site. This guide shows you how to create forms that capture additional information about your members, both on the checkout page as well as through their member profiles.
Free Download: The AI-Powered Membership Site Blueprint
Download the free guide: Learn how to plan, build, and grow a membership site using AI as your strategic partner: from buyer persona to launch and beyond.


