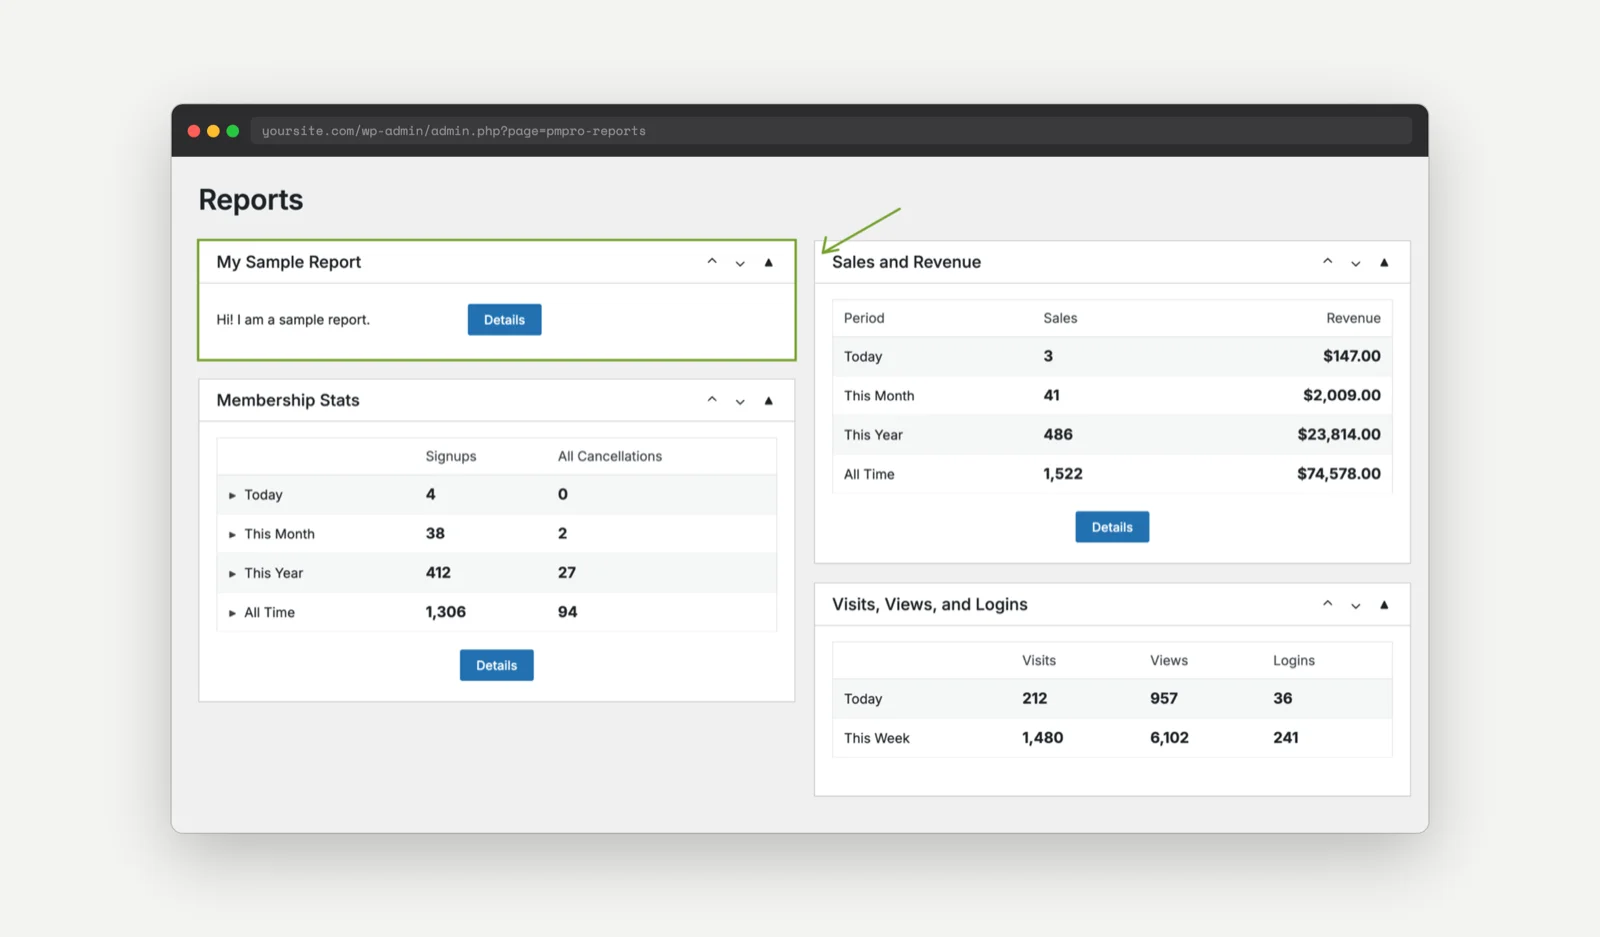
Paid Memberships Pro includes five reports on the Memberships > Reports screen of the WordPress admin: Sales and Revenue, Membership Stats, Active Members Per Level, Visits, Views, and Logins, and the Email Log (shown when email logging is enabled).
Our core reports cover the numbers most membership sites watch, but they do not know about the unique reporting needs for your specific site.
This code recipe adds your own report to that same screen. It registers the report, places a summary widget on the Reports dashboard, and gives the widget a “Details” button that opens a full report page. Your custom report, like this one that shows membership order refund rate, sits alongside the built-in reports and works the same way.
Do You Need This Recipe?
This recipe is useful if:
- You track something PMPro does not report on by default, such as refund rate, level changes, or a custom field your members fill in at checkout.
- You want that number in the same place your team already checks the built-in reports, instead of a separate plugin or a spreadsheet.
- You have a PMPro Max plan that includes access to our “Do It For Me” service or you’re a developer comfortable with PHP who can write the query and output once the report structure is in place.
If you only need to look up member data occasionally, the filters on the Memberships > Members screen or an export may be enough.
Best Practices and Considerations
- Who can see reports: The Reports screen is limited to users with the
pmpro_reportscapability. Administrators have it by default. Anything you output in a custom report is visible to every user with that capability, so treat it like the rest of the admin. - Keep the widget light: The summary widget renders on the Reports dashboard along with every other widget, every time the page loads. Put quick counts in the widget and save heavy queries, charts, and long tables for the detail page.
- Use a unique slug: The slug you register becomes part of two function names and the report URL. Avoid slugs already used by core:
sales,memberships,members_per_level,login, andemail_log. - This recipe is a starting point: The sample report prints placeholder text. A developer needs to add the query and formatting for the data you want to show.
About the Code Recipe
The recipe does three things.
- Registers the report. PMPro builds its list of reports with the
pmpro_registered_reportsfilter, which runs oninit. The recipe hooks that filter and adds one entry: a slug (sample) and a title (“My Sample Report”). The title becomes the heading of the widget on the Reports dashboard. - Renders the summary widget. When the Reports dashboard loads, PMPro looks for a function named
pmpro_report_{slug}_widget()for each registered report and calls it to fill the widget. In this recipe that ispmpro_report_sample_widget(). The widget shows a short line of text and, if a detail page function exists, a “Details” button. - Renders the detail page. Clicking “Details” loads
admin.php?page=pmpro-reports&report=sample. PMPro looks forpmpro_report_{slug}_page(), herepmpro_report_sample_page(), and calls it to render the full report. The detail page also gets a row of links to switch between reports and a “Back to Reports Dashboard” button, both provided by core.
The two render functions must use the pmpro_report_ prefix and your slug exactly. Core finds them by name, so a differently named function will not be picked up.
The Code Recipe
Adding the Recipe to Your Website
You can add this recipe to your site by creating a custom plugin or using the Code Snippets plugin available for free in the WordPress repository. Read this companion article for step-by-step directions on either method.
PMPro also loads report files from your active theme. Save the snippet as a .php file in a paid-memberships-pro/reports/ folder inside your child theme, and PMPro includes it automatically. This keeps each report in its own file without a plugin. Use a child theme so a theme update does not remove the folder.
How to Customize This Code Recipe
Change the slug (line 29): Replace sample with a short, lowercase slug for your report, such as refunds or level_changes. Then rename both render functions to match: pmpro_report_refunds_widget() and pmpro_report_refunds_page(). Update the function_exists() check on line 42 and the report= value in the URL on line 44 to the same slug.
Change the report title (line 29): Replace “My Sample Report” with the name you want on the widget heading and in the report switcher links.
Fill in the widget (lines 40 to 47): Replace the placeholder paragraph with your headline number or a short summary. Keep the pmpro_report-holder div and the “Details” button so the widget matches the built-in reports.
Fill in the detail page (lines 57 to 58): Replace the heading text and the placeholder paragraph with your full report. The core reports use a <table class="widefat fixed striped"> for tabular data and a pmpro_chart_area div for charts if you want to match their look.
Add more than one report: Duplicate the three functions for each additional report. Each needs its own slug in the register function and its own pair of render functions named after that slug.
Query the data: For an example of pulling member data into a report, see Query Active Members by User Meta Field. For a complete report built on this same structure, see Build a Lead Scoring CRM Report Inside Paid Memberships Pro.
Video: Coding with Sam Walkthrough
Sam walks through adding a custom report step by step in this video: Coding with Sam: Add a Custom Report to PMPro.

Get Support From Our Team of Experts
Have a question about how to use this feature? Our Support Page outlines three ways to get support.
Our Max plans include hands-on help customizing your membership site and implementing new features. Upgrade to PMPro Max now »