After you activate the Add On, assign an Access Restricted page, decide what users without a membership level can do in your community, and choose how new users register. This page walks through each section of the PMPro BuddyPress settings screen.
Before You Begin
This Add On requires Paid Memberships Pro and one of these community plugins, installed and active:
- BuddyPress
- BuddyBoss Platform. Read Use the Add On With BuddyBoss Platform for the differences.
Enable the community components you plan to offer (such as User Groups, Private Messaging, and Friend Connections) in your community plugin’s settings before you configure this Add On.
Open the Settings Screen
Navigate to Memberships > PMPro BuddyPress in the WordPress admin. You can also click the Settings link for the Add On on the Plugins screen. Settings are grouped into five sections. Click a section heading to expand it.
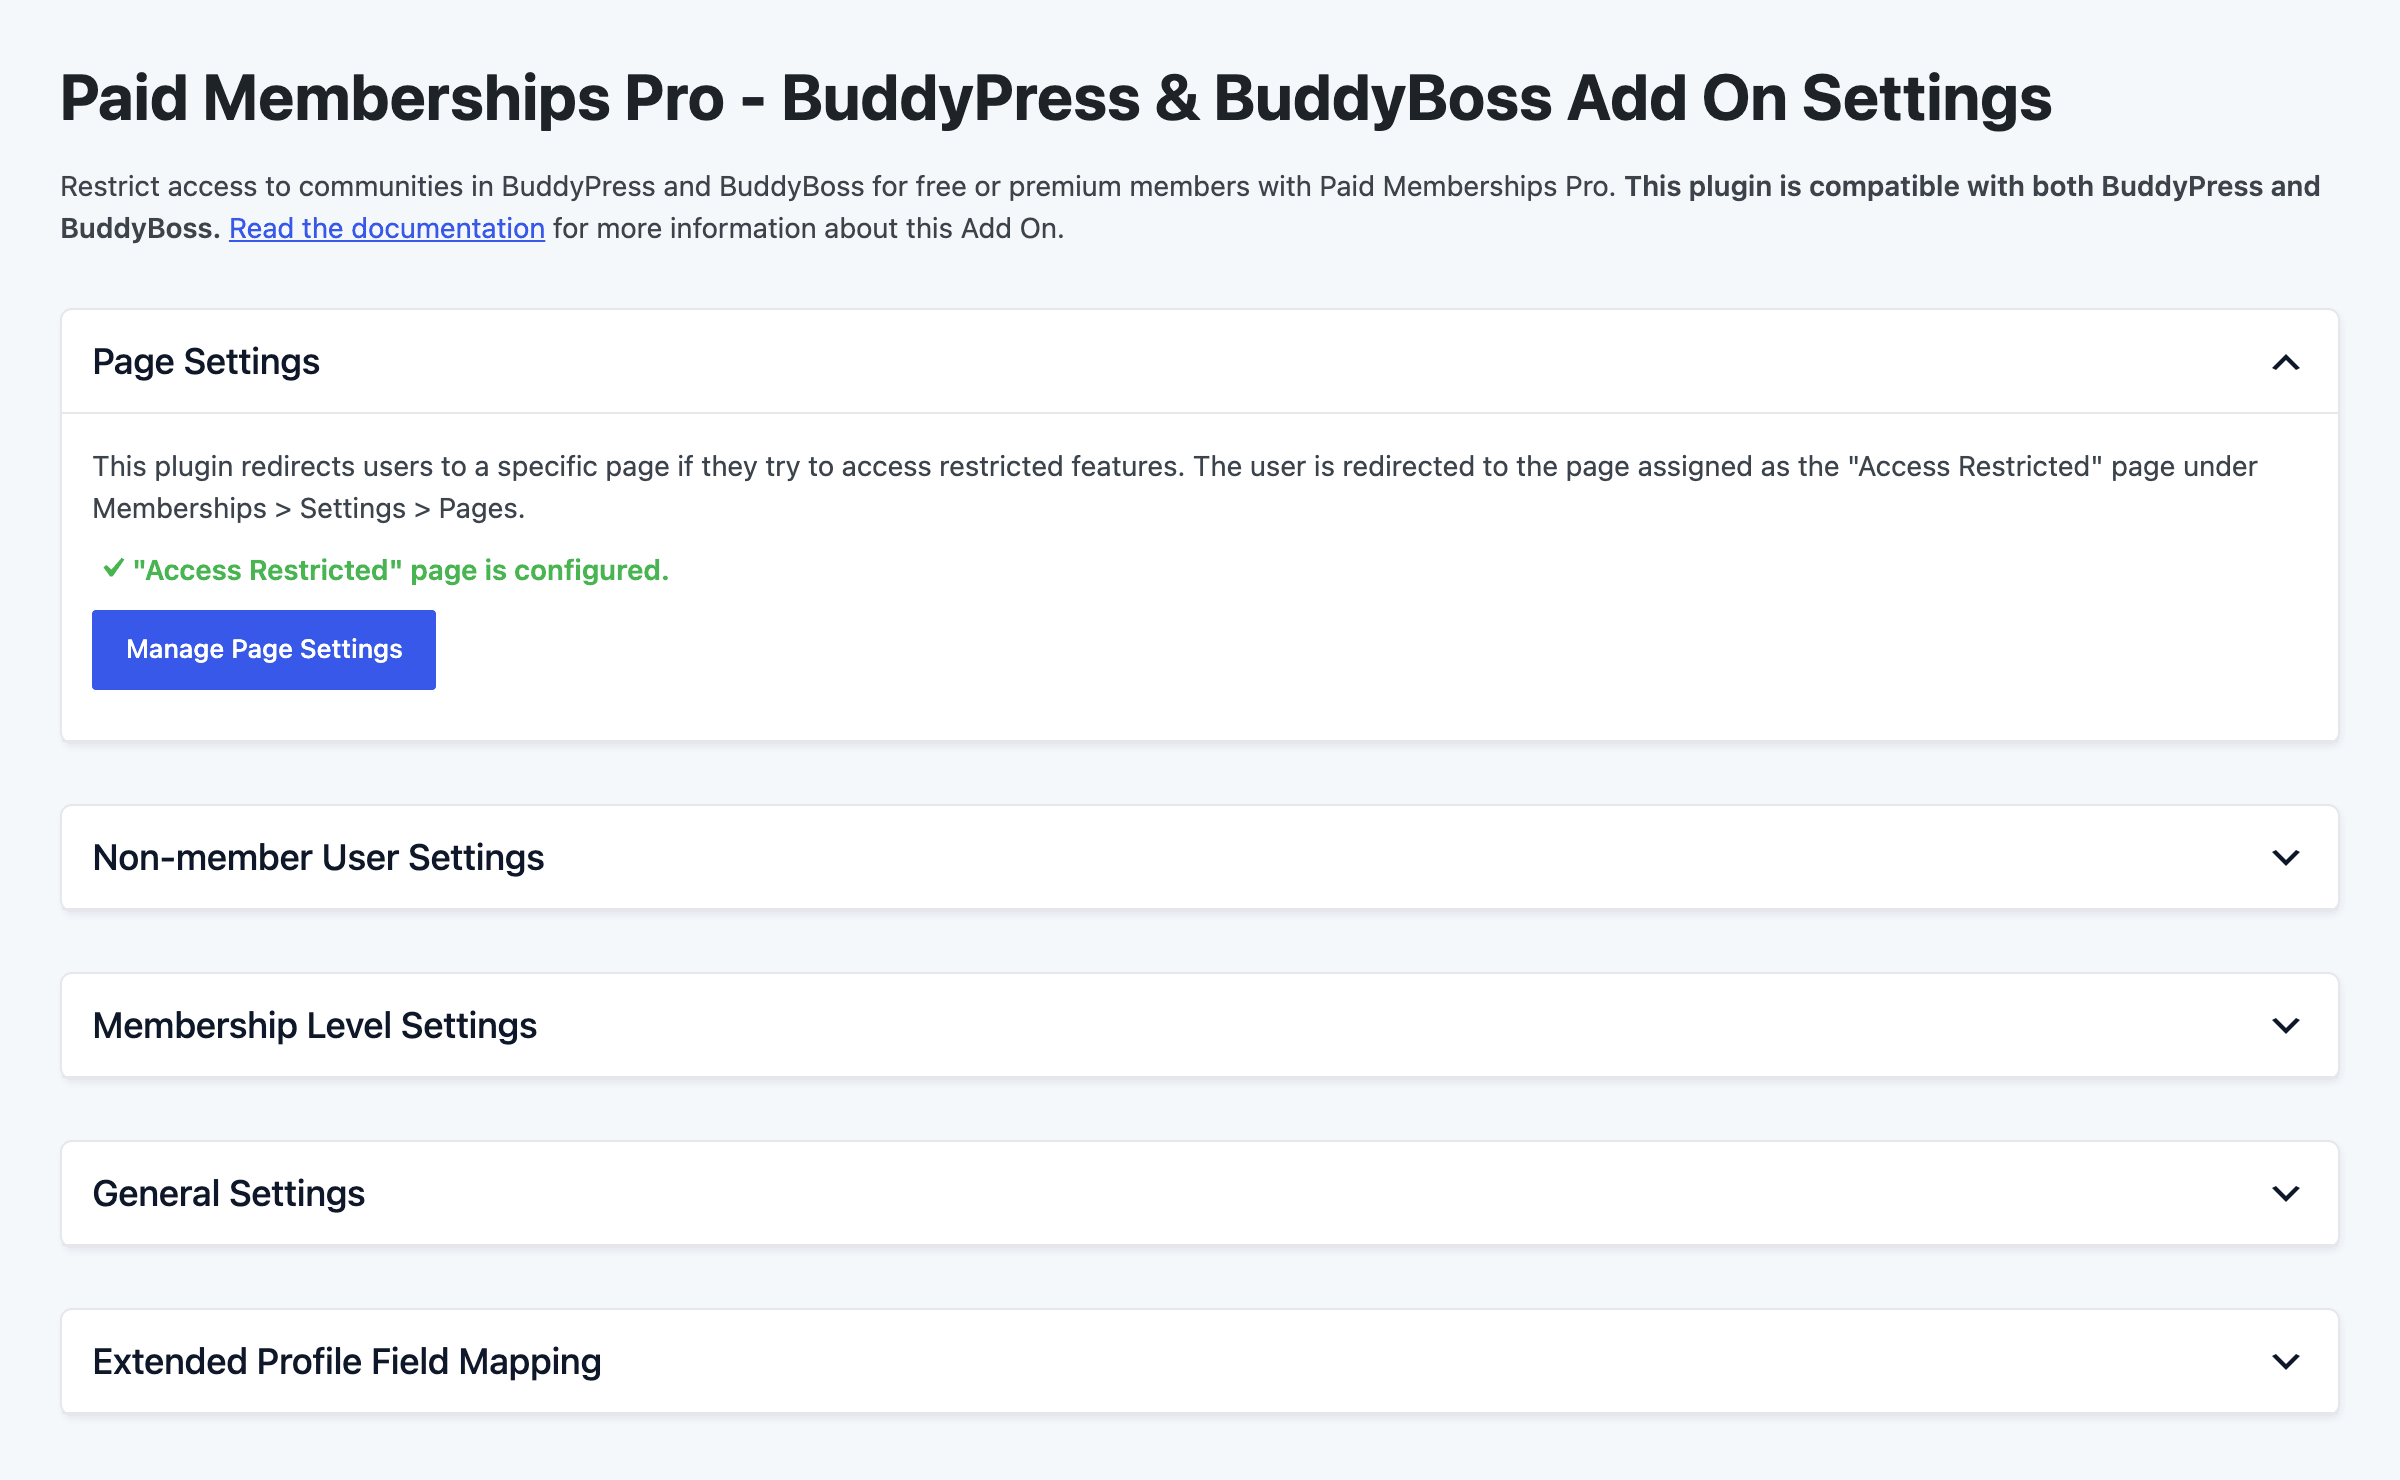
Every section shares one Save All Settings button, so changes you make in one section are saved together with the others.
Assign the Access Restricted Page
When a user tries to open a community feature they don’t have access to, the Add On redirects them to your Access Restricted page. The Page Settings section shows whether this page is configured and links to the screen where you set it.
- Navigate to Memberships > Settings > Pages, or click Manage Page Settings on the PMPro BuddyPress settings screen.
- In the Additional Page Settings section, select an existing page for Access Restricted or click Generate Page to create one.
- If you choose an existing page, add the
[pmpro_buddypress_restricted]shortcode to the page content. - Click Save Settings.

The [pmpro_buddypress_restricted] shortcode has no attributes. It displays the message “This content is restricted.” Add your own content around it, such as an explanation of what members get and a link to your Membership Levels page.
Configure Non-member User Settings
The Non-member User Settings section controls what logged-out visitors and logged-in users without an active membership level can do in your community. These settings also act as the baseline for members: a member always has at least the access you give non-member users here.
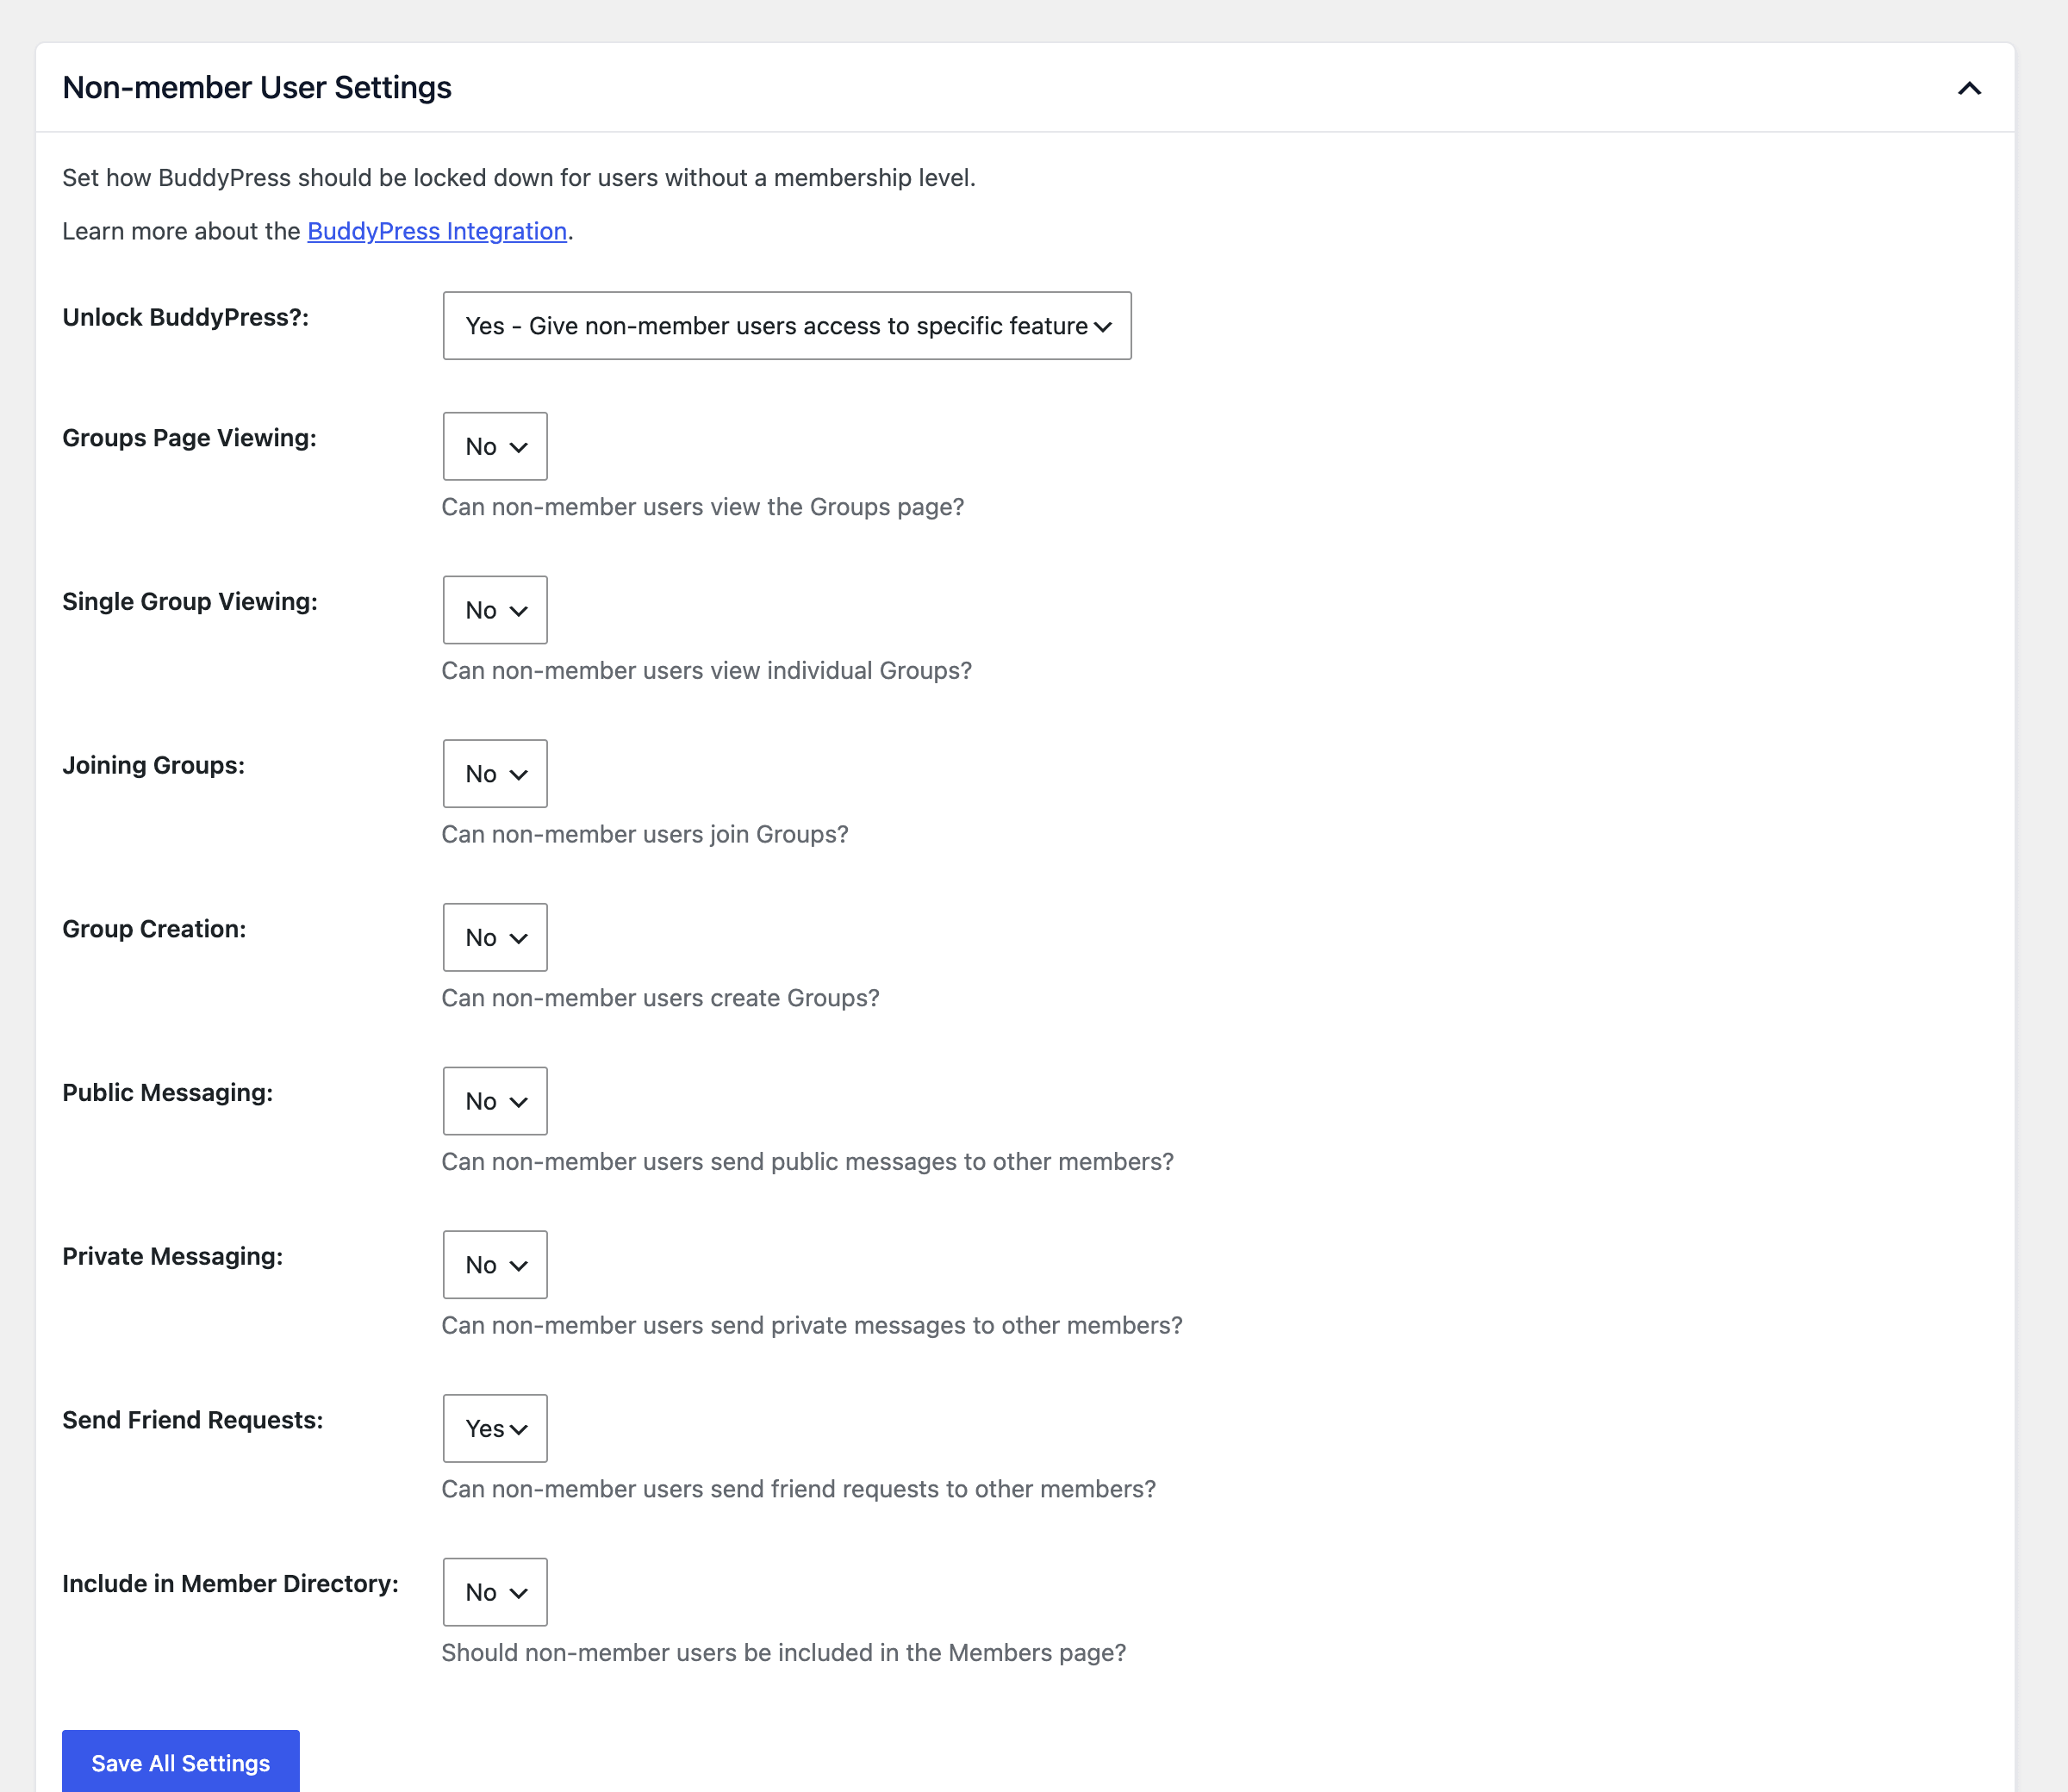
- Unlock BuddyPress?: Choose one of three options. The default is No – Lock access to all of BuddyPress.
- No – Lock access to all of BuddyPress. Non-member users are redirected away from community pages. They can still reach the registration and activation pages, your Membership Levels page, and their own profile. The lock also covers community content shown outside of BuddyPress pages, as described below.
- Yes – Give non-member users access to all of BuddyPress. Non-member users can use every community feature and appear in the member directory.
- Yes – Give non-member users access to specific features. Shows a list of features you can turn on one by one.
The specific features are the same ones you set for each membership level: Groups Page Viewing, Single Group Viewing, Joining Groups, Group Creation, Public Messaging, Private Messaging, Send Friend Requests, and Include in Member Directory. View Documents and Upload Documents also appear when your site has a supported documents feature. Each one is set to No by default. See what each feature controls.
When all of BuddyPress is locked, users without access are also blocked from community content that loads outside of BuddyPress pages. This applies to non-member users and to members whose levels don’t unlock BuddyPress:
- BuddyPress blocks: Blocks that list members, groups, or activity load their content through the BuddyPress REST API, so they show nothing to these users. Activity embeds are blocked too.
- Activity RSS feeds: The activity feeds are turned off for these users.
- Background updates: Community requests that load content without a page refresh are refused, and new activity isn’t sent to their browser.
- Their own profile: They can still open their profile, but the lists on its Friends and Groups tabs and @mention suggestions don’t load.
Sign-ups through the REST API stay open, just like the registration page. Administrators aren’t blocked from this content.
How the Lock Affects Administrators
Administrators pass every feature check, such as viewing groups or sending messages. The one exception is the full lockdown. If your Non-member User Settings are set to No – Lock access to all of BuddyPress. and your administrator account doesn’t have a membership level that unlocks BuddyPress, you are redirected away from community pages other than your own profile, just like any non-member user.
To browse the community while you set it up, give your administrator account a membership level that unlocks BuddyPress, or test in a private browser window with a member account.
The lock on BuddyPress blocks, activity feeds, and other content loaded outside of community pages doesn’t apply to administrators. A BuddyPress block on one of your pages can show members or activity to you while showing nothing to locked-out visitors. Check those pages in a private browser window to see what visitors see.
Review Your Membership Level Settings
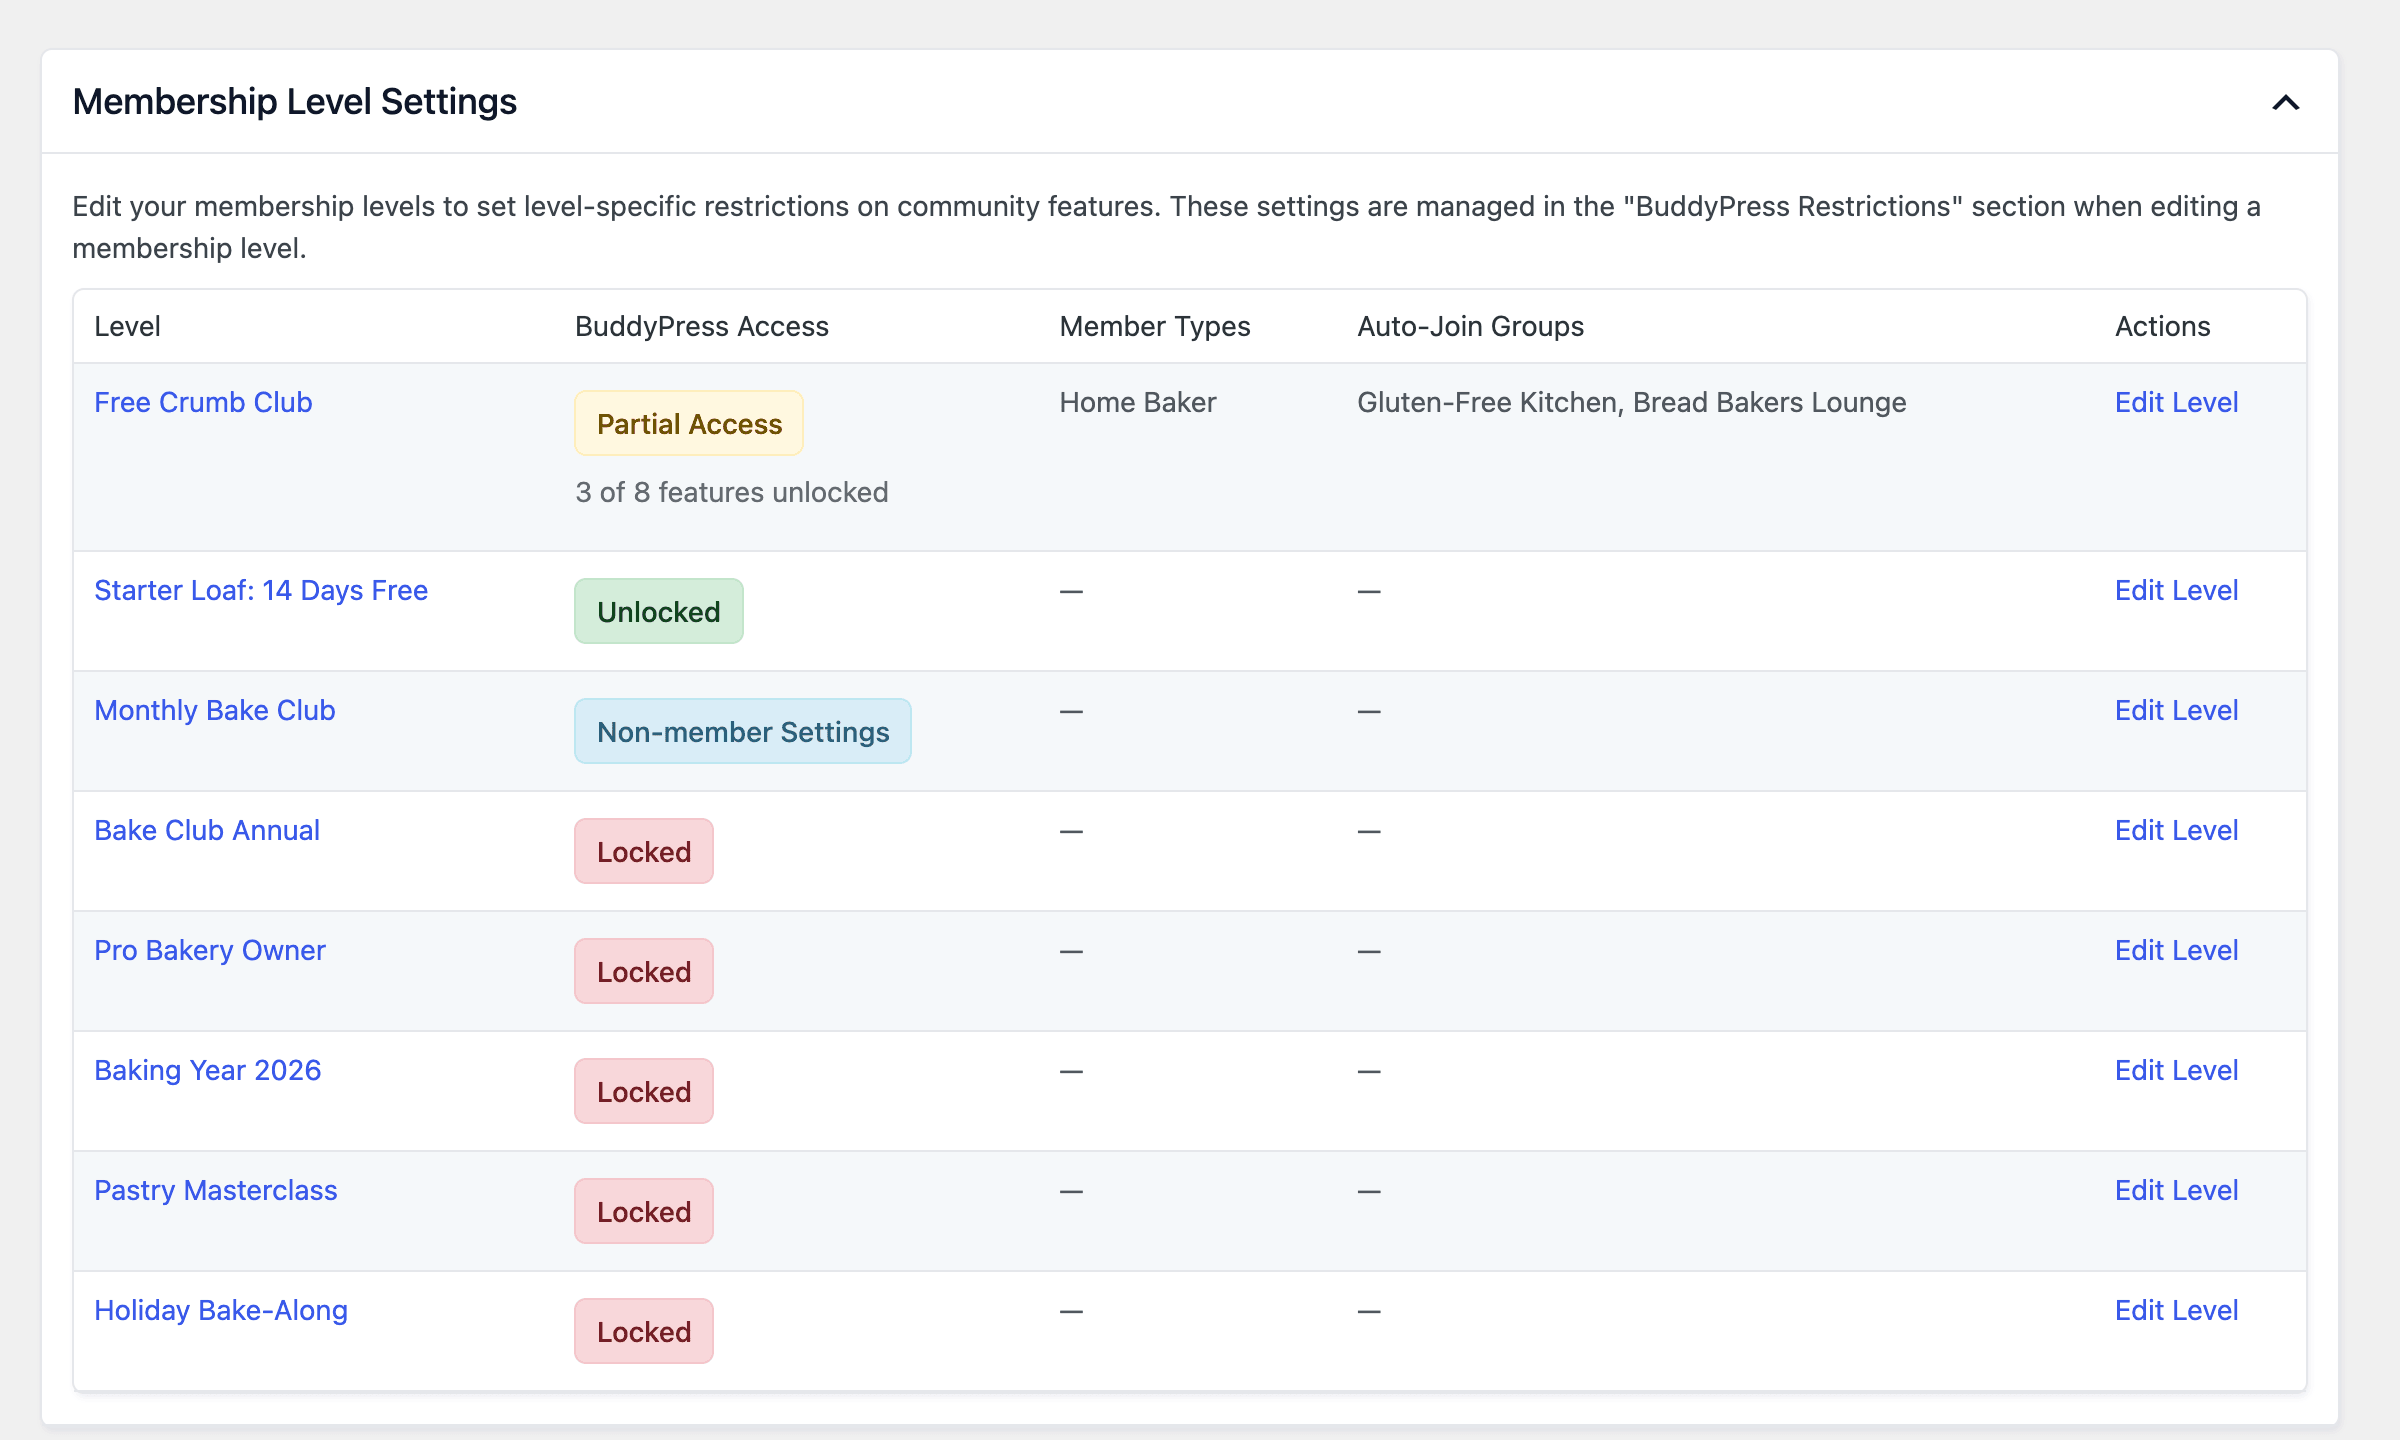
The Membership Level Settings section is a read-only summary of the community settings for every membership level. You change these settings when you edit each level. For each level, the table shows:
- BuddyPress Access: Locked, Unlocked, Non-member Settings (the level uses your non-member settings), or Partial Access with a count of how many specific features are unlocked.
- Member Types: The member types assigned to members of the level.
- Auto-Join Groups: The groups members of the level are added to automatically.
- Actions: An Edit Level link that opens the level in a new tab.
Learn how to set these options in Restrict Community Features by Membership Level.
General Settings
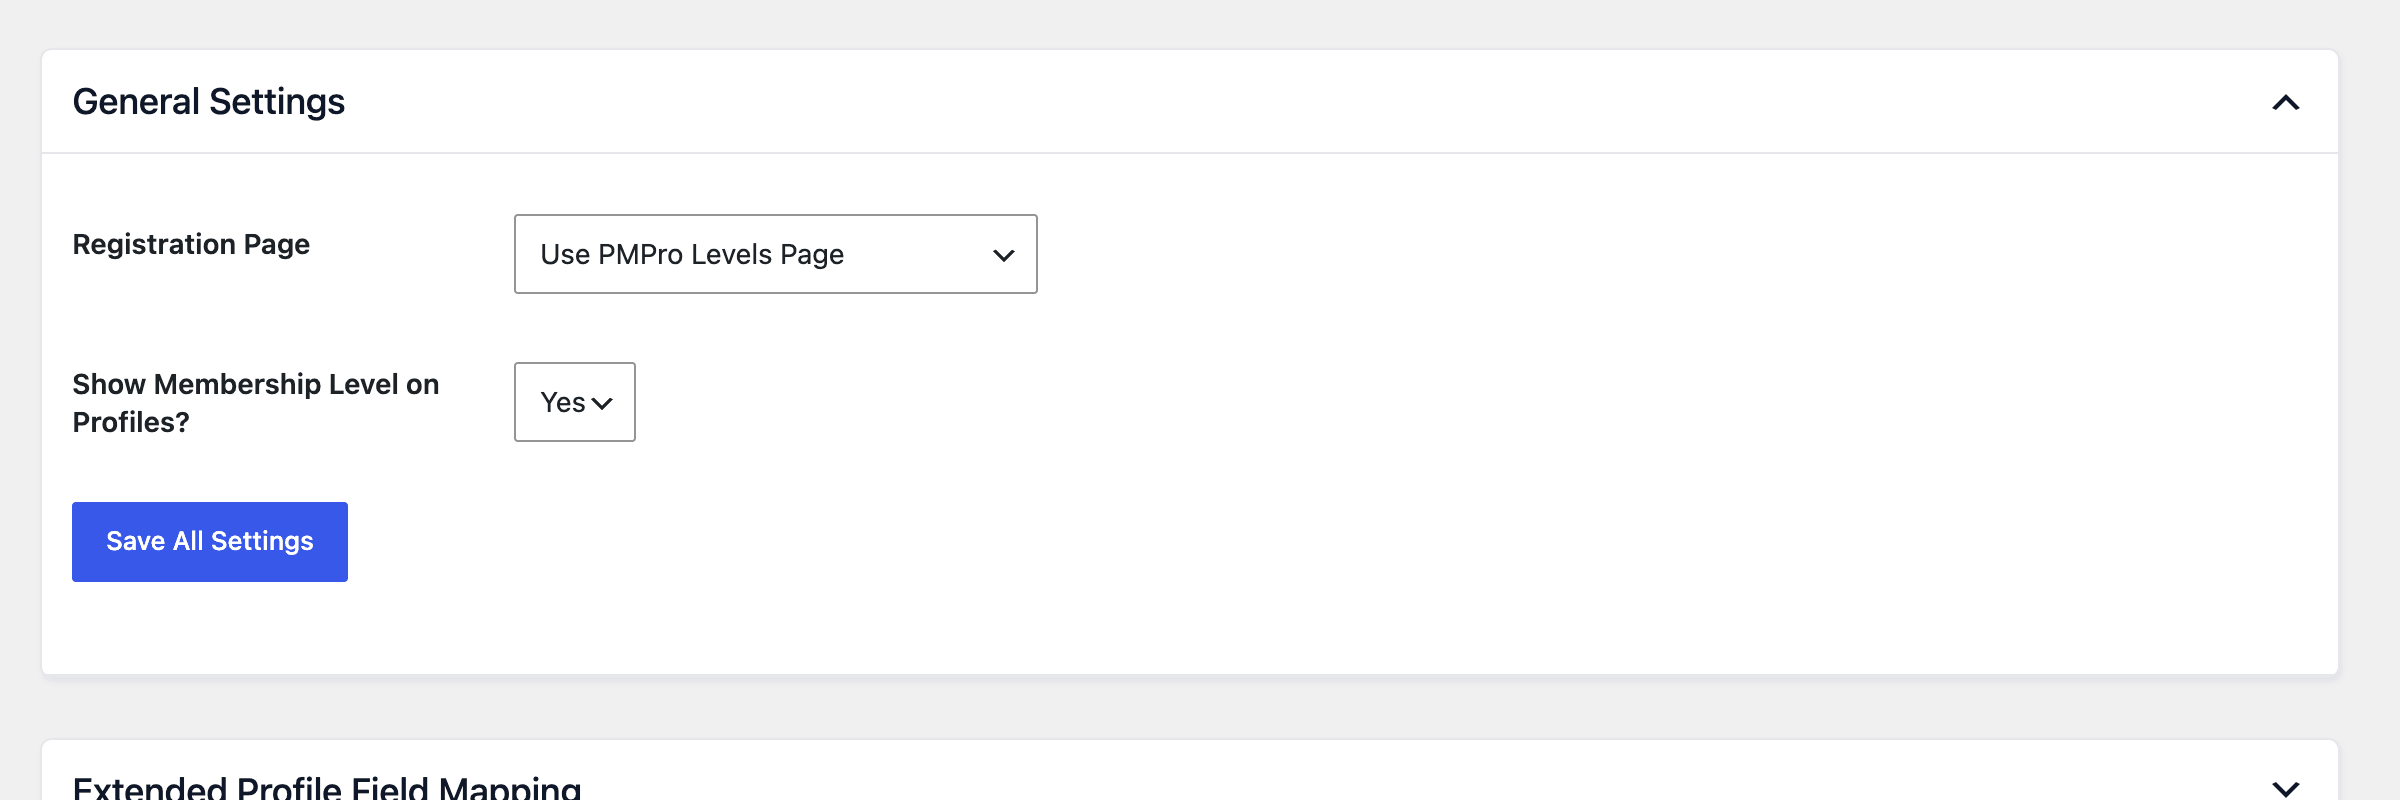
- Registration Page: Choose where new users sign up. The default is Use PMPro Levels Page. Read more in Choose Your Registration Process below.
- Show Membership Level on Profiles?: Choose Yes to show the member’s level name in the header of their community profile. Visitors to the profile see “Membership Level:” followed by the level name (or “Membership Levels:” and a comma-separated list for members with more than one level).
Choose Your Registration Process
Most sites should keep Use PMPro Levels Page. New users choose a level and complete the Paid Memberships Pro checkout, which is the only way to collect payment and assign a membership level. With this setting, visits to the BuddyPress registration page redirect to your Membership Levels page.
Choose Use BuddyPress Registration Page only if you want people to create a free community account without a membership level. With this setting:
- Logged-out visitors who open your Membership Levels page are redirected to the BuddyPress registration page. Logged-in users can still view the Membership Levels page and check out.
- The Register link on the WordPress login screen goes to the BuddyPress registration page.
- Users who register this way don’t get a membership level. Their access comes from your Non-member User Settings, so unlock at least some features for non-member users.
- BuddyPress only allows registration when Anyone can register is checked under Settings > General in the WordPress admin.
If you want users who register through BuddyPress to receive a free membership level, follow our guide to give users a default membership level at registration.
Extended Profile Field Mapping
The last section connects your community’s extended profile fields to Paid Memberships Pro User Fields so the two stay in sync. See Sync User Fields With Extended Profile Fields for setup steps.
Get Support From Our Team of Experts
Have a question about how to use this feature? Our Support Page outlines three ways to get support.
Our Max plans include hands-on help customizing your membership site and implementing new features. Upgrade to PMPro Max now »
Last updated on November 13, 2026