When you’re trying to optimize or grow a membership site, you may feel like you’re just taking guesses. What’s really driving membership site conversions—your marketing, your free content or lead magnets, referrals, something else?
In marketing, sometimes you have to take a blind bet. But most of the time, there are tools to help you eliminate most of the guesswork.
In this guide, we walk through how to set up Google Analytics 4 Conversion Events. We’ll be setting up events for membership sites built with Paid Memberships Pro. That said, these steps are the same for any ecommerce site. You just need the unique URL string for your final “confirmation” page post-purchase.
Once done, your GA4 property will be ready to report on the full website experience. You’ve got instant access to top referral sources, landing pages, and “likely” buyers that lead to a membership site conversion.
Table of contents
- What are “conversions” in GA4?
- Why should you track membership site conversion events?
- Video: GA4 Conversion Tutorial
- How to Access Events and Conversions in GA4
- How to Set Up Membership Site Conversion Events in GA4
- How to Mark Membership Site Events as Conversions in GA4
- How to Access GA4 Reports on Membership Site Conversion Data
- Membership Site Conversion Events With GA4: Wrap Up
What are “conversions” in GA4?
A GA4 conversion is a user action that you think is valuable. Conversions aren’t a fixed concept in GA4. Unlike built-in events, such as page_location or page_referrer, GA4’s custom conversion events give you freedom to make up the rules for what matters to your business.
Conversions are a specific type of “event” that you or the built-in events tracked by GA4 identify as an important user milestone.
Some common examples of conversion events include:
- Lead generation: The member completed the registration process.
- Online sales: A visitor started checkout.
- High interest: The user scrolled through 90% of a blog post.
- Educational: Your member completed a course, lesson, or took a quiz.
Google Analytics offers built-in events that are commonly used for e-commerce tracking, such as view_item, add_to_cart, and purchase.
There are also built-in events for standard user interactions like page views, watching embedded videos, and downloading files. Some of these built-in events may already appear in your GA4 reports.
PMPro now offers a complete Google Analytics Integration plugin with custom membership data and full ecommerce tracking. Say goodbye to MonsterInsights or Google Site Kit. This Add On is your all-in-one solution for Google Analytics integration.
Why should you track membership site conversion events?
There’s no one way to make your membership site successful. The goal of this post isn’t to give you the exact recipe to grow membership or convert more visitors.
Conversion events provide an additional source of data that you can reference to make more informed decisions, take interesting small bets, and even conduct new experiments.
Conversion events give you useful data for things like:
- Tracking Key Metrics: Google Analytics provides valuable information about the performance of your ecommerce membership site, including traffic sources, user behavior, and conversion rates. Setting up custom conversion events or goals allows you to see this data with respect to the positive impact on your business.
- Optimize User Experience: By monitoring user behavior, you can identify pain points in the user experience and take steps to improve the site’s design, functionality, and content. This can lead to higher conversion rates and increased customer loyalty.
- Make Informed Business Decisions: Google Analytics data can inform your decision-making processes, such as identifying the most profitable pages, regions, or marketing channels. Setting up custom conversion events or goals allows you to measure the effectiveness of your marketing campaigns and make data-driven decisions to optimize your business strategy.
- Measure ROI: By tracking conversion rates and other key metrics, you can measure the return on investment (ROI) of your marketing and advertising efforts. This can help you allocate your budget more effectively and focus on the channels that provide the highest ROI.
Video: GA4 Conversion Tutorial
How to Access Events and Conversions in GA4
Follow these steps to see what events are being tracking for your GA4 property:
- Navigate to your Google Analytics property and click Admin in the lower left menu area to access settings.
- Within the Property column, locate the settings for Events or Conversions.
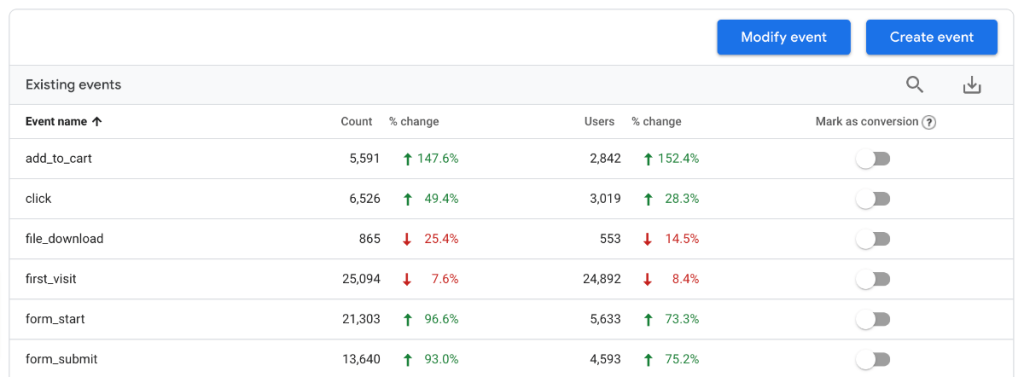
- These screens show you all of the event types currently tracked by your analytics setup.
- You can select an Event or Conversion from the list to see a more detailed report on performance with respect to the metrics.
So now that you know how to access Events and Conversions, how do you put this feature to work for your membership site? The next section of this guide demonstrates how to set up custom conversion events that make sense for a basic Paid Memberships Pro-powered membership site.
If you aren’t using PMPro, these same steps will work for you as long as you know the URL of your final “confirmation” post-purchase page. The steps below use that URL to help GA4 know that the “conversion” happened.
How to Set Up Membership Site Conversion Events in GA4
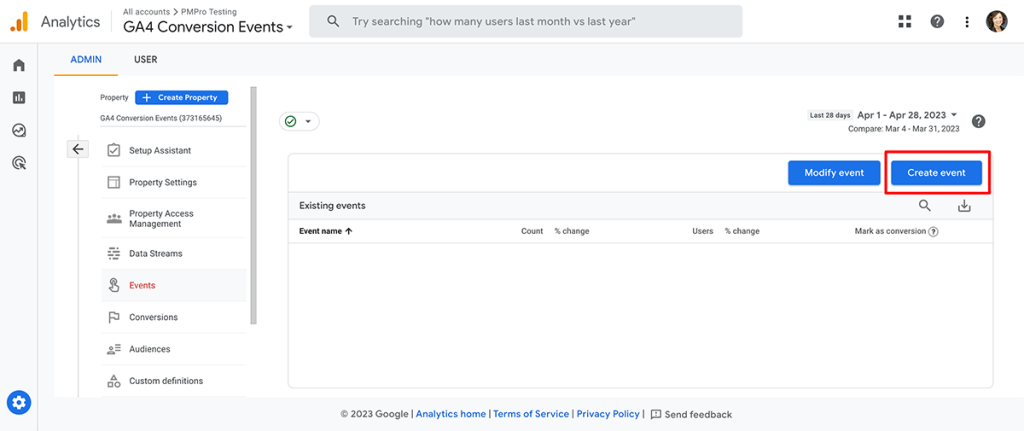
- Navigate to your Google Analytics property and click Admin in the lower left menu area to access settings.

- Within the Property column, click on the Events setting.
- Click Create Event.
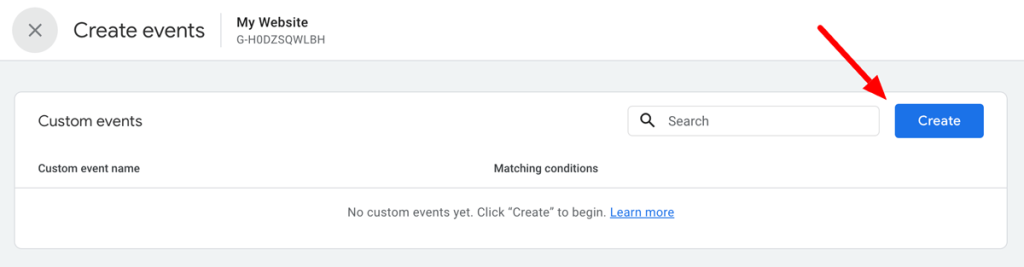
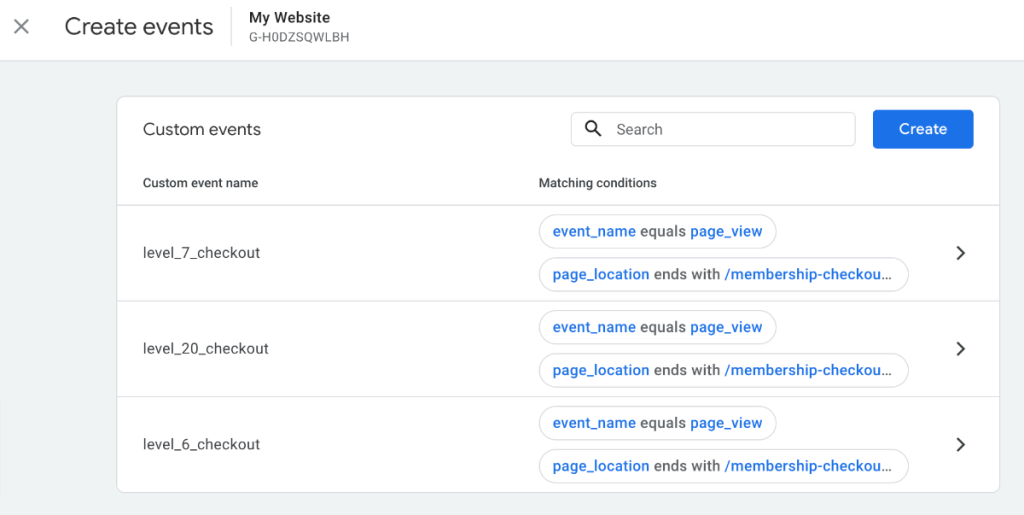
- This screen will bring up a window that lists all the custom events that exist for this GA4 property.
- Click Create to add a new custom event.
There are many fields on the Create Event screen that help you customize exactly when you want to trigger this event.

Tracking Membership Checkouts: What to Enter in the Create Event Fields
For this tutorial, we want to create a conversion event when members visit the Membership Confirmation page. In a standard Paid Memberships Pro site, visits to this page signify that a new membership checkout was completed.
- Custom event name: Enter a name for the event with no special characters or spaces. For example,
level_20_checkout.

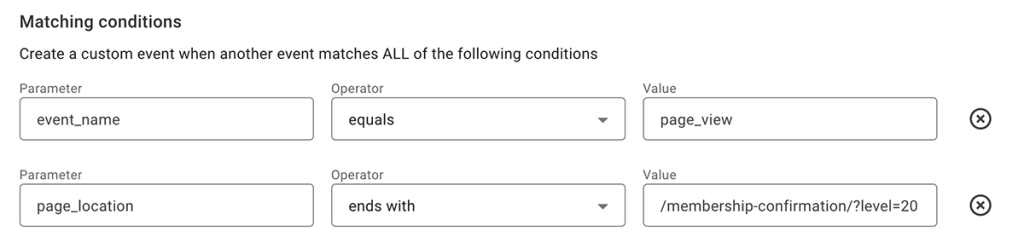
- Matching conditions: There are two required conditions for the conversion event:
- First, enter a condition for parameter
event_nameequalspage_view. - Next, add a condition for parameter
page_location> ends with. For the value, enter just the ending portion of your Membership Confirmation page, including the slug of the page and the Level ID for this unique event, for example/membership-confirmation/?pmpro_level=20.
- First, enter a condition for parameter
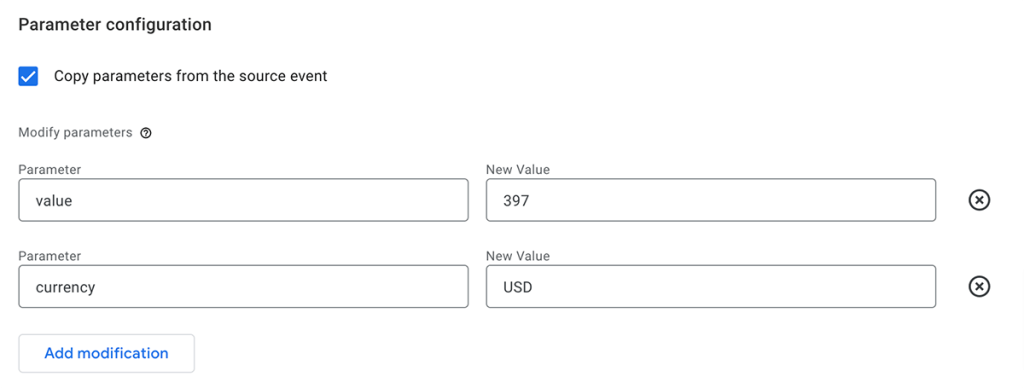
- Parameter configuration: This section defines the value for the event. This step is super important. It’s the key to helping you track the value of other pages on your site related to the event.
- Check the box to Copy parameters from the source event.
- Next, add a modification for parameter
value. In the New Value field, enter the amount most people pay for this checkout. For this tutorial, we aren’t setting up the complete GA4 ecommerce analytics like our companion guide. Enter the regular price most people pay. For example,397. - Finally, add a second modification parameter for
currency. In the New Value field, enter the currency code for your site. For example,USD. You must use a GA4 supported currency code.
- Click Create to finish creating the event and add it to your property. Once the event is created, GA4 will start collecting data for your event from that point forward (GA4 won’t show data on past conversions).
You should repeat these steps and create individual custom events for each membership level ID you offer and want to track for conversions.
How to Mark Membership Site Events as Conversions in GA4
Now that you’ve created custom events in GA4, you need to tell GA4 these are conversions.
But your events are brand new. GA4 hasn’t added any data for these events yet.
Here are two options you can use to start tracking these custom events as Conversions:
- Option 1: Wait for the data to start tracking. Once your custom event starts to get some data, the event name will appear in the main Events settings page. Locate the event in this list and toggle the setting to “Mark as conversion”.

- Option 2: Create a custom Conversion with a matching Event name.
- Navigate to Admin > Property Settings > Conversions.
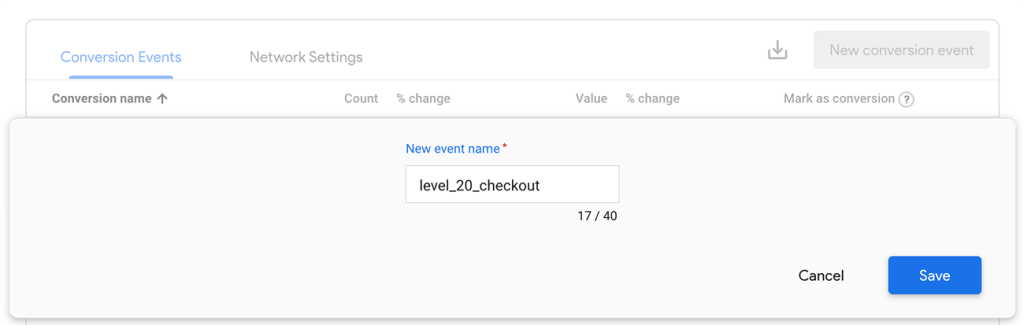
- Click the New Conversion Event button.
- Enter the Event name that exactly matches the Custom Event Name field you entered when you created the event. For this example, the
event_nameislevel_20_checkout. - Repeat these steps for each custom event you want to track as a conversion.
How to Access GA4 Reports on Membership Site Conversion Data
Google Analytics 4 (GA4) uses a different data model than its predecessor, Universal Analytics (UA), which means that some metrics that were available in UA are no longer tracked in GA4.
Not only is the data different in GA4, the reporting interface is also vastly different from UA. Like me, you might be a bit upset about just how different the data looks in your reports—and even more upset about some of the key metrics that got totally removed in GA4.
One such shake up is the new feature this post is all about: Conversions.
Conversions in GA4 are the evolution of Goal Completions in UA. But as an extension of goals and conversions, GA4 also introduces a new metric called Conversion Probability, which estimates the likelihood of a user converting on your website or app based on their behavior and attributes.
Overall, GA4 focuses more on user behavior and engagement, and less on session-based metrics like bounce rate and time on page. This reflects the shift towards a more privacy-centric and user-centric approach to analytics.
Here’s how you can access data on Conversions and Conversion Probability:
- Navigate to your Google Analytics property and select the property for your ecommerce membership site.
- In the left-hand menu, click on Reports.
- Navigate to Engagement, then Conversions.
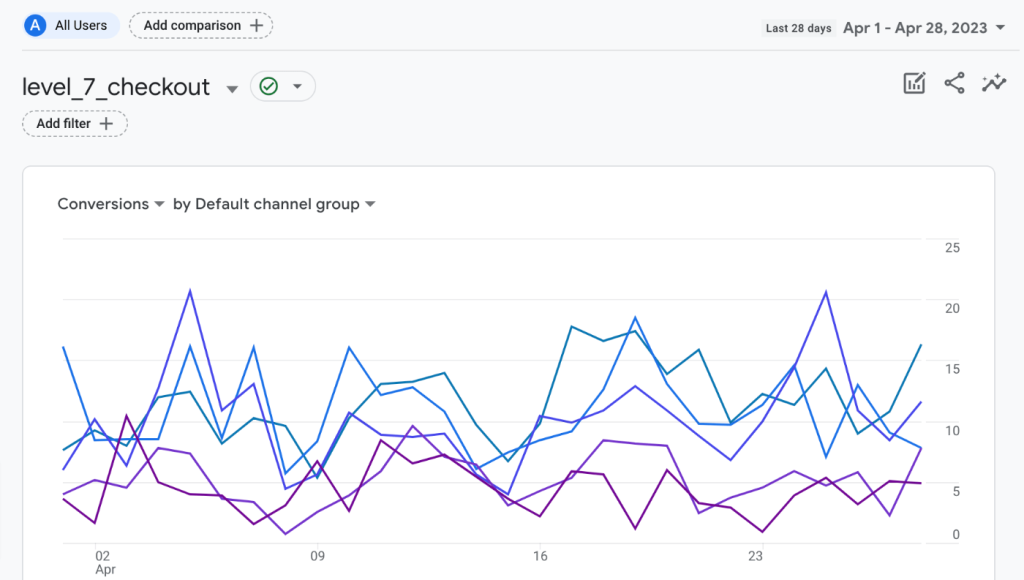
Here you will see a pre-built report related to conversions: Conversions by Event name over time.
- Select a single event name to see more detailed information about a specific conversion event.
- On the single conversion event report, you can click the Default channel group dropdown to change the context of this report. This lets you see conversions by Source, Medium, and Campaign (if you use UTM links in your marketing).
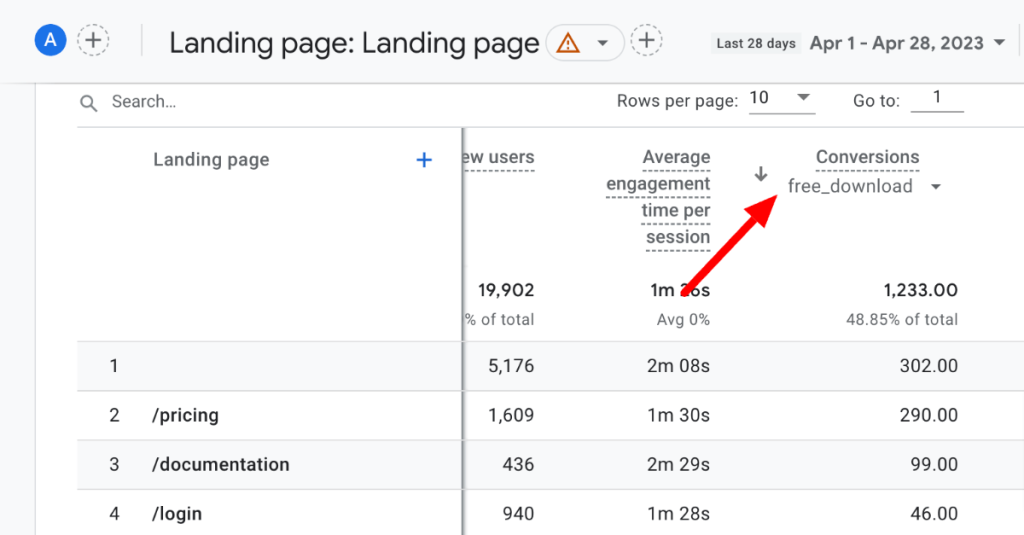
In any report that shows a table of data below the chart, be sure to scroll to the right to show the Conversions column.
If you click the All events dropdown in the Conversions column, you can filter the report based on a specific Conversion event. For example, use this field to reveal top Landing pages that contribute to conversions for the level_20_checkout event.
You can also see Conversion metric data in other reports. The report located Engagement > Landing page is a good report to look at with respect to Conversion metrics. On this report you can see the initial page that the user landed on when visiting your site that ultimately led to a Conversion event.
By exploring these reports, you can gain valuable insights into the performance of your ecommerce membership site and make data-driven decisions to optimize your business strategy.
Membership Site Conversion Events With GA4: Wrap Up
Whether you are new to Google Analytics or have been using GA for some time, conversion events are an important addition to your reporting toolbox. Over time, the membership conversion events in GA4 will begin to populate your entire analytics property, and help you see how the traffic on your site is helping you achieve your goals.
By following the step-by-step instructions outlined above, you will be fully set up with conversion events, with insight into the full funnel performance of your WordPress membership site.
More Content About Membership Site Data and Analytics
- Membership Site Analytics: How to Set Up GA4 and GTM with Custom Dimensions
- Ecommerce Analytics: Send Events to Google Tag Manager and Google Analytics 4 (GA4)
- How to Set Up Google Analytics GA4 Conversion Events for Membership Sites
- How to Reliably Track Ad Campaign Conversions with Privacy-First Affiliate Tracking
- Extraordinary Strategies to Manage Membership Engagement
- Does Your Membership Registration Page Maximize Conversions?
- Top Membership Site KPIs to Measure
Free Download: The AI-Powered Membership Site Blueprint
Download the free guide: Learn how to plan, build, and grow a membership site using AI as your strategic partner: from buyer persona to launch and beyond.


