You found this post because you need to move a Paid Memberships Pro (PMPro) site. Maybe you are switching hosts, promoting a staging site to production, or finally ready to launch the rebuild you have been working on for months. You are probably a little nervous about the cutover. That’s the right instinct.
A PMPro migration is not technically hard, but it is unforgiving. Moving a membership site is not the same as moving a blog.
- On a regular WordPress site, the worst case during a botched migration is a few hours of downtime.
- On a membership site, the worst case is canceled subscriptions at the gateway, duplicate charges, missing uploads, and members locked out of paid content they paid for.
Real money is on the line. So is member trust.
The good news is that with a plan, a checklist, and a calm cutover window, you can move a PMPro site between hosts (or promote a staging site to production) without losing a member, a subscription, or a search ranking. This guide walks through both scenarios with one canonical flow:
- Migrating a live PMPro site from one host to another.
- Taking an existing staging or development site live (replacing the current production site).
Both scenarios use the same pattern: back up, copy, point, verify. The PMPro-specific gotchas are called out as we go, and there is an honest section near the end about when to hand the work off to our team instead of doing it yourself.
Table of contents
- Before You Begin: Migration vs. Staging Cutover
- What’s Actually Moving: The Seven Categories
- Pre-Flight Checklist
- Step 1: Plan Your Cutover Window
- Step 2: Back Up the Source Site
- Step 3: Provision the New Host and Stage the Copy
- Step 4: Copy Files and Database to the New Server
- Step 5: Handle Passwords (the Salts Question)
- Step 6: Update URLs With a Safe Search and Replace
- Step 7: Configure PMPro on the Destination
- Step 8: Reconnect Your Payment Gateway and Webhooks
- Step 9: Point DNS to the New Host (the Cutover Moment)
- Step 10: Post-Launch Verification
- Recovery Sidebar: What If Something Goes Wrong?
- When to Hand This Off to PMPro Max
- Frequently Asked Questions
- Final Thoughts
Migrating to PMPro from another membership platform? This guide assumes you already have a working PMPro site you are moving. If you are switching to PMPro from MemberPress, Restrict Content Pro, s2Member, Ultimate Member, WooCommerce Subscriptions, or another system, you want our companion guide on how to migrate to Paid Memberships Pro instead. That post covers the CSV-import flow for moving member data out of a competing system.
Before You Begin: Migration vs. Staging Cutover
The two scenarios look almost identical from a server perspective, but the risk profile differs.
Scenario A: Host-to-host migration. Move a live site as-is to a new server. The database, files, members, orders, and subscriptions all travel together. Your goal is a 1:1 copy, then a clean DNS switch.
Scenario B: Promoting a staging site to live. This is more delicate. Your staging site usually contains test orders, scrambled member data, and disconnected gateway credentials by design. You do not want any of that touching real customers. The right approach is usually to push your code, content, and settings from staging to the production environment, while leaving live member and order data alone.
In other words: if you are migrating hosts, copy everything. If you are launching changes from staging, copy the code (plugins, themes, custom snippets) and the settings, then recreate them on the live site without overwriting live member data.
A Critical Caveat for Staging-to-Live: Diverged IDs
The runbook below assumes your staging site started as a clone of your current live site. You copied production to staging, changed code or content or settings, and now you want to push those changes back.
In that case, the IDs in your two databases line up because staging was born from live.
If your staging site was built independently (a fresh WordPress install, a rebuild from scratch, or a staging environment that has diverged significantly over time), the IDs in the two databases do not match. That is not a small inconvenience. It’s the difference between a few hours of work and a multi-week custom data reconciliation project.
Specifically, when staging and live have diverged:
- Membership level IDs: Your live members’ subscriptions are linked to specific level IDs in wp_pmpro_memberships_users. If level “VIP” is ID 5 on live and ID 3 on staging, importing your live members against staging’s database orphans every active subscription.
- Gateway subscriptions: Stripe and PayPal store the PMPro level ID in subscription metadata at the gateway. A level-ID mismatch breaks renewal handling at the gateway, not just on your site.
- Post and page IDs: PMPro’s content restrictions, Membership Level Groups, restricted-page settings, and any custom code that hardcodes a post ID all break when post IDs differ between sites.
- LMS course progress: If you run LifterLMS (or another eLearning platform) or BuddyPress (or another community plugin), every course completion, quiz score, lesson progress record, forum post, follower, and direct message is tied to one or more ID. Those IDs almost certainly do not match between independently-built sites.
- Users and accumulated activity: Any new members, orders, or LMS progress that happened on the live site since staging diverged has to be reconciled into the new database, not overwritten by it.
This is no longer a runbook exercise: it’s a custom data migration project. The reconciliation work usually involves writing one-off SQL to remap level IDs, post IDs, and user IDs while preserving the relationships between them, plus careful gateway-side coordination so existing subscriptions keep charging the right thing.
If you are in this situation, get help. PMPro Max includes this kind of custom migration work as part of onboarding, and our team has done it enough times to know which gotchas to watch for. The DIY path here is rarely worth the time saved when one missed mapping can break renewal billing for your entire membership.
A third scenario, taking a brand-new site live for the first time with no existing members, is much simpler and is not really a migration. If that is you, you do not need this post. You need the standard PMPro setup documentation.
Related: How to Set Up a Staging Environment to Test Changes and New Features for Your Membership Site
What’s Actually Moving: The Seven Categories
Before you touch a backup or a DNS record, it helps to know what you are actually working with. A PMPro site has seven categories of stuff that need to make it to the destination. Get all seven right and the migration is a non-event. Miss one and the problem shows up days later as a broken renewal or a member who cannot log in.
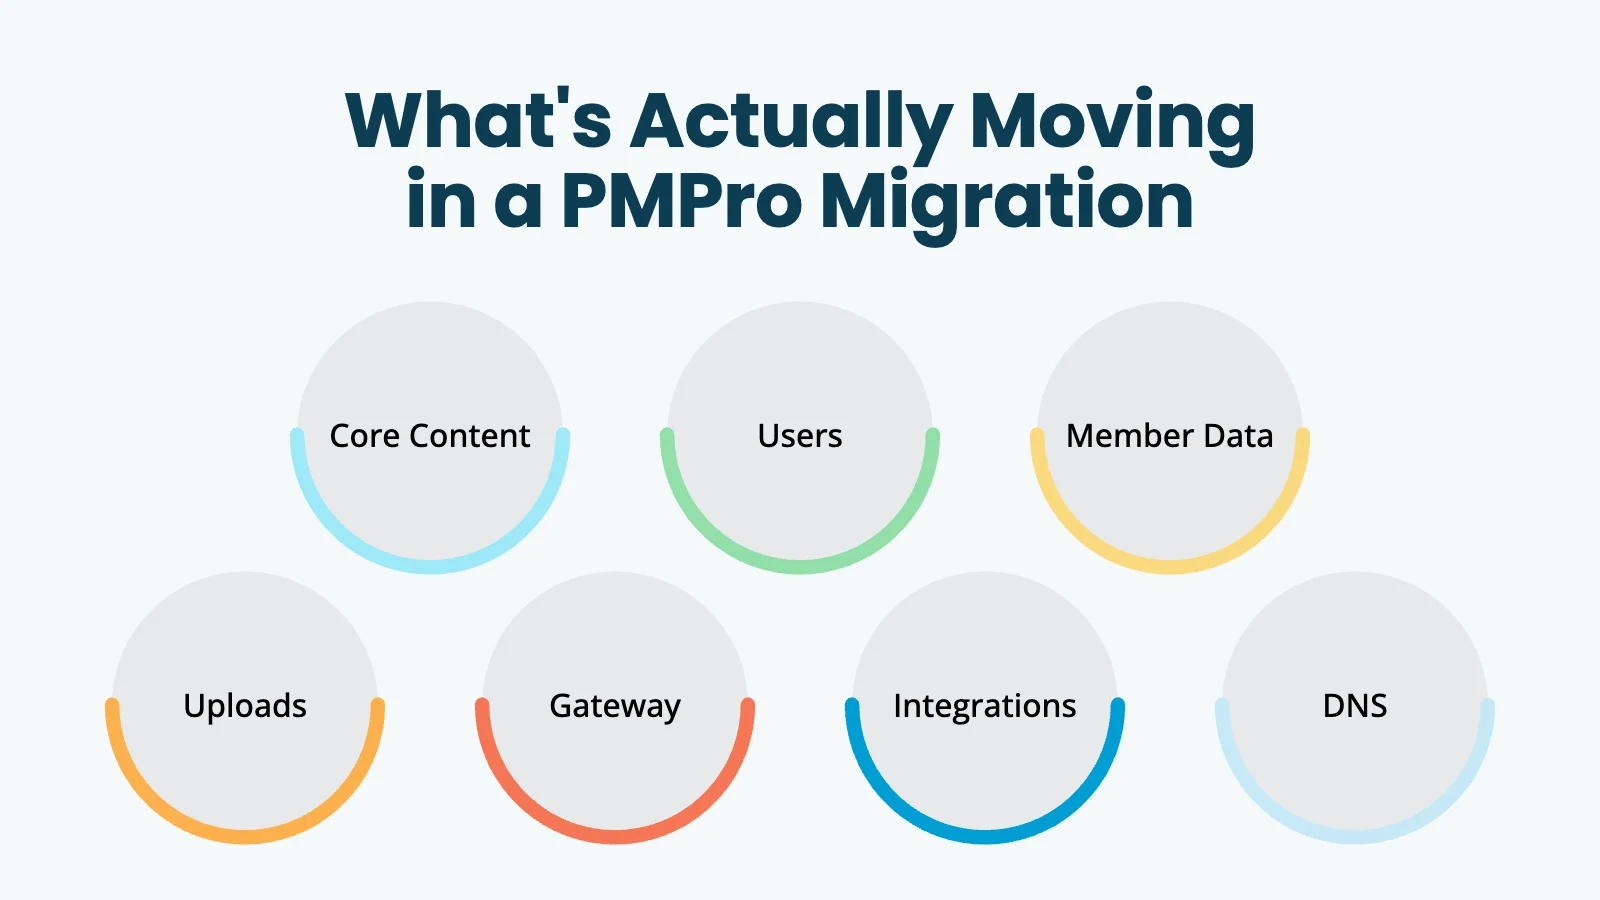
- Core content: Posts, pages, settings, theme configuration. The part most generic migration guides cover.
- Users:
wp_usersandwp_usermeta. The login credentials, profile fields, and roles for every account on the site: users, members, and admins alike. - Member data: PMPro’s custom tables (memberships, orders, discount codes, level configuration). This is the data your members literally cannot afford for you to lose.
- Uploads:
/wp-content/uploads/. Lives on disk, not in the database. Database-only migrations leave this behind and break every image on the new site. - Gateway connection: Stripe, PayPal, or whichever processor handles your subscriptions. The gateway itself does not move. What you migrate is your site’s connection to it (API keys, webhook URLs, IPN endpoints).
- Integrations: Email service provider, CRM, Zapier automations, analytics, and the webhook destinations that gateways post to.
- DNS and the domain: For host changes, this is the actual cutover that points the domain at the new host.
The point of the framework: every category is the responsibility of the migration. Missing one shows up as a problem later, almost always at the worst time. A migration that nails categories 1 through 4 but forgets the gateway, integrations, or DNS ends up with members whose renewals charge against a broken connection (or, worse, get charged twice).
Pre-Flight Checklist
Before you start, confirm you have everything you need. Treat each item as required, not optional.
- Admin access to the current live site, the new host (or staging environment), your domain registrar, and any DNS provider.
- SFTP, SSH, or file-manager access at both ends so you can move files.
- Gateway dashboard access at Stripe, PayPal, or whichever processors you use. You will be updating webhooks.
- A current, restorable backup of the source site. Test that you can actually restore it, not just create it.
- Two backups, ideally from different methods: One via a plugin like UpdraftPlus, one via your host’s backup feature, or one of each. Store at least one outside the source host’s environment.
- A maintenance window with members notified in advance, especially if you take payments during the day.
- A documented current setup: Write down the PHP version, WordPress version, PMPro version, the active plugins and their versions, the active theme, your gateway settings (which gateway, test mode or live, which webhook URLs), and any external service connections. The destination site should match this before you migrate data.
- A rollback plan: Specifically: at the cutover moment, how would you revert if something is clearly wrong in the first 30 minutes? For a host change, keep the old host running until you have verified the new one. For staging-to-live, keep a fresh database backup of the live site ready to restore.
If you are missing any of the above, stop and get it before you continue. A migration is not the time to discover that nobody remembers the gateway login.
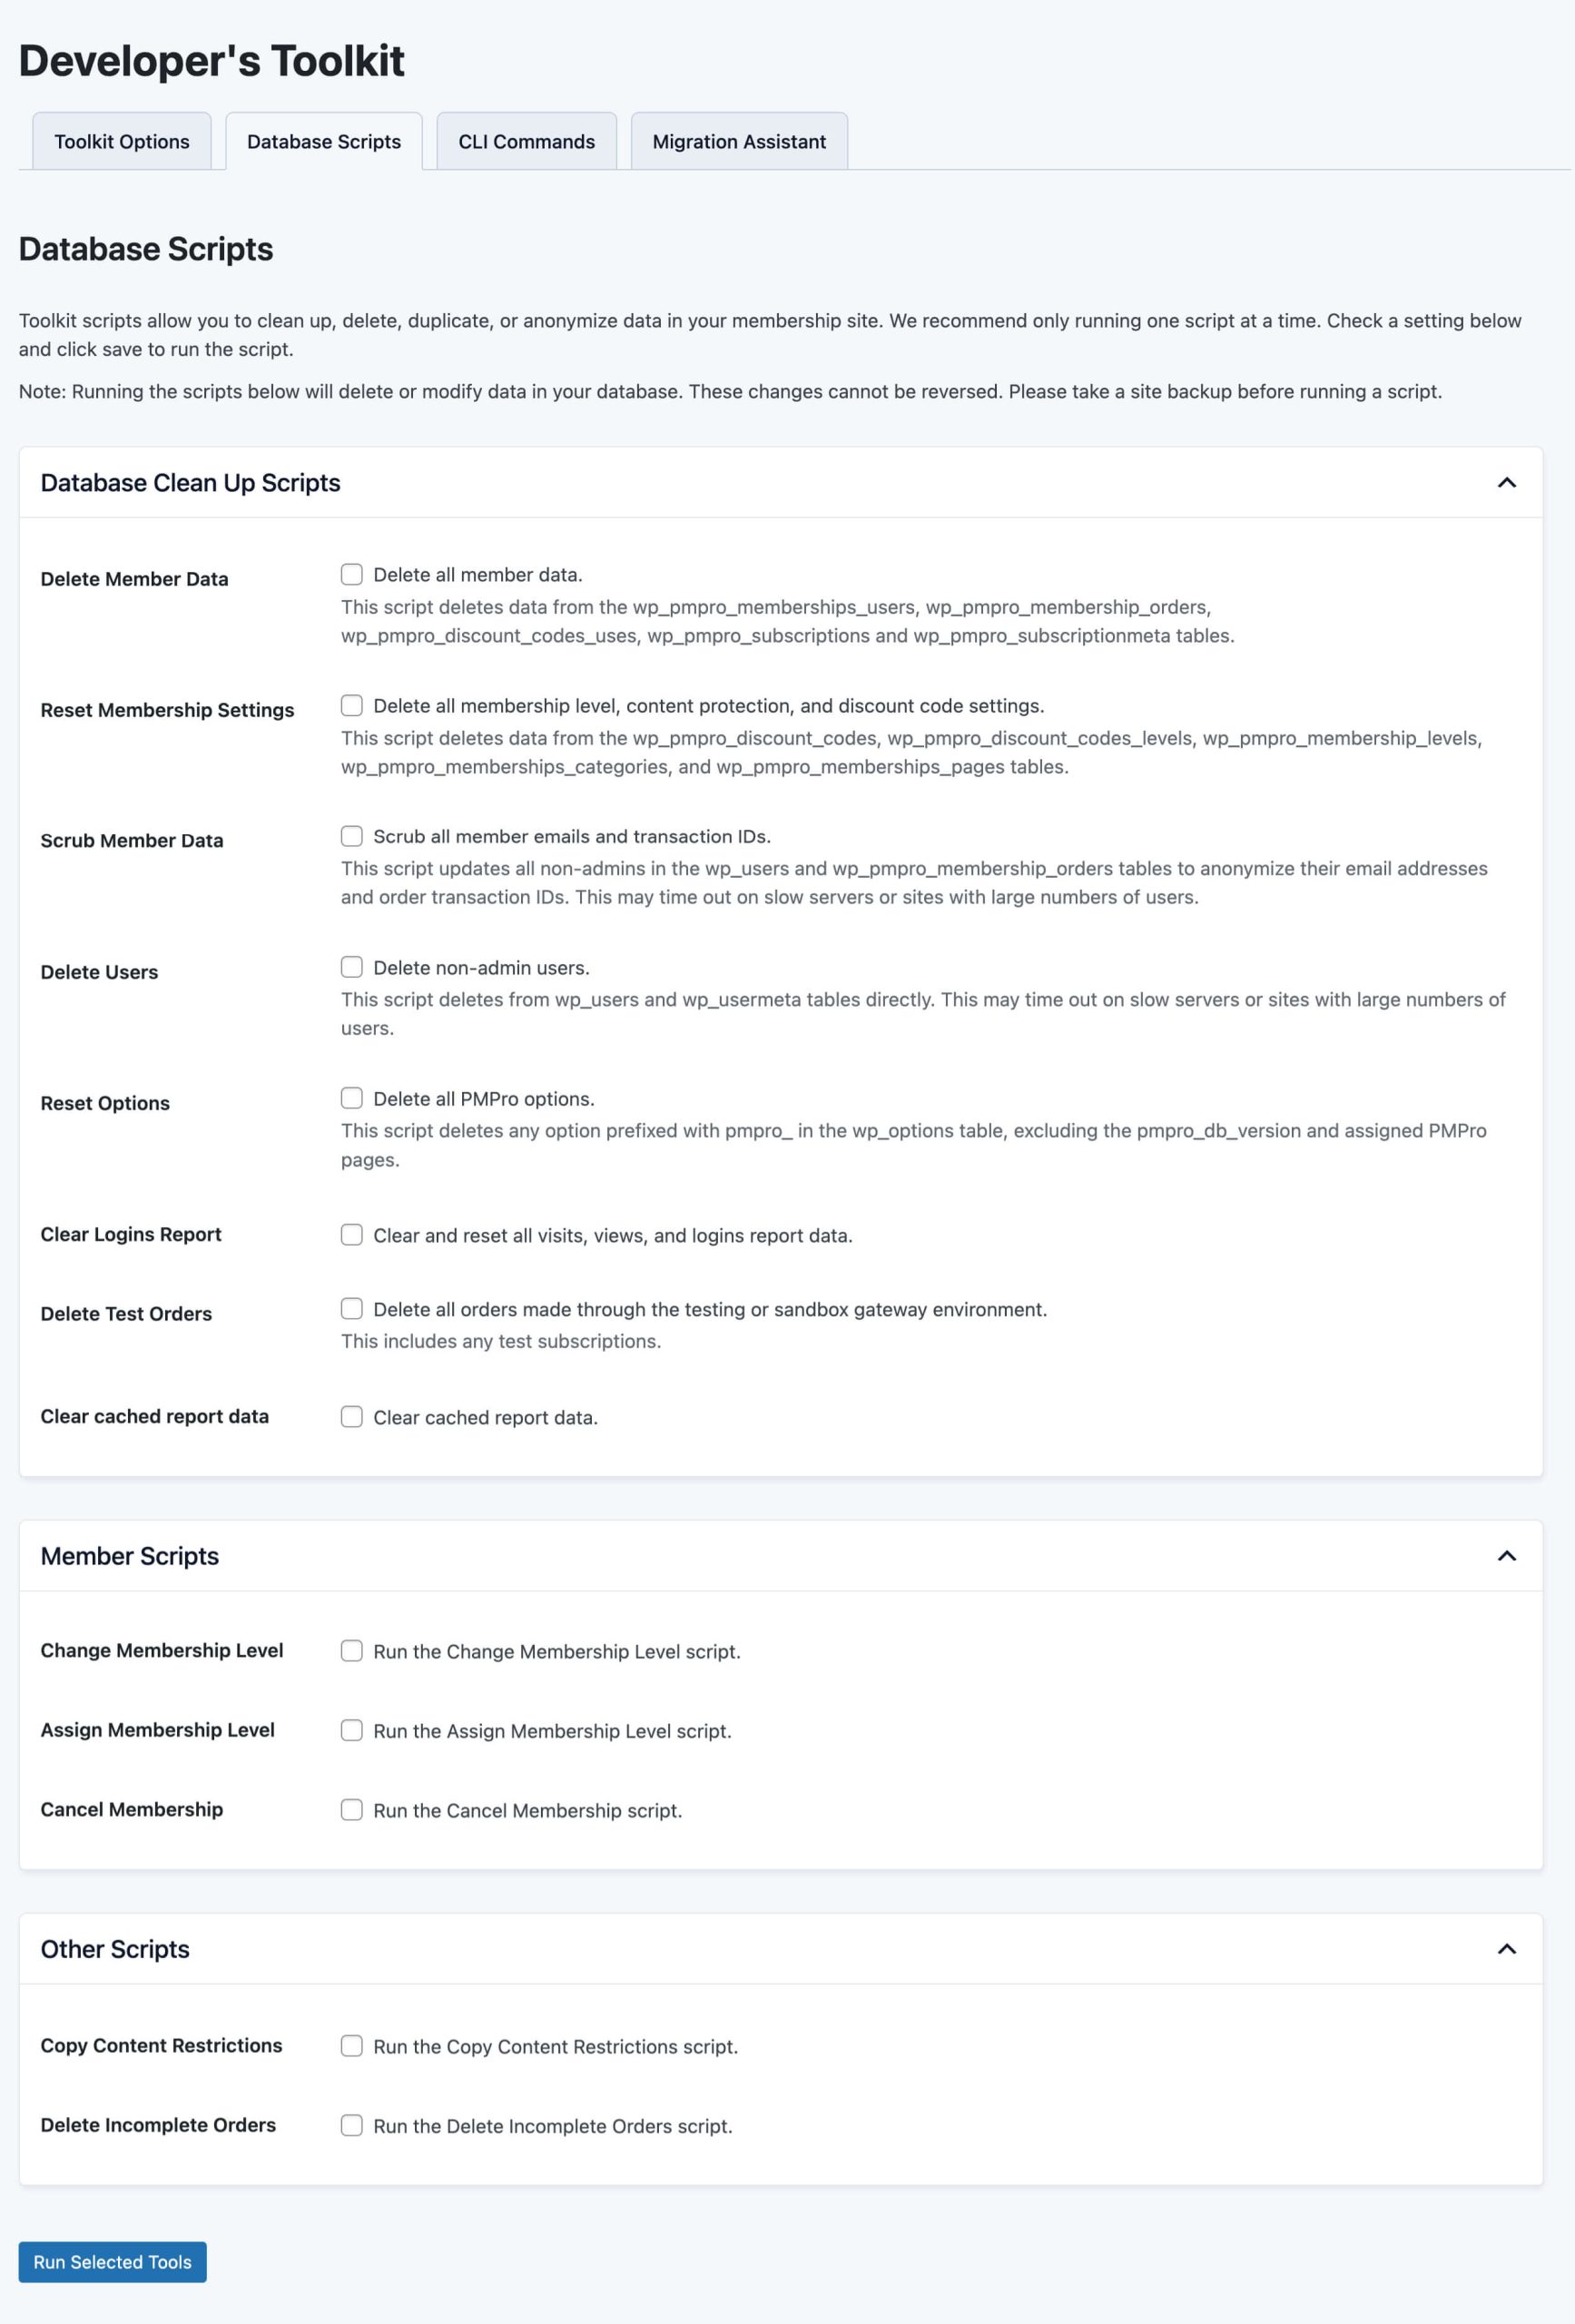
One more thing for staging-to-live promotions: treat the destination like a staging site even though it is about to become your live site. Install the Developer’s Toolkit Add On for Paid Memberships Pro and forward all email to yourself so any test emails do not go to real members. Do not connect the destination site to your live gateway yet. Leave gateway settings empty, or use test-mode credentials. This containment is what protects you if you accidentally trigger something during the work.
Step 1: Plan Your Cutover Window
Pick a low-traffic time. For most membership sites that is overnight on a weekend, or whenever your members are least active.
Plan for the cutover to take 2 to 4 hours, even if the technical work is shorter. You will want buffer time for DNS propagation and final checks. Lower your DNS TTL to something like 300 seconds at least 24 hours before the move. That makes the eventual switch propagate much faster.
Pause non-essential automation during the cutover:
- Postpone scheduled email sends and broadcasts.
- Disable any new product launches, promotional discounts, or sales sequences during the move.
- If you run a webinar or live event next to the cutover, push the move to a different day.
Communicate the window to your team and (briefly) to your members. A simple notice is plenty:
Step 2: Back Up the Source Site
Take a complete backup of the site you are moving. That means:
- The full WordPress database: All standard tables plus the PMPro custom tables (more on which ones below).
- The
wp-contentfolder, includinguploads, themes, plugins, and any custom mu-plugins. - The
wp-config.phpfile, so you can compare environment-specific settings later (including the salts, which matter in Step 5).
You can do this with a backup plugin like UpdraftPlus or via your hosting control panel. If your host offers a one-click full-site export, use it. Either way, download the backup files to your local machine before continuing. Do not rely on backups stored on a host you are about to leave.
Once the backup is downloaded, test that you can open the SQL file and that the wp-content archive extracts cleanly. A backup you cannot restore is no backup at all.
The PMPro Tables to Verify in Your Export
If you are doing a selective export (rather than dumping the whole database), confirm your export includes these tables:
wp_pmpro_discount_codeswp_pmpro_discount_codes_levelswp_pmpro_discount_codes_useswp_pmpro_email_logwp_pmpro_membership_levelswp_pmpro_membership_levelmetawp_pmpro_membership_levels_groupswp_pmpro_membership_orderswp_pmpro_membership_ordermetawp_pmpro_memberships_categorieswp_pmpro_memberships_pageswp_pmpro_memberships_userswp_pmpro_subscriptionswp_pmpro_subscriptionmeta- Tables from any Add Ons that ship their own (for example, Affiliates uses
wp_pmpro_affiliates*tables, and Group Accounts useswp_pmpro_groups). - The standard WordPress tables:
wp_users,wp_usermeta,wp_options,wp_posts,wp_postmeta,wp_terms,wp_term_relationships,wp_term_taxonomy.
If your source site uses a non-standard table prefix (anything other than wp_), note it now. You will either match it on the destination or run a prefix-replacement query after import.
Step 3: Provision the New Host and Stage the Copy
Set up a fresh WordPress installation on your new host. Most managed hosts will spin one up for you in a few clicks. If you are moving to PMPro Hosting or another managed plan built for membership sites, the team there can do this step for you and even handle the move.
A few rules for the new install:
- Use the same PHP version (or newer) as the source site. PMPro requires PHP 7.4 or higher, but we recommend 8.1 or higher.
- Match the MySQL or MariaDB version when possible to avoid character-set surprises.
- Install PMPro and any Add Ons the source site uses before you import data. That way the destination has the right tables and configuration scaffolding when the import lands.
- Do not connect the new install to your live domain yet. Use the host’s temporary URL, a staging subdomain, or a
/etc/hostsfile entry to access it privately while you work.
If you are taking a staging site live, your new install lives on the same server but at the production domain (with a temporary URL until you flip DNS).
Step 4: Copy Files and Database to the New Server
This is the heaviest step. The goal is to recreate the source site on the new server.
- Upload the
wp-contentfolder to the new install, overwriting the empty default. Make sure file permissions match what your new host expects (usually 755 for folders, 644 for files). Pay specific attention towp-content/uploads/since this is the most-forgotten part of a migration. A database-only move breaks every image on the new site. - Import the database into the new server’s MySQL or MariaDB instance. Most hosts offer phpMyAdmin or a similar tool. For very large databases, ask the host to import the SQL file from the command line so you do not time out.
- Update
wp-config.phpwith the new database name, user, password, and host. Leave theWP_HOMEandWP_SITEURLvalues out for now, or set them to your temporary URL.
WP-CLI alternative for the database import. If you are comfortable on the command line, WP-CLI is faster and more reliable than phpMyAdmin for large databases:
wp db import source-site-backup.sql
If your source site used a non-standard table prefix (something other than wp_) and the destination uses the default, you can fix the prefix references inside wp_usermeta and wp_options with an UPDATE after import:
UPDATE wp_usermeta
SET meta_key = REPLACE(meta_key, 'oldprefix_', 'newprefix_')
WHERE meta_key LIKE 'oldprefix_%';
Replace oldprefix_ and newprefix_ with your actual prefixes. The same logic applies to wp_options if you have prefix-dependent option names there. Back up before running any UPDATE.
At this point, you should be able to load the site at its temporary URL. The styling may look off and some images may not appear yet. That is normal. The next two steps fix it.
Step 5: Handle Passwords (the Salts Question)
Here is the wrinkle that catches most people: WordPress validates passwords against hashes that are partly derived from secret keys in wp-config.php. Specifically, AUTH_KEY and the related salts (SECURE_AUTH_KEY, LOGGED_IN_KEY, NONCE_KEY, AUTH_SALT, SECURE_AUTH_SALT, LOGGED_IN_SALT, NONCE_SALT). If the source and destination wp-config.php files have different salts, your members’ existing passwords will not validate on the new site, and everyone gets pushed to “Forgot Password.”
You have two options.
Option A: Copy the salts from source to destination. Paste the AUTH_KEY, SECURE_AUTH_KEY, LOGGED_IN_KEY, NONCE_KEY, AUTH_SALT, SECURE_AUTH_SALT, LOGGED_IN_SALT, and NONCE_SALT values from the source site’s wp-config.php into the destination’s wp-config.php. With matching salts and the imported user data, existing member passwords will work. Test with at least one account before announcing the migration is complete. Copying salts will log out anyone currently logged in to the destination, so do this after you import users, not before.
Option B: Accept that members will need to reset. Let members reset their passwords on the new site. Communicate the change clearly in advance (“after the migration, you will need to reset your password the first time you log in. Use the ‘Forgot Password’ link”). This is simpler operationally but creates member friction. Most migrations choose Option A unless you have a specific reason not to, such as a compromised credentials cleanup or a deliberate password rotation policy.
Step 6: Update URLs With a Safe Search and Replace
WordPress stores its primary URL in dozens of places: serialized options, post content, widget areas, plugin settings, and member profile fields. A blind find-and-replace in the database will corrupt serialized values. You need a search-and-replace tool that handles serialization correctly.
You have a few options:
- Better Search Replace: Free plugin that runs from inside WordPress.
- WP-CLI’s
search-replacecommand: A fast and safe method run from the command line. - The Interconnect IT Database Search and Replace tool: Runs as a standalone PHP script outside WordPress.
Whichever you pick, replace https://www.olddomain.com with https://www.newdomain.com (or your temporary URL during testing). Run a dry run first if the tool supports it. After the replacement, re-save your permalinks under Settings > Permalinks and clear any caching.
If you are migrating from a staging site that has a different URL, you will run this replacement twice: once to point the data from “staging” to “temporary URL,” and a second time (after DNS) from “temporary URL” to “production.”
WP-CLI version for the developer readers:
wp search-replace 'https://staging.example.com' 'https://www.example.com' --dry-run
wp search-replace 'https://staging.example.com' 'https://www.example.com'
The --dry-run flag shows you exactly what would change without writing anything. Use it before running the real thing.
Step 7: Configure PMPro on the Destination
PMPro stores some settings in wp_options (which moves cleanly with the database) and some settings as references to post IDs and page IDs (which depend on the source and destination matching). Walk through these settings before declaring the import done.
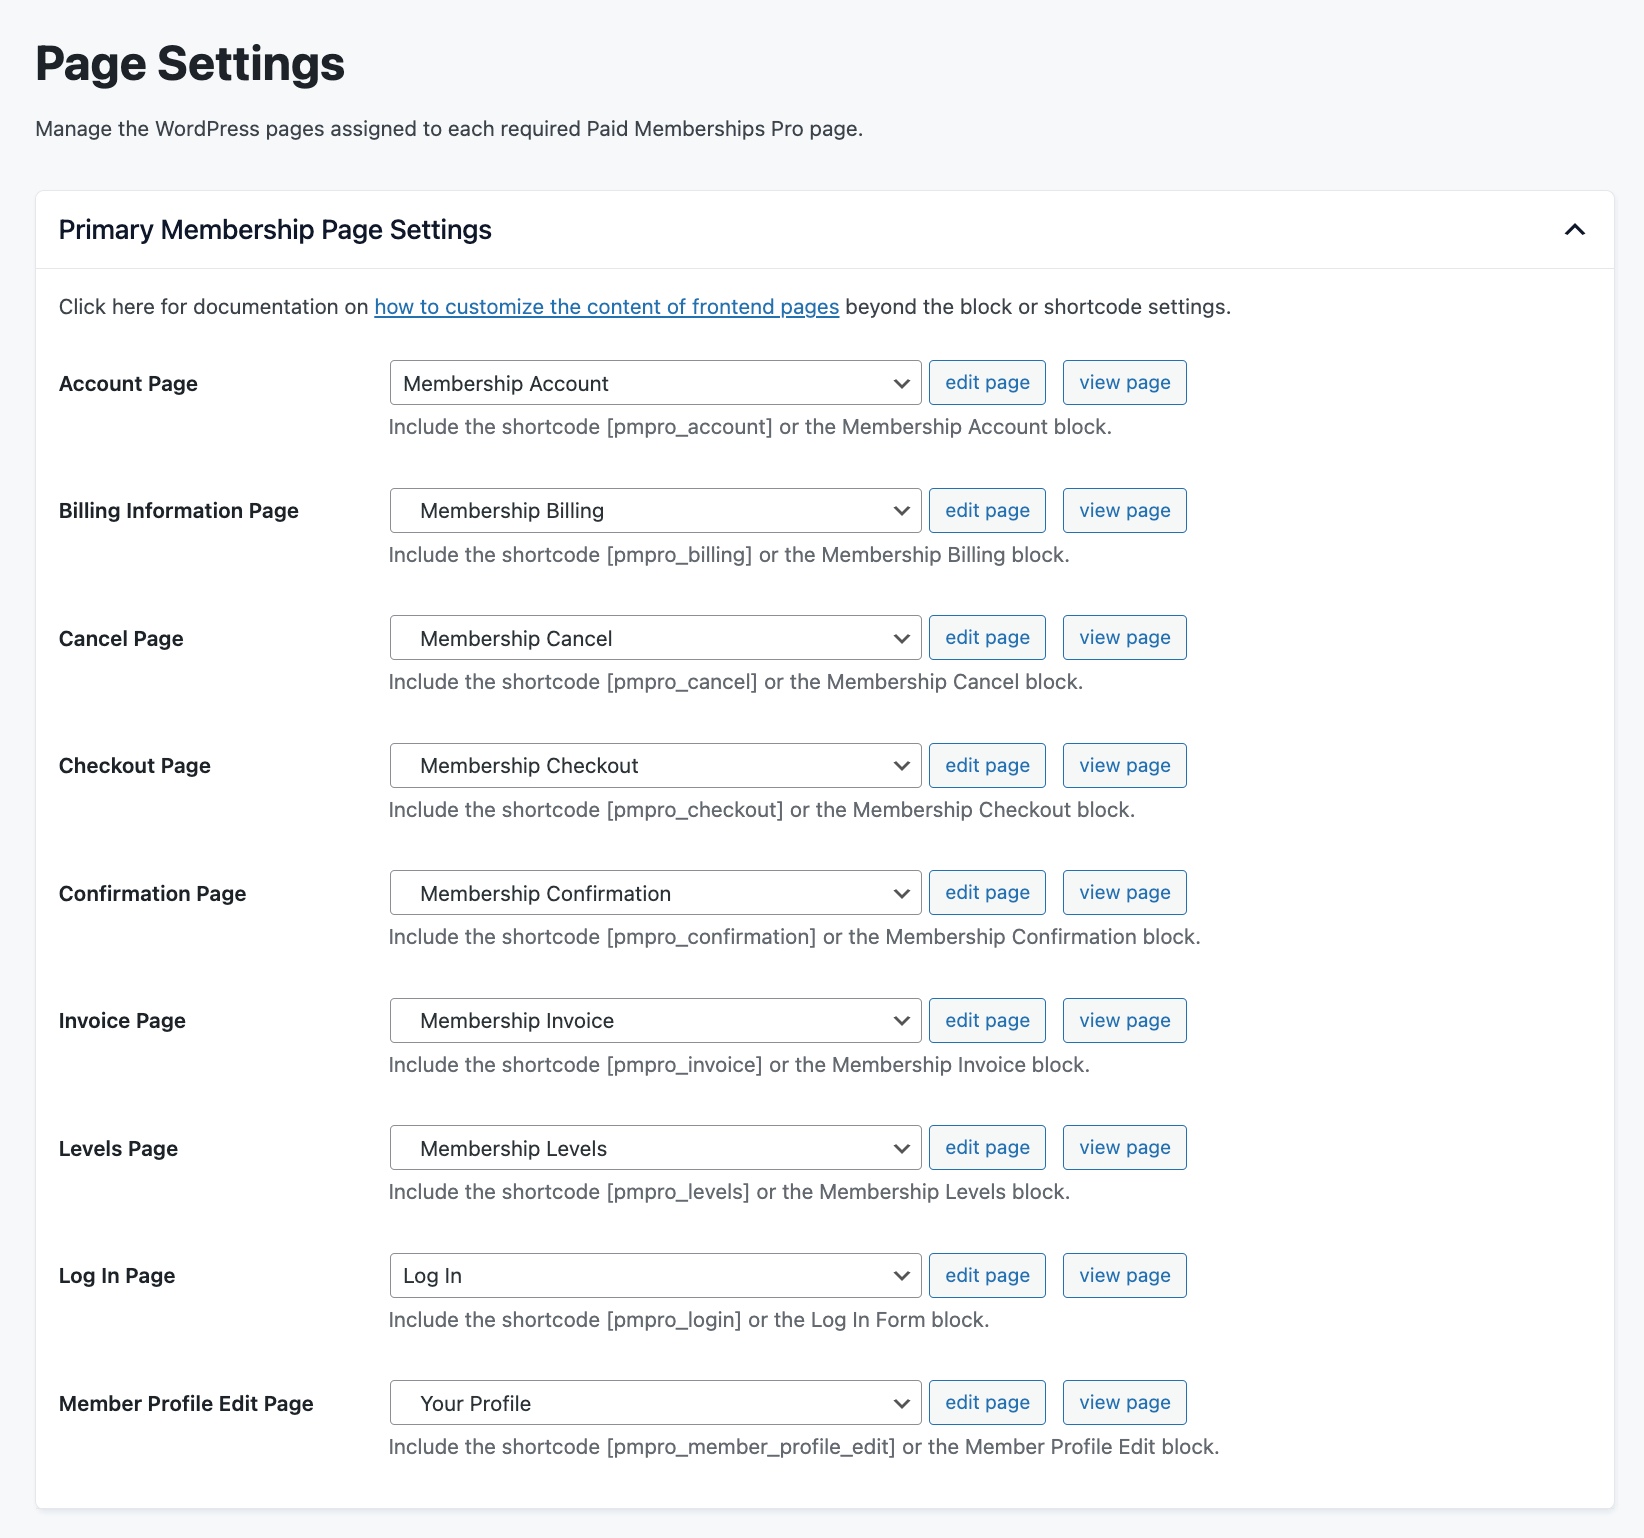
- Go to Memberships > Settings > Pages. Verify that the membership pages (Account, Levels, Checkout, Confirmation, Invoice, Cancel, Billing) are correctly assigned to the right pages on the destination. If the source site’s page IDs do not exist on the destination (because you used different page IDs during the rebuild), PMPro will be pointing at missing pages.
- Go to Memberships > Settings > Levels. Spot-check that your levels imported correctly. Pay specific attention to level IDs. If you set up the destination with new levels before importing, the level IDs may conflict.
- Go to Memberships > Settings > Advanced. Verify the content settings, the cancellation behavior, and any other advanced options match the source.
- For Add Ons with their own settings or tables (Affiliates, Group Accounts), verify each one’s configuration carried over. Some Add Ons store data in
wp_options(which moves cleanly with the database). Some have their own tables (which you need to have imported). Some store IDs that depend on post IDs matching across sites.
Step 8: Reconnect Your Payment Gateway and Webhooks
This is the highest-risk single step in a PMPro migration. If you mishandle the gateway connection, you can fail real charges, cancel real subscriptions, double-charge members, or send duplicate emails. Move slowly.
The general principle: do not have two sites connected to the same gateway in live mode at the same time. If both sites are listening for webhooks against the same Stripe account, one will succeed and one will fail, and you will not always know which.
The right sequence:
- On the destination site, enter your gateway API credentials but leave them in test mode initially.
- Run a test transaction in test mode to verify the connection works end-to-end.
- Do not switch the destination to live mode until you have also disconnected or paused the source site’s gateway connection.
- At the cutover moment (Step 9), switch the source site to test mode (or disconnect entirely), then switch the destination to live mode.
Stripe
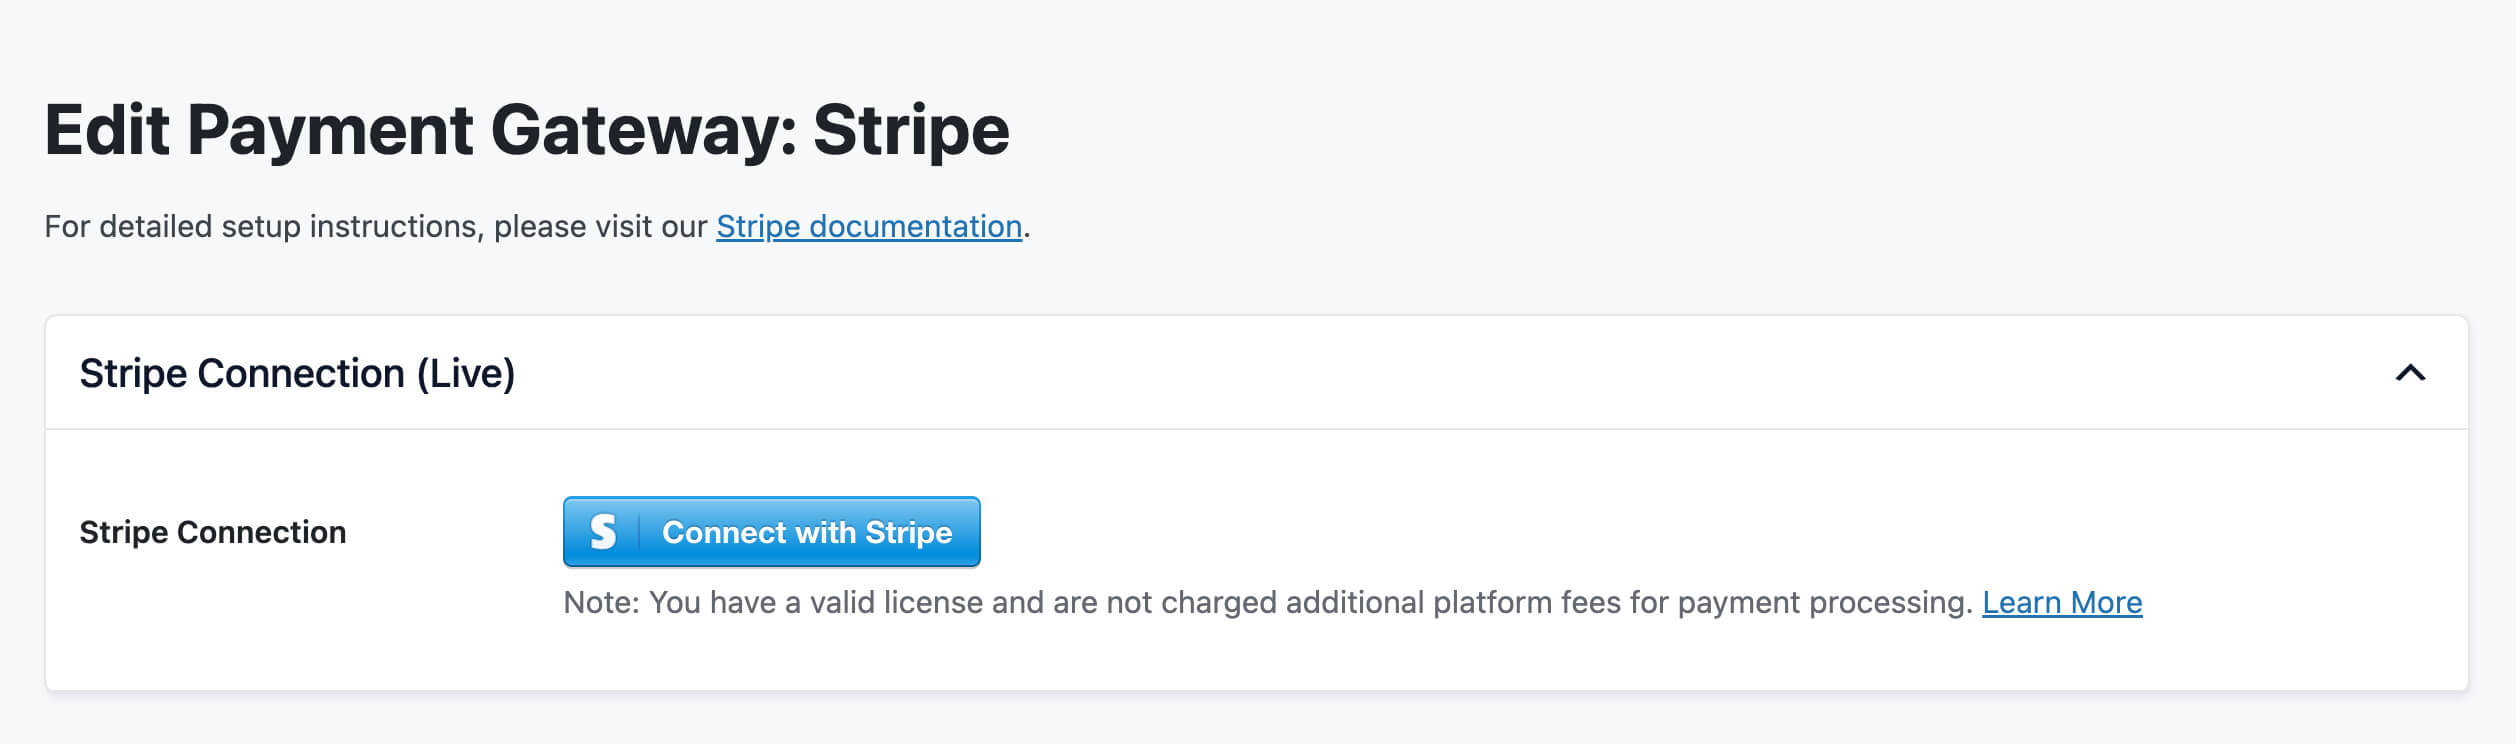
If you use Stripe, the connection on the new site needs to point at the same Stripe account that holds your live subscriptions. The simplest path is Stripe Connect:
- On the new site, go to Memberships > Settings > Payment Gateway.
- Click Connect to Stripe and authenticate with the same Stripe account.
- PMPro will configure the webhook automatically. Confirm the webhook is showing as connected.
- In your Stripe dashboard under Developers > Webhooks, verify that the new domain’s webhook URL is present. Remove the old domain’s webhook only after you have confirmed the new one is receiving events.
PayPal
The modern PMPro PayPal Gateway Add On uses the REST API with automatic webhook registration. There is no IPN URL to update and nothing to configure in the PayPal dashboard.
- Install and activate the PayPal Gateway Add On if it is not already. Go to Memberships > Settings > Payment Gateway and choose PayPal.
- Enter your Live (and, if you are testing first, Sandbox) Client ID and Client Secret from your PayPal Developer dashboard.
- Save settings. The Add On calls the PayPal API and registers the webhook for you. You should see a Webhook ID appear on the settings page confirming the registration succeeded.
The webhook endpoint the Add On registers is https://yoursite.com/wp-json/pmpro-paypal/v1/webhook. You do not need to enter this anywhere yourself: that line is informational, in case you need to debug a delivery failure later.
Because the webhook is tied to the API credentials rather than a single global IPN URL, the new site and the old site can both have working PayPal connections during DNS propagation without stepping on each other the way the old IPN model did. That said, the same dual-site rule from the top of this step still applies: do not leave the old site processing subscriptions against your live PayPal account once the new site is live. Switch the old site’s gateway to sandbox or disconnect it at cutover.
Other Gateways
For CCBill, Paystack, and other gateways, the same principle applies. Reconnect using the live API credentials, and update any webhook, IPN, or postback URLs stored in the gateway dashboard.
Dual-Site Transition: Forwarding IPN and Webhook Posts
During the DNS propagation window, both hosts may serve traffic for a short time. If your domain is changing and you cannot afford to miss any gateway events, you can set up a forwarding rule on the old domain that posts incoming gateway events to the new domain.
For peopel using the legacy PayPal gateway, here is a guide on IPN forwarding for this case.
Pause Mode Protects You While You Work
PMPro v2.10 and later includes Pause Mode, which automatically disables destructive processes when the plugin detects that your primary URL has changed. This means you can copy your live site to a temporary URL without worrying about it processing renewals or sending recurring payment emails behind your back.
You can confirm Pause Mode status and learn more in the Staging or Development Sites documentation.
Step 9: Point DNS to the New Host (the Cutover Moment)
Once the new site loads cleanly at its temporary URL, PMPro is configured, and the gateway is reconnected in test mode, it is time to flip the switch.
Before flipping DNS:
- Re-enable PMPro emails on the destination (you disabled them in the Pre-Flight Checklist).
- Turn off the Toolkit’s email forwarding.
- Switch the source site’s gateway to test mode or disconnect it.
- Switch the destination site’s gateway from test mode to live mode.
- Verify that the webhook URLs in the gateway dashboard point at the new site.
Then flip DNS:
- Log into your DNS provider (your registrar, Cloudflare, or wherever your A and AAAA records live).
- Update the A record (and AAAA record, if applicable) to point at the new host’s IP address. Your new host will give you the values.
- Wait for propagation. Most visitors will see the new site within minutes, although some may take up to 48 hours.
While DNS propagates, both hosts may serve traffic. This is why the gateway and database must be ready on the new host before you switch DNS. Members who land on the new host should be able to log in, view content, and renew normally.
If you also changed domains during the move, you will want a 301 redirect from the old domain to the new one. The complete guide to changing your domain name covers that flow in detail.
Step 10: Post-Launch Verification
The migration is not done when DNS resolves. It’s done when you have tested the things that matter to your members. Run through this checklist in the first hour after launch, then circle back at the 24-hour mark for the items that take time to settle.
- Test an admin login on the new site.
- Test a member login with an existing member’s credentials (use a test account you own, not a customer’s). Confirm you reach the member dashboard and can view paid content.
- Process a real checkout for a low-cost level using a real card. Refund yourself immediately. This confirms the gateway path works end-to-end with live credentials.
- Trigger a webhook event: In Stripe, send a test webhook to your endpoint and confirm PMPro receives it.
- Check on Action Scheduler: Visit Tools > Scheduled Actions and confirm events are running. If Pause Mode is still active because of the URL change, disable it now that you are on the production URL.
- Spot-check the uploads folder: Open a few posts with images and confirm the images load.
- Spot-check member-only content: Confirm the access restrictions still work as expected.
- Spot-check member emails: Send a test email from PMPro and confirm it arrives without delays or spam folder issues. If you migrated email DNS records (SPF, DKIM, DMARC), let them settle.
- Verify external integrations (email service provider, CRM, Zapier, analytics) are connected to the new site.
- Submit the new sitemap to Google Search Console if the URL changed.
- Watch the error logs for the first few hours. Most hosts expose
error.logthrough the control panel.
Migrations have a “did it work” window that lasts 24 hours, not 24 minutes. The first hour shows obvious breakage. The rest of the day shows subtle problems: a Stripe webhook that quietly fails on a renewal, a CRM integration that stops syncing, a transactional email that lands in spam. Keep your rollback plan accessible until the 24-hour window passes cleanly.
Recovery Sidebar: What If Something Goes Wrong?
Most migration problems map to a small number of root causes. If you hit one of these in the first 24 hours, here is where to look first.
Members cannot log in (but the site loads). Almost always a salts mismatch. Either copy the salts from the source wp-config.php to the destination, or accept that members will reset. See Step 5.
Logged-in pages are broken, anonymous pages are fine. Almost always a caching problem. The new host may be aggressively caching responses for logged-in URLs like /membership-account/ or /login/. Add those paths to your cache exclusion list.
Members report duplicate charges or canceled subscriptions. Stop. Check whether the old site is still running scheduled actions against the live gateway. If both sites are pointing at the same Stripe account and processing renewals, you have a race condition. Disconnect the gateway on the old site immediately, then audit the past 24 hours of charges in Stripe.
The new site is slow. Run through the host’s recommendations for object caching and PHP workers. Membership sites generate a lot of logged-in traffic that cannot be cached the same way as a blog. Our guide to the best web hosting for membership sites walks through what to look for.
Transactional emails are not arriving. Email DNS records (SPF, DKIM, DMARC) take time to settle when you change hosts. Use a deliverability tool like Mail Tester to confirm. If you use SendGrid, Postmark, or another transactional email service, verify the API key is still valid on the new host.
If you are stuck and need help mid-migration, open a support ticket or reach out to your hosting provider. The longer a half-finished migration sits, the more risk accumulates.
When to Hand This Off to PMPro Max
If you read the runbook above and your reaction is “this is doable, but I would rather not do it myself,” you are describing exactly what PMPro Max is built for. Or, if you read the runbook and your reaction is “absolutely not for me!”, you’ve reached the right part of this guide.
PMPro Max is our all-in-one bundle for membership site owners who do not want to think about server administration. Every Max plan includes:
- Managed PMPro Hosting tuned for membership sites.
- Unlimited technical support from the same team that maintains the plugin.
- “Do It For Me” development requests.
- Free migration as part of onboarding: Our team handles the migration steps in this guide on your behalf.
A PMPro migration done by someone who has done dozens of them takes a few hours and rarely surprises anyone involved. The same migration done by someone doing their first one takes a full day or longer and frequently produces a surprise or two. For a site with paying members where downtime or data integrity issues cost real money, the math usually favors handing it off.
Reasons to specifically choose PMPro Max for a migration:
- You have active members and any downtime or billing disruption is unacceptable.
- Your staging site was built independently from live, or has diverged enough that IDs no longer match. This is a custom data reconciliation project, not a runbook one.
- The migration involves anything non-standard. Custom code, unusual integrations, multiple Add Ons with their own data.
- You have never done a migration before and the stakes are high.
- You started one and got stuck, and the longer it takes to finish, the more risk accumulates.
Either path is fine. The wrong path is doing a migration casually, assuming it is just a file copy, skipping the backup, forgetting the uploads folder, or leaving webhooks pointed at the wrong URL. Migrations punish carelessness more than almost any other operation you will do on a membership site.
Frequently Asked Questions
No. As long as you reconnect the same gateway account (Stripe, PayPal, etc.) on the new site and update the webhook, the existing subscriptions keep running. Members will not see anything unusual on their statements.
A host change alone does not affect SEO. If you keep the same domain, URLs, and content structure, search engines will not notice. If you change domains during the move, follow the change your domain name guide to set up 301 redirects and submit a change of address in Google Search Console.
A short window of read-only or maintenance time is hard to avoid. The cleanest path is a low-traffic cutover window where checkouts may be briefly paused but content remains visible. True zero-downtime migrations require a load balancer and database replication, which is beyond what most sites need.
Be careful. One-click clones overwrite the target’s database wholesale, which means real member data and recurring orders on the live site can be replaced with stale data from staging. For staging-to-live promotion, push your code and settings manually instead of cloning the database. The Toolkit Migration Assistant is built for this case.
Rehearse on a subdomain or a /etc/hosts entry first. Do every step (file copy, database import, search-replace, gateway test) on the new host without changing DNS. Only flip DNS once you have verified that login, checkout, and webhooks all work.
Final Thoughts
A PMPro site migration is not glamorous work, but it is the kind of work where a clear plan pays for itself in saved hours and a calm inbox. Back up, copy, point DNS, verify. Slow is smooth, and smooth is fast.
If you have questions about the steps above, our team is here to help. Standard and Plus members can open a support ticket, and PMPro Max customers can ask the team to handle the heaviest steps as part of onboarding.
Whichever direction you are going (new host, new server, or staging promotion), the goal is the same: a smooth transition that your members never notice. With the right preparation, that is the migration story they will tell.
PMPro Max—Built for Membership Sites
Everything in its right place. The best membership platform on our official hosting setup, all managed by us for $99/mo [compare pricing]. Hosting includes a Max license, unlimited technical support, Do It For Me development requests, access to our AI Skills library, and free migration.

Free Download: The AI-Powered Membership Site Blueprint
Download the free guide: Learn how to plan, build, and grow a membership site using AI as your strategic partner: from buyer persona to launch and beyond.