The Group Accounts Add On for Paid Memberships Pro enables you to sell group memberships, where one account (the parent account) manages and pays for a group of members (child accounts).

With the ability to add multiple members under one primary account, businesses can significantly expand their user base and revenue.

The Group Accounts Add On can be used by many types of membership and subscription sites. Some of the most popular scenarios for group or team accounts includes:

  1. Corporate Training and Resources: Corporations purchase memberships for their employees, providing them with access to exclusive training materials and resources for professional development.
  2. Educational Institutions: Schools or universities can offer access to courses and academic content to students and faculty through a single group account.
  3. Family Plans: Ideal for family-oriented services or content, allowing one family member to manage and pay for access for the entire family.
  4. Health and Wellness Programs: Gyms or wellness centers can offer group memberships to corporate clients or families, promoting health and fitness.
  5. Online Communities and Clubs: Clubs or online community platforms can utilize group accounts for managing memberships of different interest groups or sub-communities.
  6. Subscription-Based Services: For services offering tiered content or features, such as video streaming services or software tools, enabling one primary account holder to manage access for a group.

No matter what you’re creating, with PMPro, you can build your membership site your way. While this list is a helpful jumping off point, you may have other ideas for how to sell group memberships in a way that best fits your membership site goals.
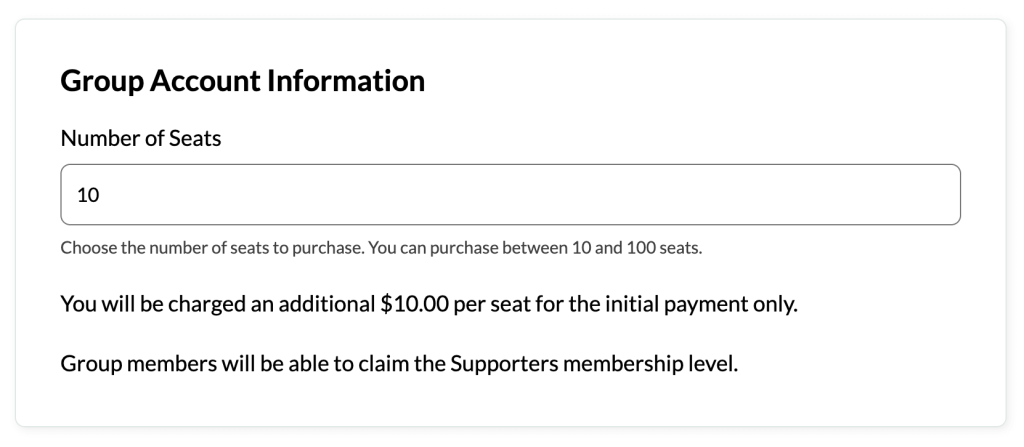
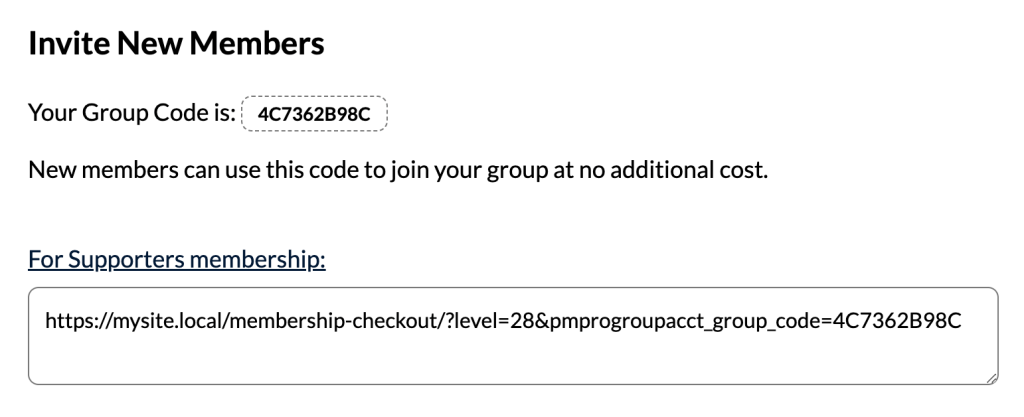
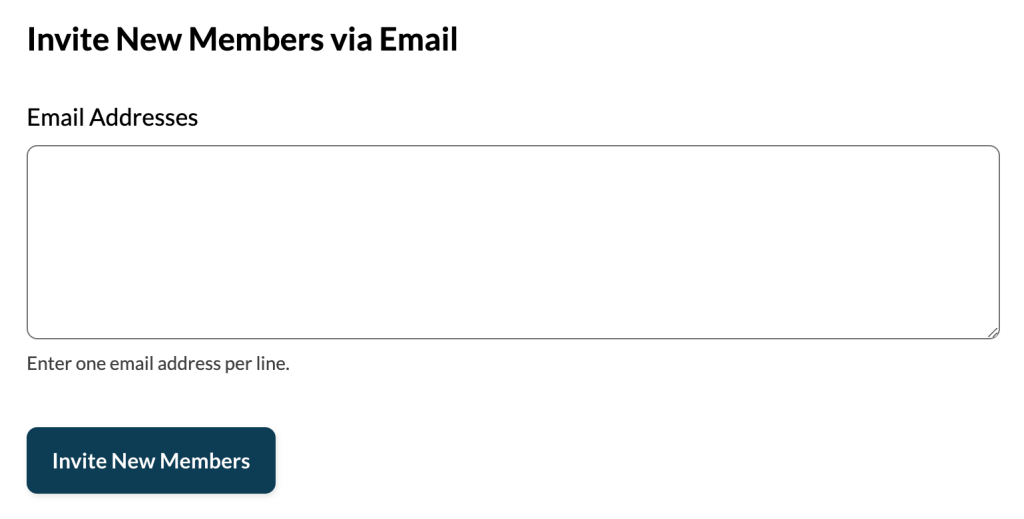
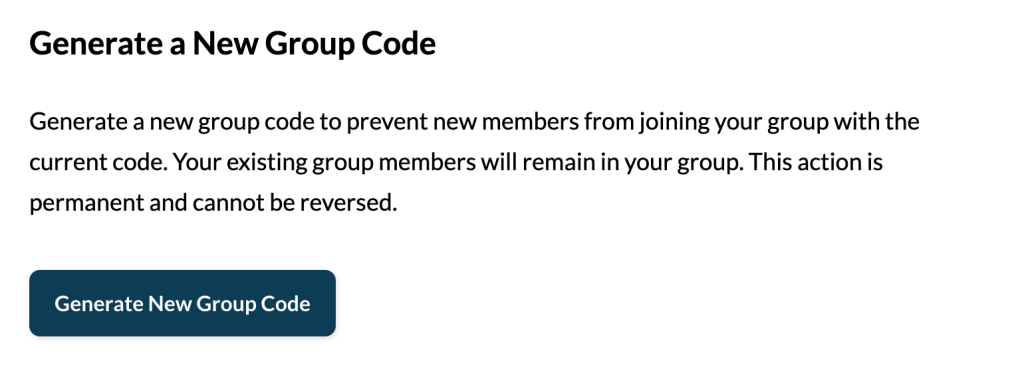
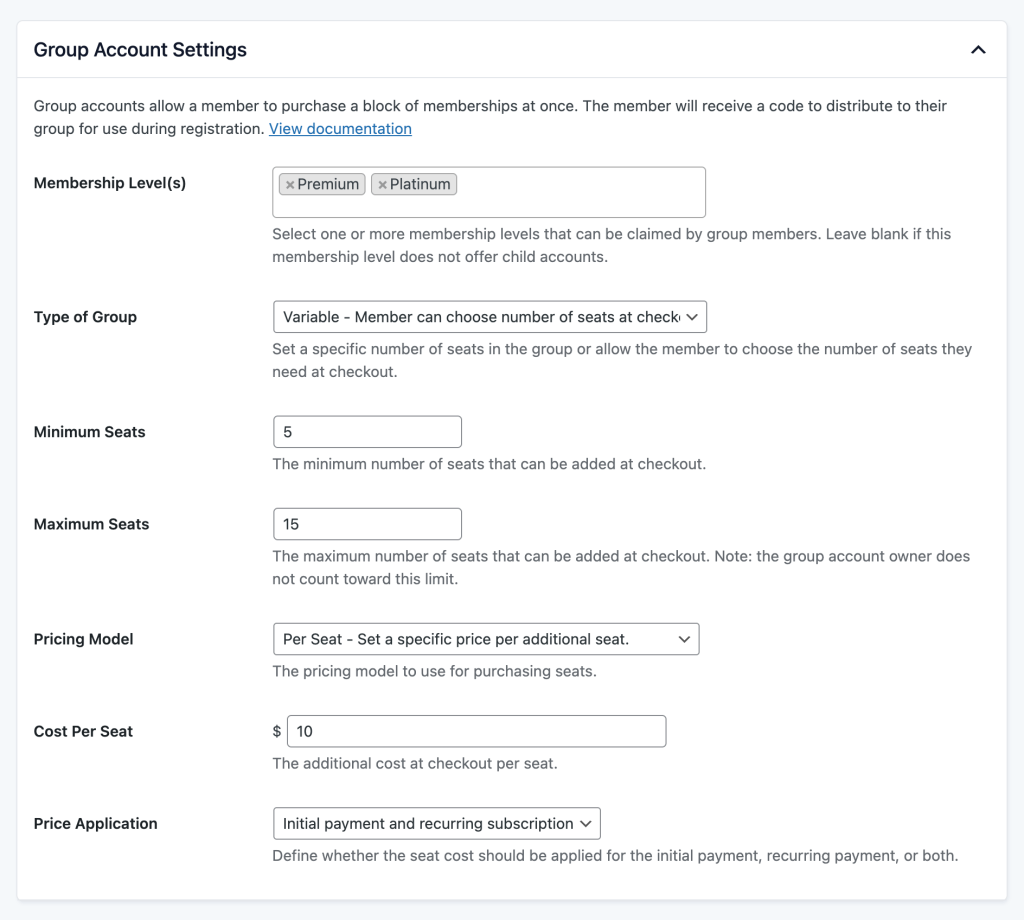
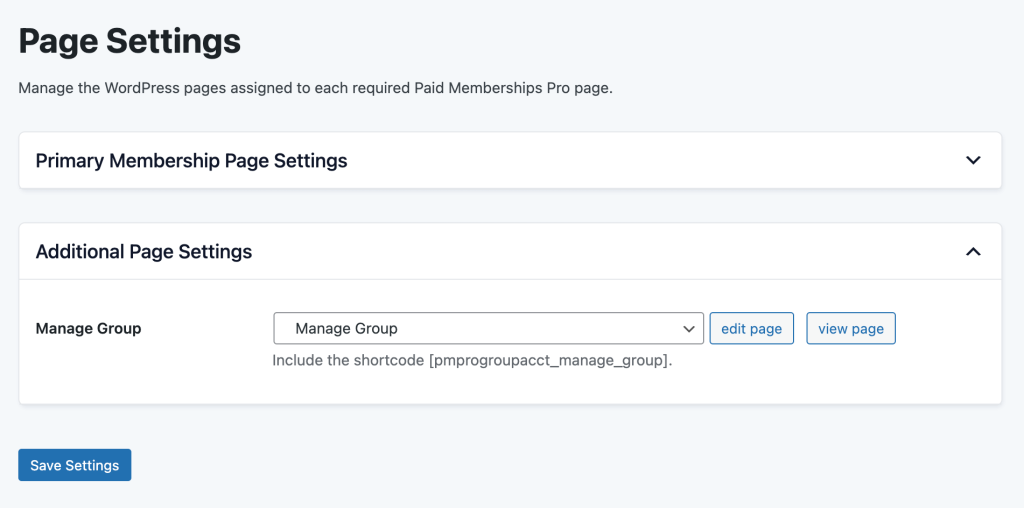
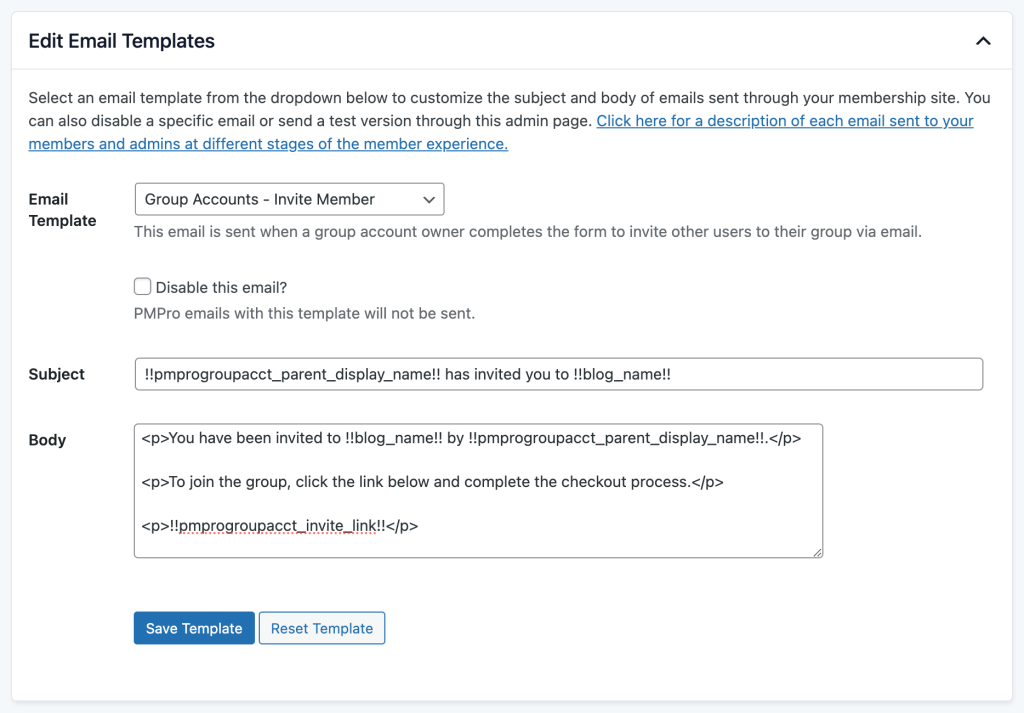
Note: This new Add On replaces the code-based features of the Sponsored Members Add On with more features and no-code setup.

Video Demo: Group Accounts

Installation

You must have the Paid Memberships Pro plugin installed and activated with a valid license type to use this Add On.

  1. Navigate to Memberships > Add Ons in the WordPress admin.
  2. Locate the Add On and click Install Now.
    • To install this plugin manually, download the .zip file above, then upload the compressed directory via the Plugins > Add New > Upload Plugin screen in the WordPress admin.
  3. Activate the plugin through the Plugins screen in the WordPress admin.

Settings

Create the Manage Group Page

After configuring the group account details for your levels, you must also create a new frontend page for your member to manage their group.

  1. Navigate to Memberships > Settings > Pages in the WordPress admin.
  2. Locate the Additional Page Settings section.
  3. Click Generate Page to automatically create the Manage Group page. This page will be created as a child of your Membership Account page.
  4. If you prefer to manually create this page, you must use the shortcode [pmprogroupacct_manage_group] and then return to this screen to assign the page using the dropdown.
  5. Save Settings to update your membership site.
Generate and Assign the Manage Group page using the PMPro Group Accounts Add On

Setting Up Membership Levels

Group Accounts requires you to have a minimum of two membership levels in your site: one that the owner of the group will hold (the parent account) and the level that members of the group get assigned (the child account).

Create the Child Account Level

  1. Navigate to Memberships > Settings > Levels in the WordPress admin.
  2. Create a new membership level that members of the group (child accounts) will be assigned.
    • The level pricing or expiration details here do not matter, but if you also plan to offer this level for individual checkout, you should set these up.
    • If you do not set up level pricing or expiration details, the level will be available for free on your site. People without a group code will be able to sign up for this level at no cost.
    • Do not set up any Group Account settings for this child account.
    • You can consider to hide the child account level from your Membership Levels page using the Advanced Levels Shortcode Add On or a custom built pricing page.
  3. Save the level.

Create the Group Owner (Parent Account) Level

The next step to configure Group Accounts is to add a new membership level or edit an existing level to define group settings.

  1. Navigate to Memberships > Settings > Levels in the WordPress admin.
  2. Choose an existing level to edit or select Add New Level.
  3. Group Account Settings: In the edit level screen, find the Group Account Settings section.
  4. This section defines all the rules for your group membership, including:
    • Membership Level(s): Select level(s) available for group members. This is the child account level that people who use your group code will be assigned at checkout (at no cost to them).
    • Type of Group: Choose between a fixed number of seats or variable.
      • Fixed Seats: The group includes a specific number of seats.
      • Variable Seats: The user can select the number of seats they need at checkout.
    • Based on the type of group you have chosen, the following fields may appear:
      • Total Seats (Fixed): Specify the total number of seats in this group.
      • Minimum/Maximum Seats (Variable): Set the range for purchasable seats.
    • Pricing Model: Define how to handle child account pricing.
      • None: Child account pricing is built into the price of the parent account’s membership level.
      • Per Seat: Set an additional price to charge per seat at checkout.
    • Cost Per Seat: If you have chosen per seat pricing, define the additional per-seat cost at checkout.
      • Note: The total amount due will not automatically display at checkout. This is a known concern that we are working to improve.
    • Price Application: Choose to apply the per seat cost to the initial checkout, recurring payments, or both.
      • Note: If the parent’s level does not have recurring billing, and you choose to apply per seat pricing to the recurring payment, you must set up recurring billing for the parent level. If this is not defined, a default billing cycle of 1 per month will be used.
  5. Save the level to add or update settings.
Edit Membership Level Settings to Add Group Accounts using the PMPro Group Accounts Add On

Group Checkout Process for Parent Account

Here’s what happens when a user selects to checkout for a group membership as the account owner:

  1. The parent account’s base level pricing is shown in the main section of checkout.
  2. A new Group Account Information section is shown on the page. This section displays information about the group including:
    • Number of Seats: The checkout page displays the fixed number of seats included or an option to choose a number of seats between your minimum and maximum setting.
    • Child Account Pricing: The checkout page displays the price for each child account, if defined.

The total amount due at checkout is calculated and charged when the checkout form submits. The parent account will see a recap of their billing details on the membership confirmation page.

Parent Account checkout fields to select the number of seats to purchase using the PMPro Group Accounts Add On

How Parent Accounts Manage Their Group

Any member that is the parent of a group will see a new link to Manage Group within the Memberships section of the Membership Account page. This page includes the following options:

  • View the list of active members, including their username and membership level, in the group.
  • Optionally remove members from the group.
  • Information on how to invite new members to the group, including their group code and invite links for any membership levels that the group supports.
  • Field to invite members to the group by email. This form triggers an invite email with a direct link to checkout for the group’s supported membership level.
  • Regenerate the group code if the existing code is being abused or they otherwise want to have a new code that isn’t shared yet.
Parent Accounts and Admins can see group members and optionally remove people using the PMPro Group Accounts Add On

If you are the site owner (administrator), you can also use this Manage Group page to adjust the number of seats in the group. Note the editing the number of seats does not adjust the subscription price for the member.

Group Checkout Process for Child Account

Child accounts will use the provided Group Code at checkout. This code bypassses any payment for the chosen level, essentially giving them the membership level for free.

On their membership account page, they will see a note that their account is managed by the named parent account.

Parent Account Expiration or Cancellation Process

  • When the parent account loses membership or changes their level, the child accounts lose access immediately.
  • Previously associated child accounts do not automatically rejoin when a parent rejoins. The parent will need to send the new invitation link to their group in order for them to join again.

Customizing Email Templates

This Add On adds a new email template for group account invites, as well as a new checkout template variable to recap group information.

View or Change the Invite Member Email

  1. Navigate to Memberships > Settings > Email Templates in the WordPress admin.
  2. Select the Group Accounts – Invite Member template.
  3. Make changes to the template as you wish.
  4. Click Save Template to apply your changes.
Edit the Invite Member Email using the PMPro Group Accounts Add On

View or Change Membership Checkout Emails

  1. Navigate to Memberships > Settings > Email Templates in the WordPress admin.
  2. Select any email that begins with Checkout – template. These are the various emails that may be sent to a member after a free or paid checkout, based on your level pricing and payment gateway.
  3. Add the new template variable !!pmprogroupacct_group_info!! to your template.
  4. This section will show the group’s code, supported child levels, and includes the correct checkout links, so that the parent account knows how to get their group signed up.
  5. Make any other changes to the template as you wish.
  6. Click Save Template to apply your changes.

Action and Filter Hooks

apply_filters( 'pmprogroupacct_show_group_code_field', true );

Filter whether or not to show the group code field on the checkout page. Default: true.

Screenshots

Parent Account checkout fields to select the number of seats to purchase using the PMPro Group Accounts Add On

Parent Accounts and Admins can see group members and optionally remove people using the PMPro Group Accounts Add On

Parent Accounts and Admins can see the group code and direct checkout links using the PMPro Group Accounts Add On

Parent Accounts can Invite Members by Email using the PMPro Group Accounts Add On

Parent Accounts and Admins can regenerate the group code to repair issues of code abuse or for other security using the PMPro Group Accounts Add On

Edit Membership Level Settings to Add Group Accounts using the PMPro Group Accounts Add On

Generate and Assign the Manage Group page using the PMPro Group Accounts Add On

Edit the Invite Member Email using the PMPro Group Accounts Add On

This is a Plus Add On.

Plus Add Ons are included in all Plus or higher premium membership plans.