If your membership site already runs Gravity Forms for your contact form or member support, you have most of what you need to launch a member content submission program, no new plugin required.
Gravity Forms’ Advanced Post Creation Add-On (included with the Pro and Elite licenses) turns any form into a post-creation engine. The trick is that Gravity Forms thinks in feeds, not just fields, which means one form can do different things based on who is submitting and what they pick. That makes it the right form builder for membership sites that want real moderation rules, level-based behavior, and custom post type support without writing custom code.
Here’s the full workflow we’ll build:
- Configure the post submission form and the Create Post feed
- Lock the form down to specific membership levels with PMPro
- Set up moderation, submission limits, and on-site display
Let’s wire it up.
How to Set Up Member Submissions With Gravity Forms
Make sure these plugins are installed and active before you start:
- Gravity Forms: Pro or Elite license (required for the Advanced Post Creation Add-On)
- Advanced Post Creation Add-On for Gravity Forms
- Paid Memberships Pro
1. Build the Post Submission Form
Start with a blank form. Unlike WS Form, Gravity Forms doesn’t auto-generate a post submission template, you build it from form fields, then connect those fields to a post via a feed in the next step.
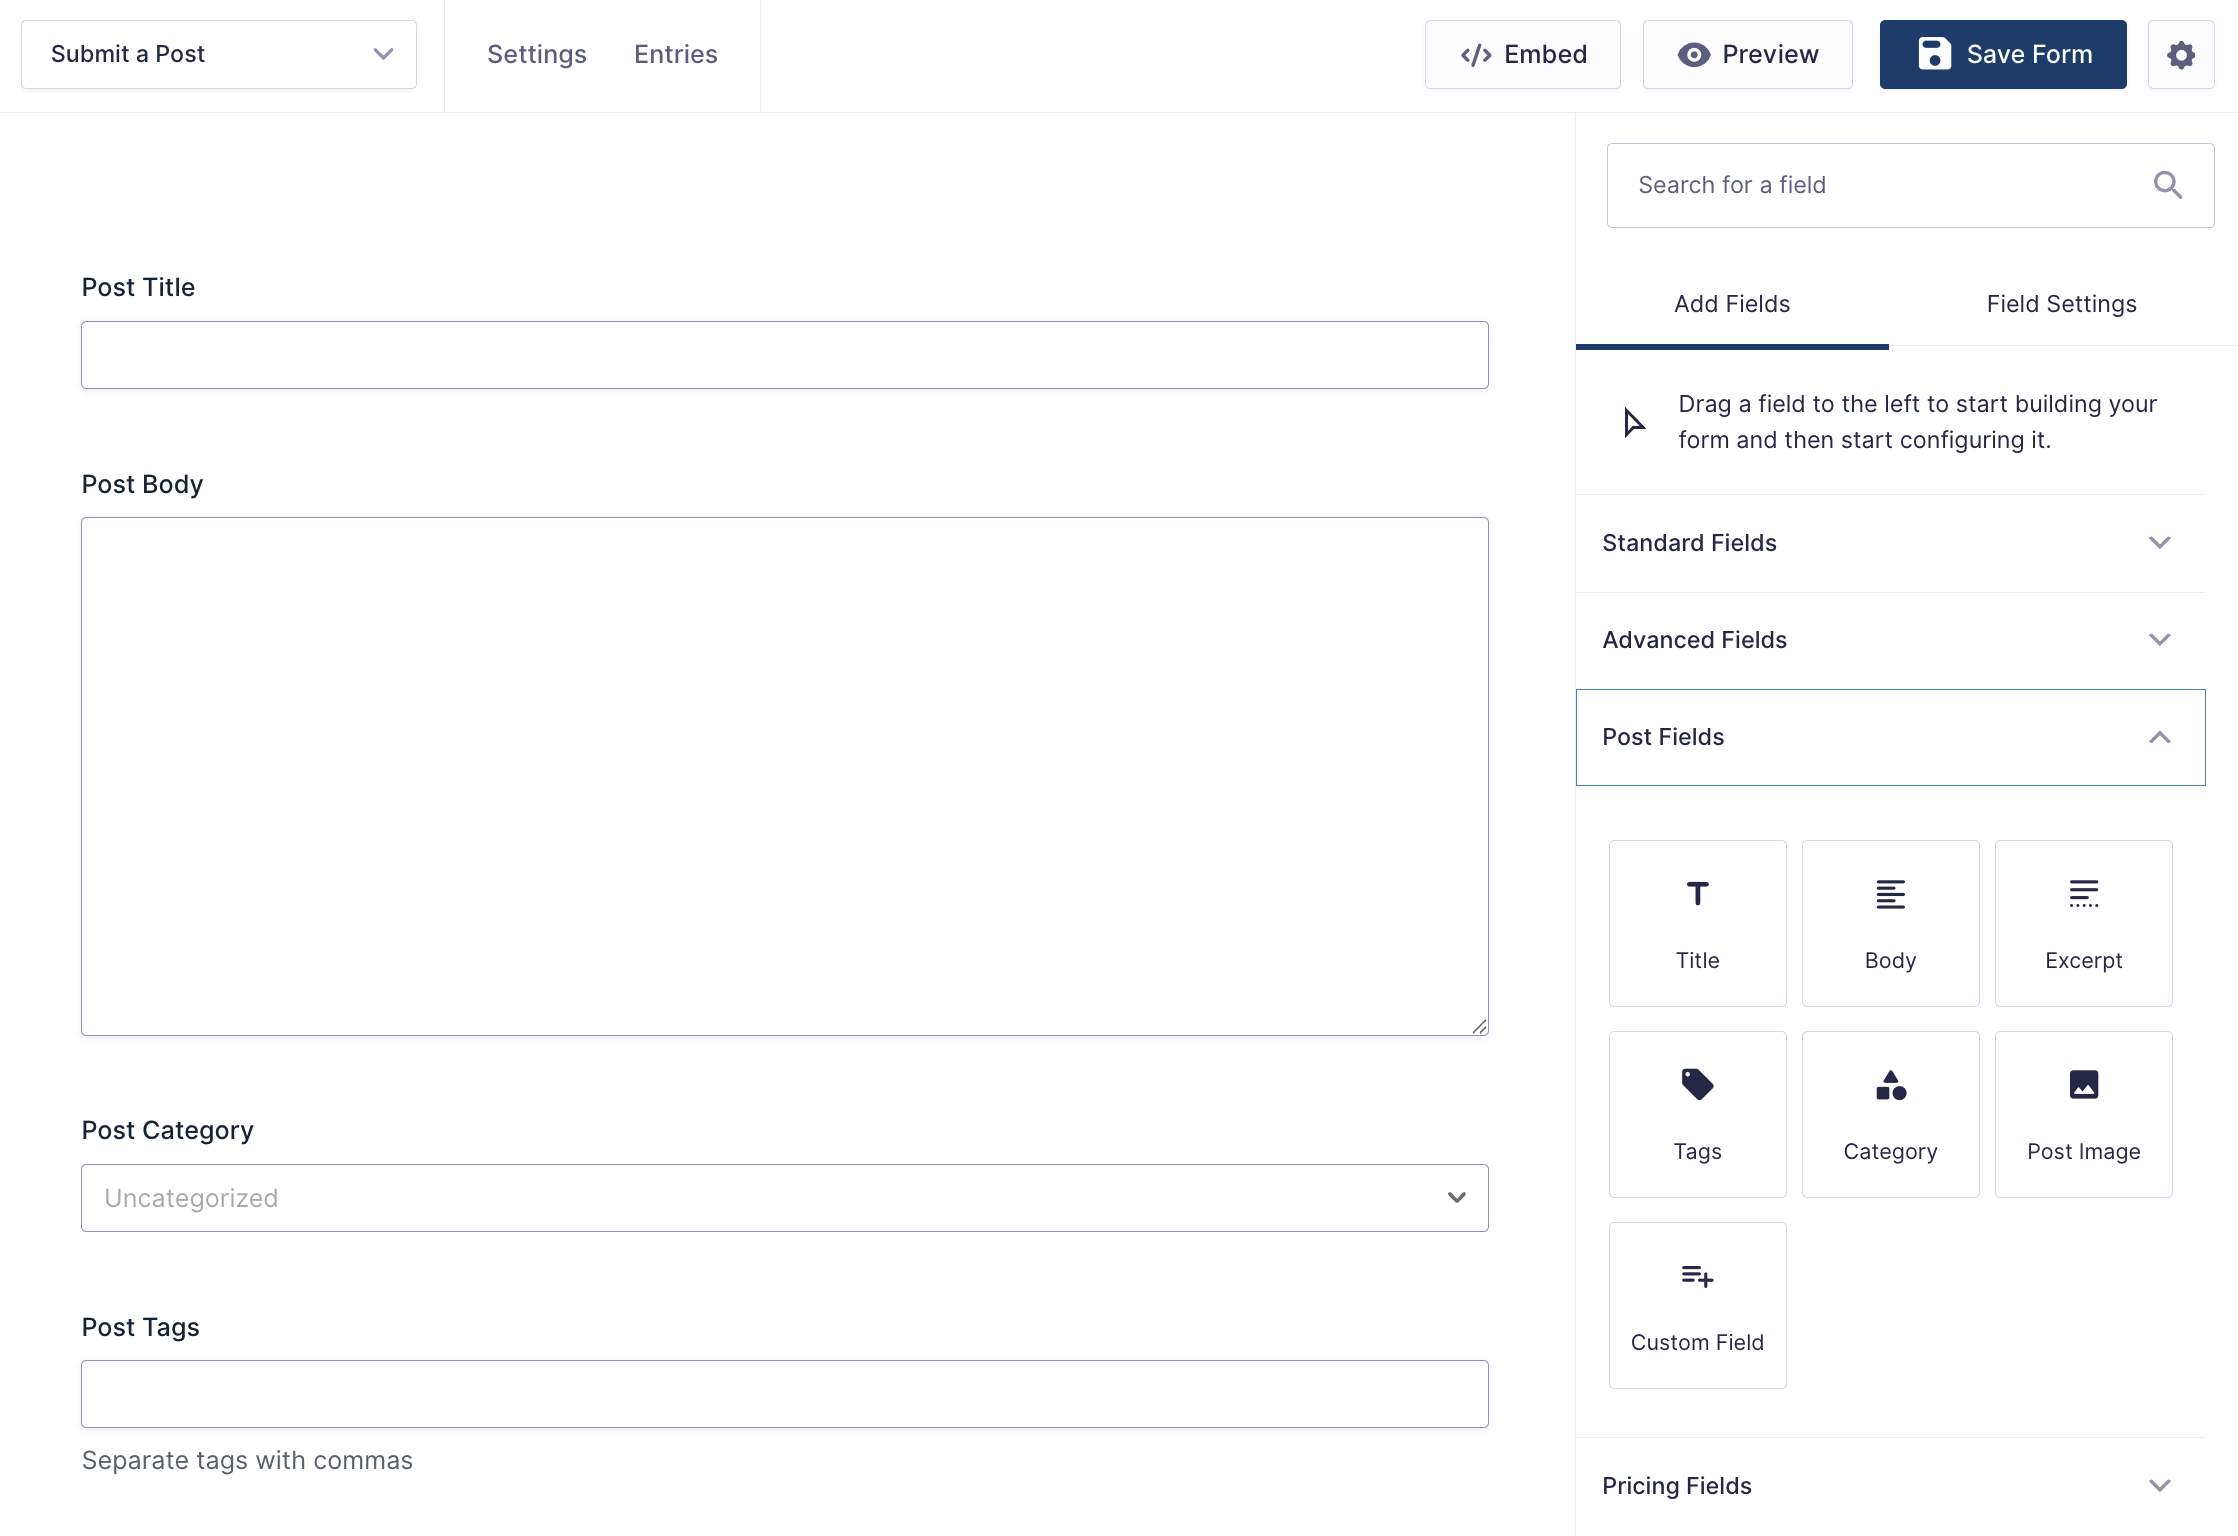
- Go to Forms > New Form in the WordPress admin and create a blank form.
- Add the fields you want members to fill in. A common starting set:
- Single Line Text:
post title - Paragraph Text (or Rich Text):
post content - Drop Down or Checkboxes:
categories - Multi Select:
tags - File Upload (Image):
featured image
- Single Line Text:
- Save the form.
You’re not done yet. At this point you just have a generic form. Submissions go to entries, not posts. The next step is what makes the magic happen.
2. Add a Create Post Feed
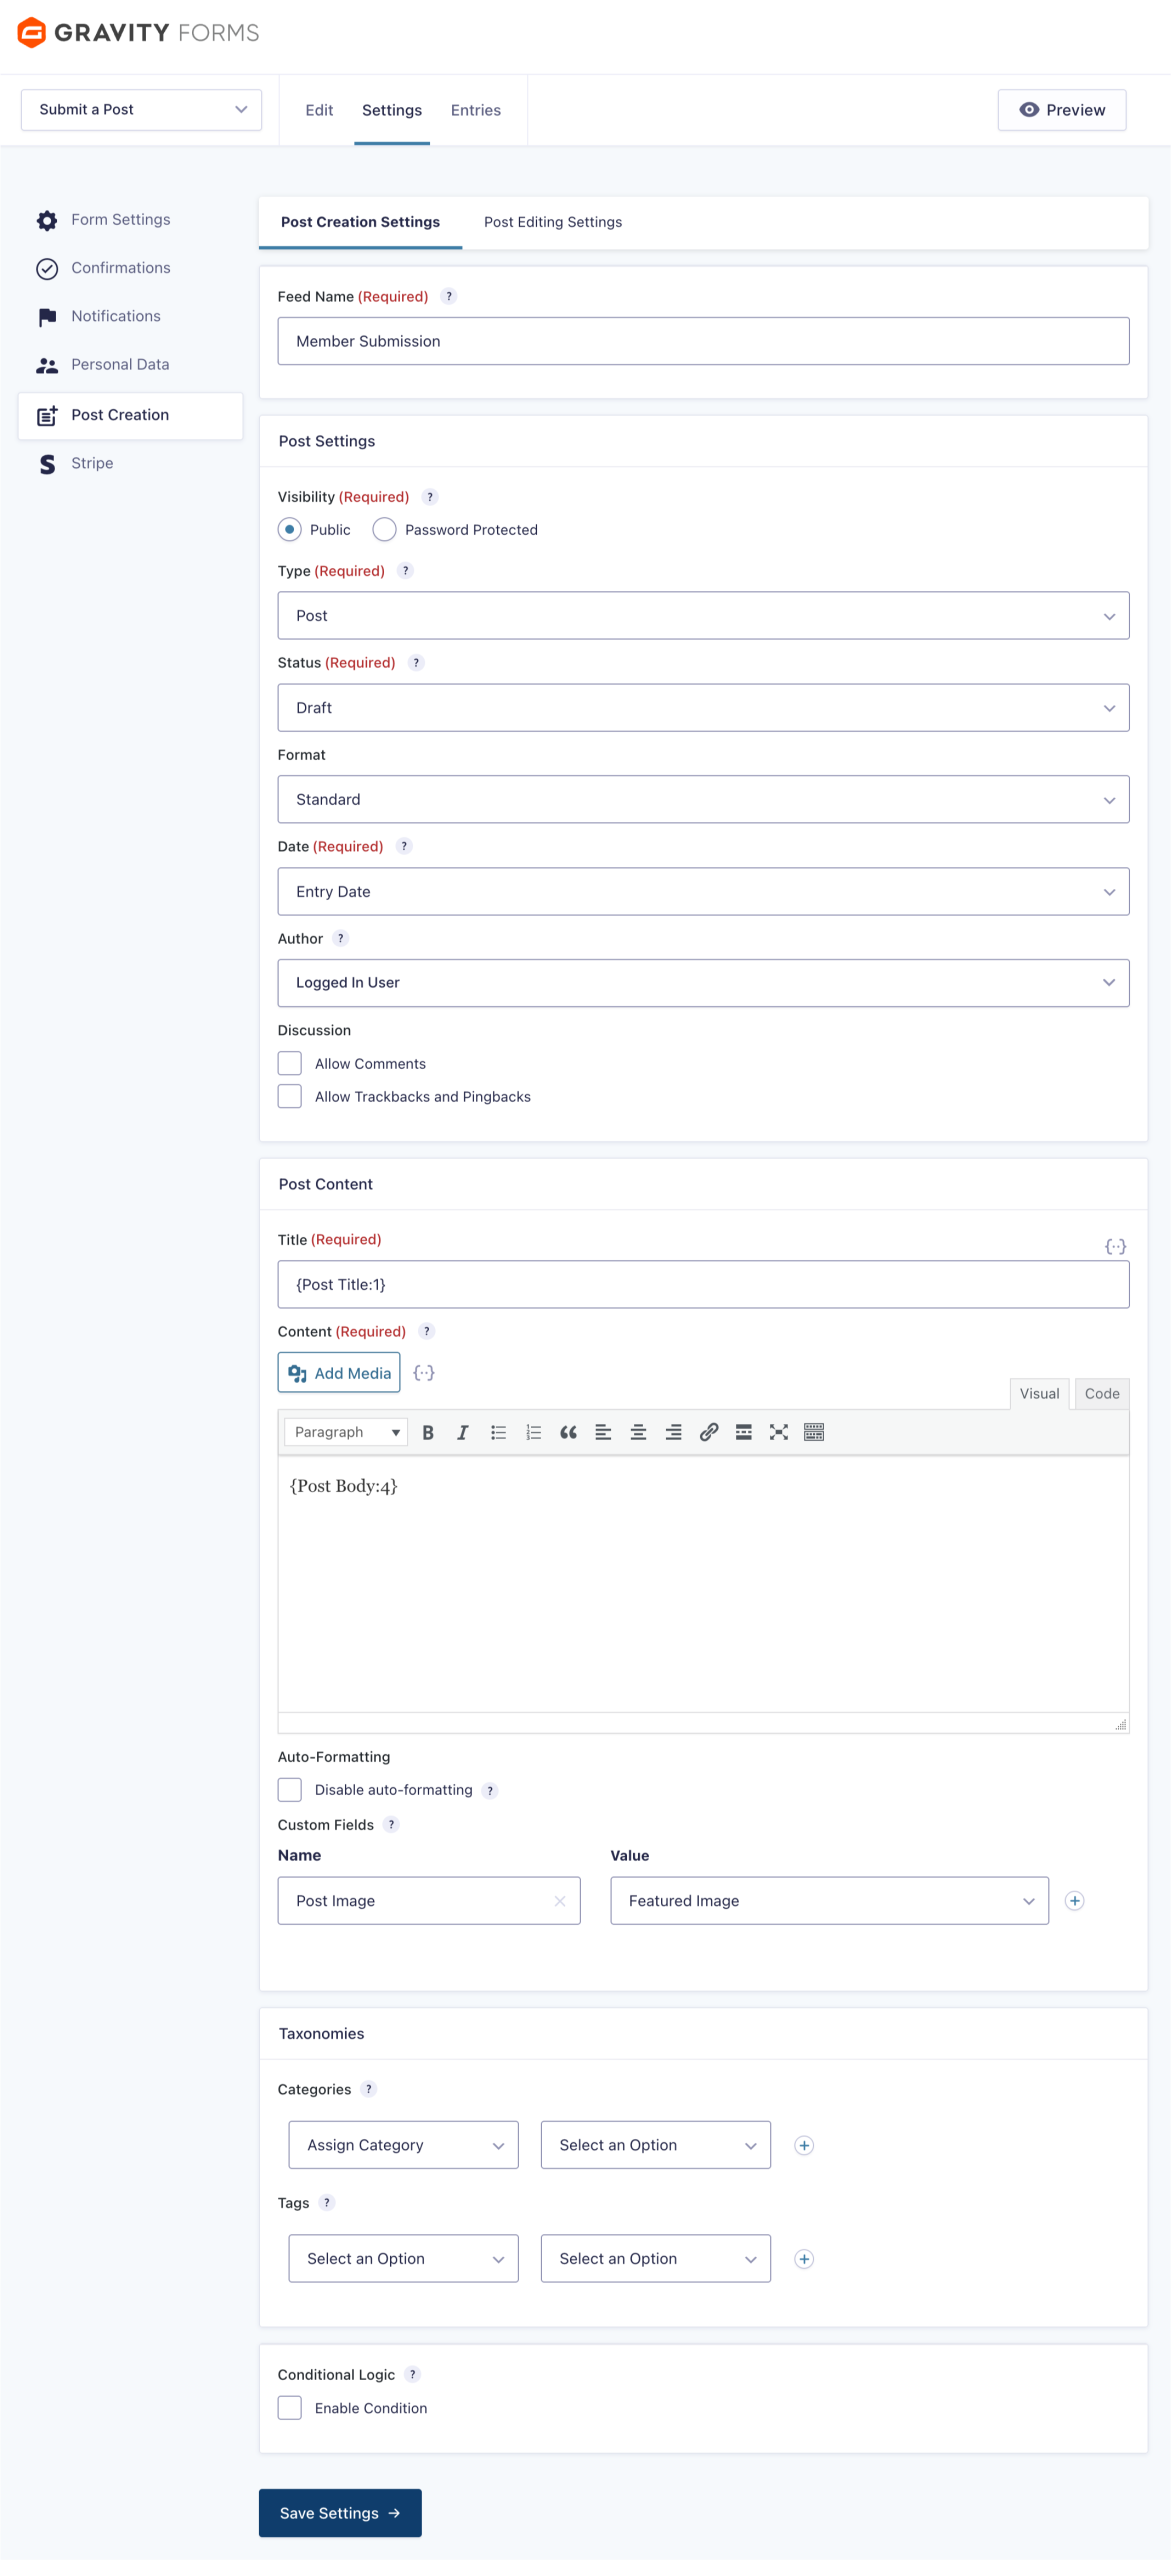
A feed in Gravity Forms is a rule that says “when this form is submitted, do this thing.” The Advanced Post Creation Add-On adds a Create Post feed that maps form fields to a real WordPress post.
- With your form open, go to Settings > Post Creation
- Click Add New and give the feed a name.
- Choose the Post Type (a standard Post, or any custom post type you’ve registered).
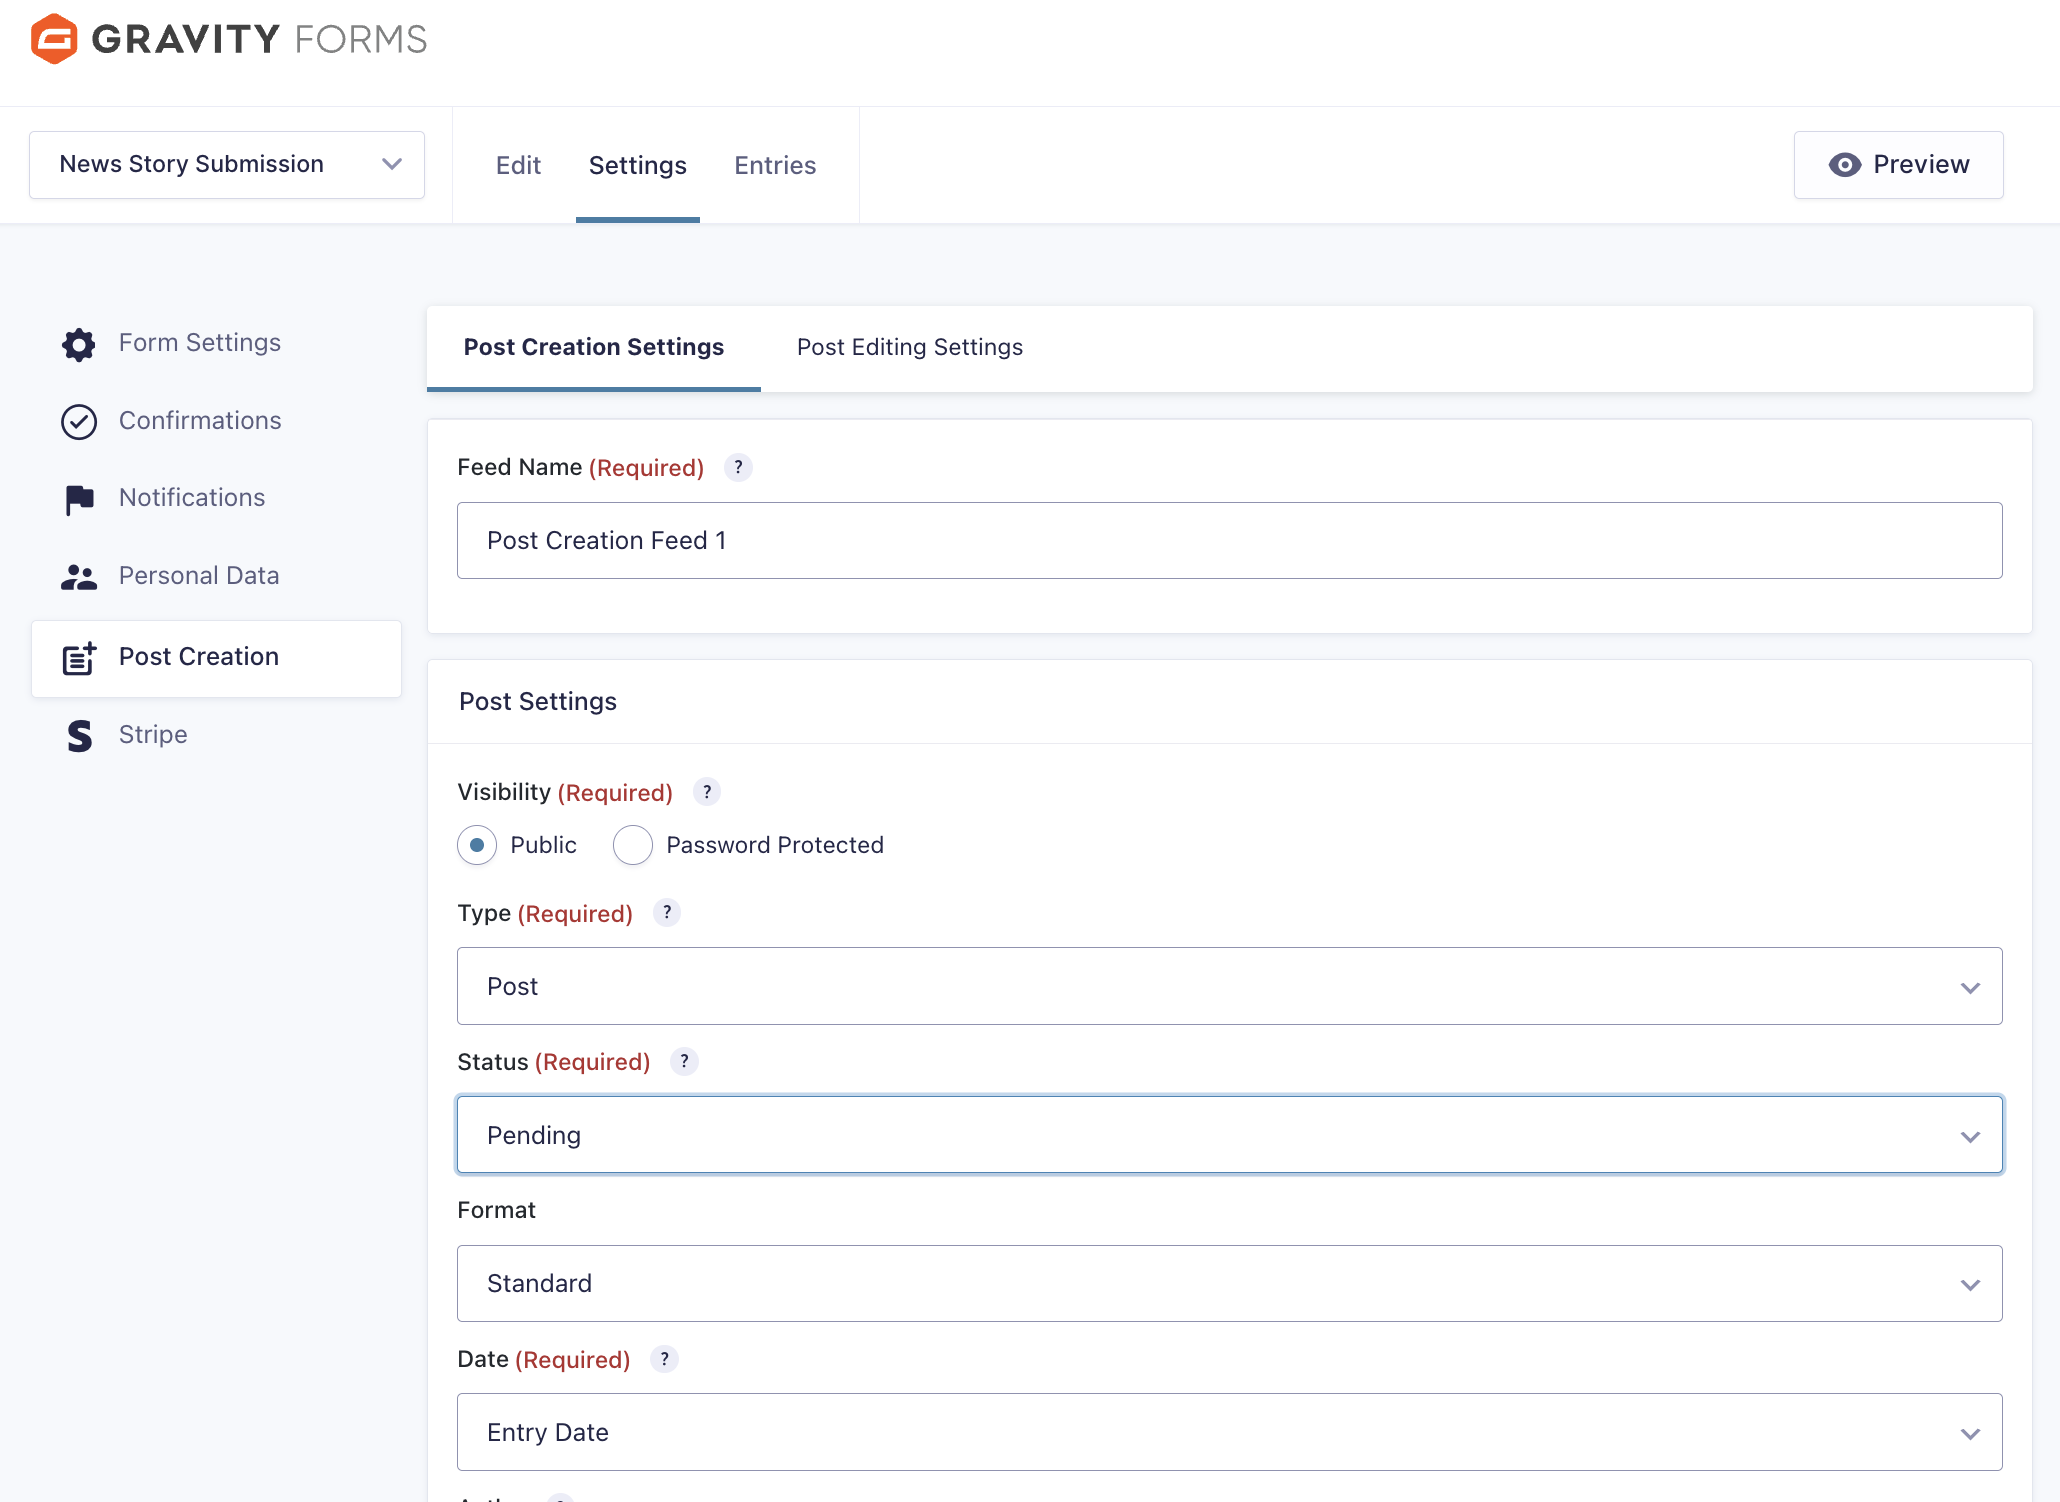
- Map your form fields to Post Title, Post Body, Featured Image, Categories, and Tags.
- Set the default Post Status. We recommend starting with Pending Review or Draft (you can always loosen this later).
- Save the feed.
3. Restrict the Form to Members With PMPro
A public submission form is an open invitation to spam. Lock it down before you launch.
PMPro gives you three ways to do that, and they stack. Pick the one that fits your site, or combine them.
Option A: Restrict the Whole Page
The cleanest setup. One page, one form, one membership requirement.
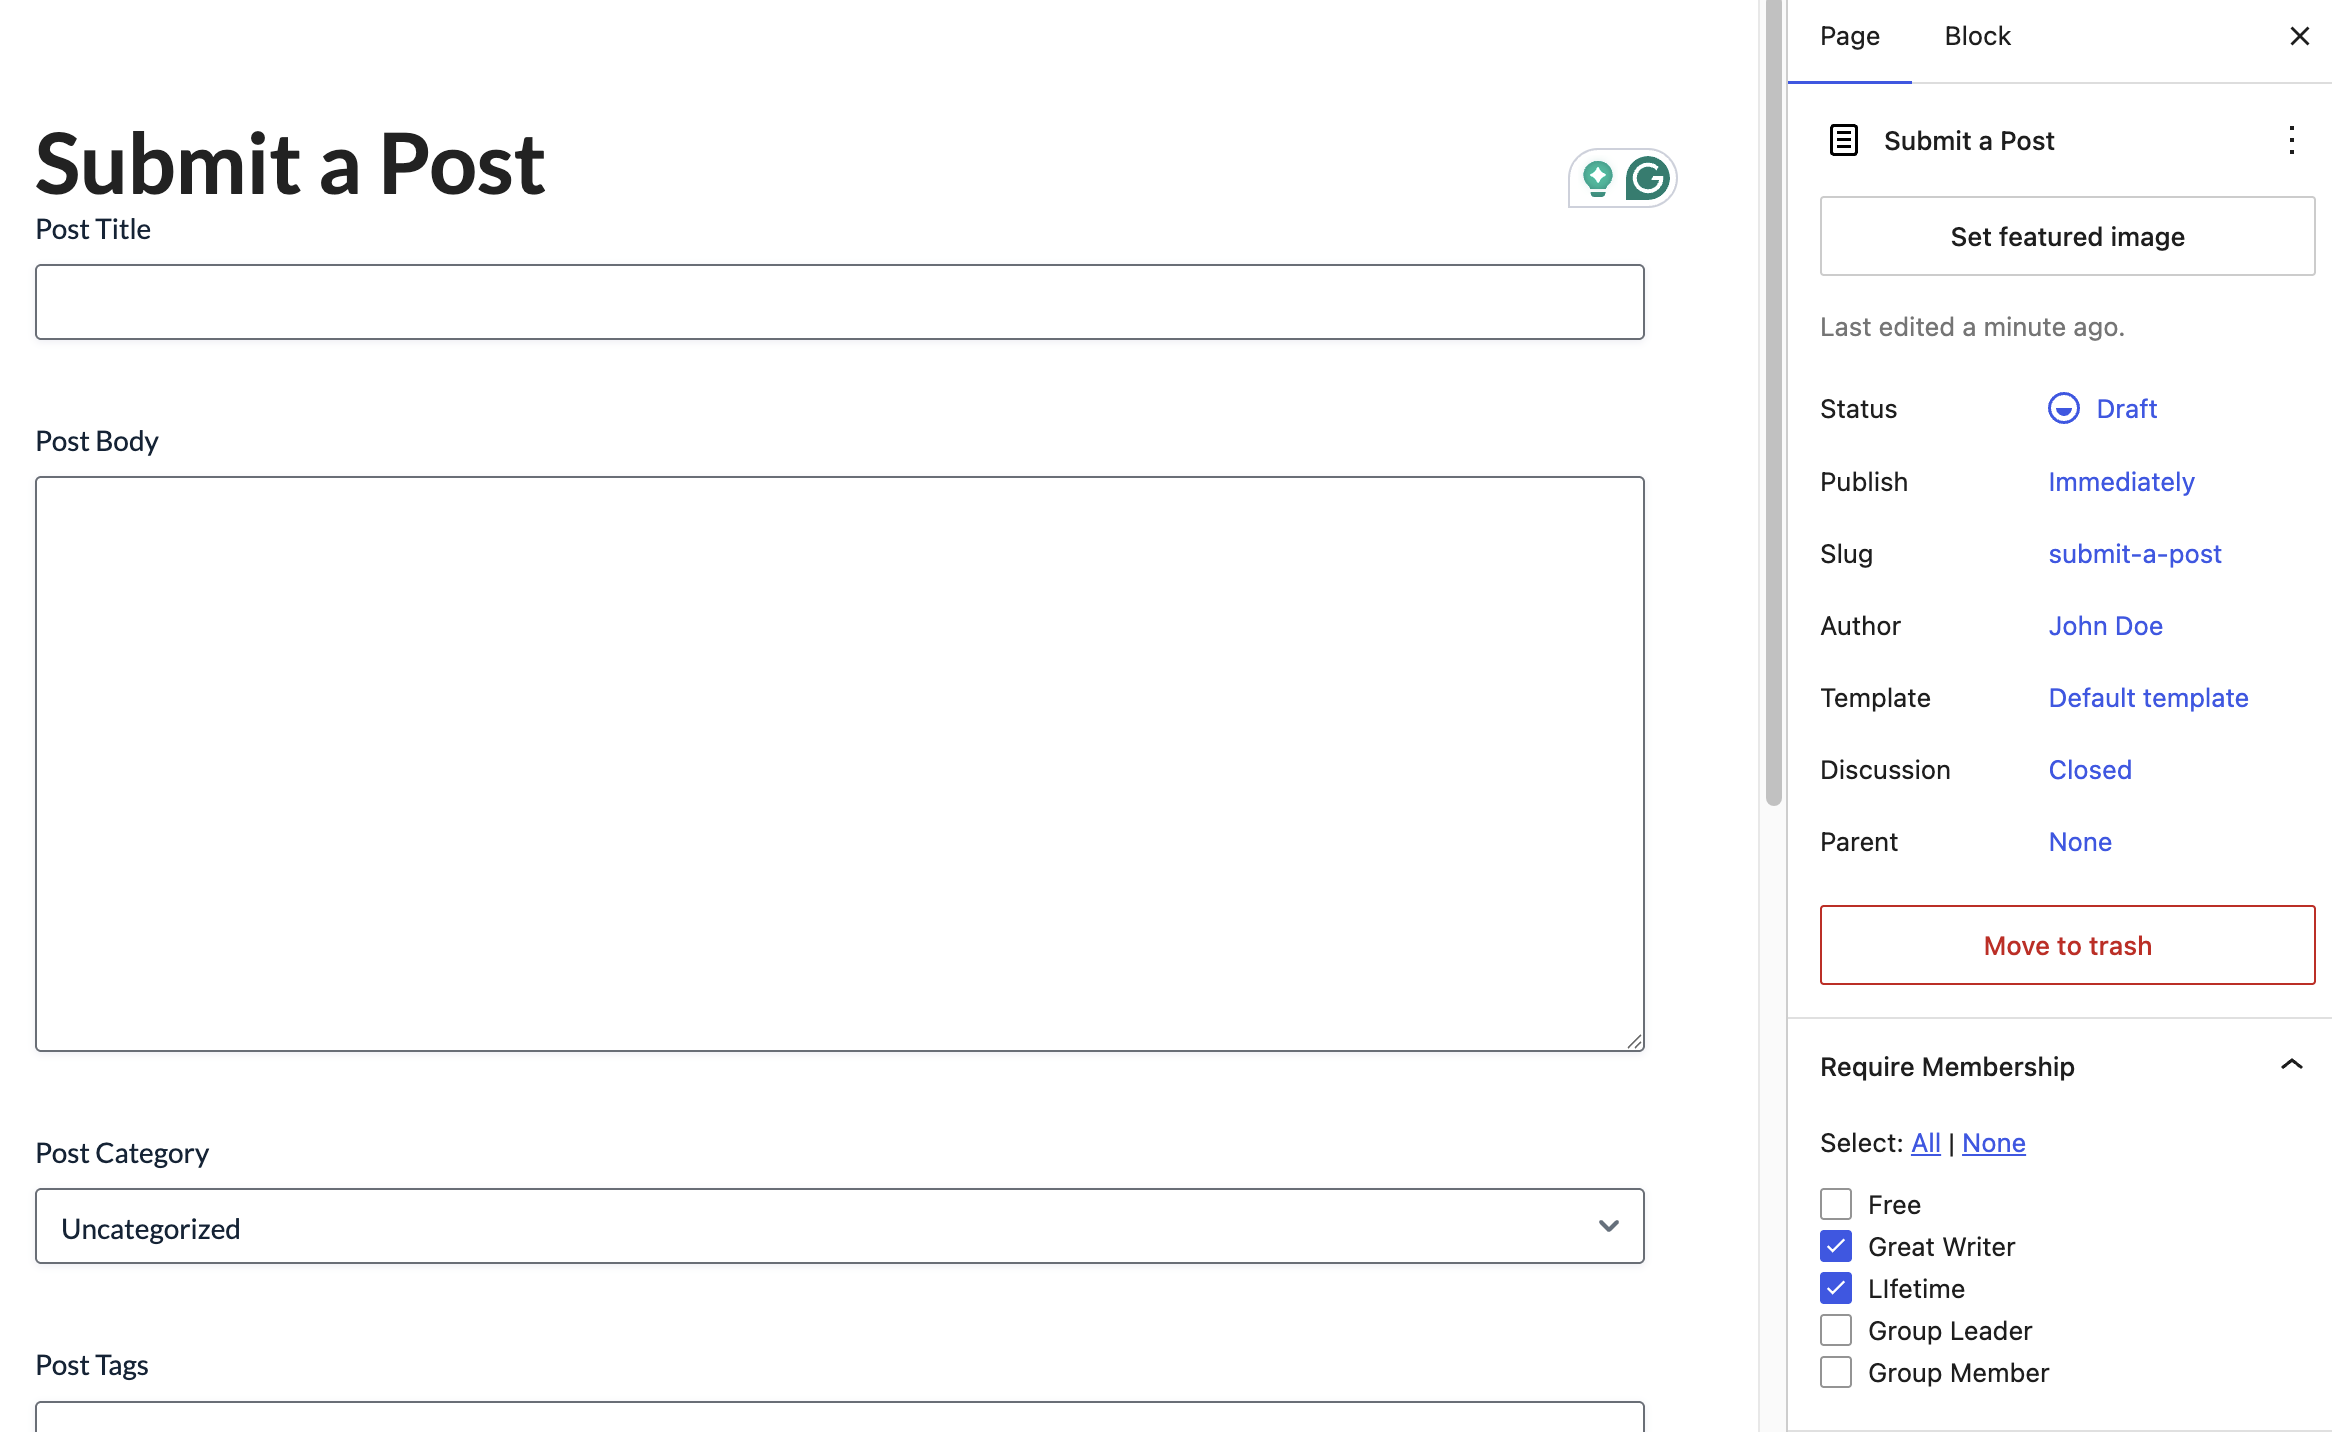
- Create a page in WordPress (e.g., “Submit Your Post”).
- Drop in the Gravity Forms shortcode:
- From the page editor, use the Require Membership meta box to require a specific membership level.
Option B: Hide the Form Block on a Mixed Page
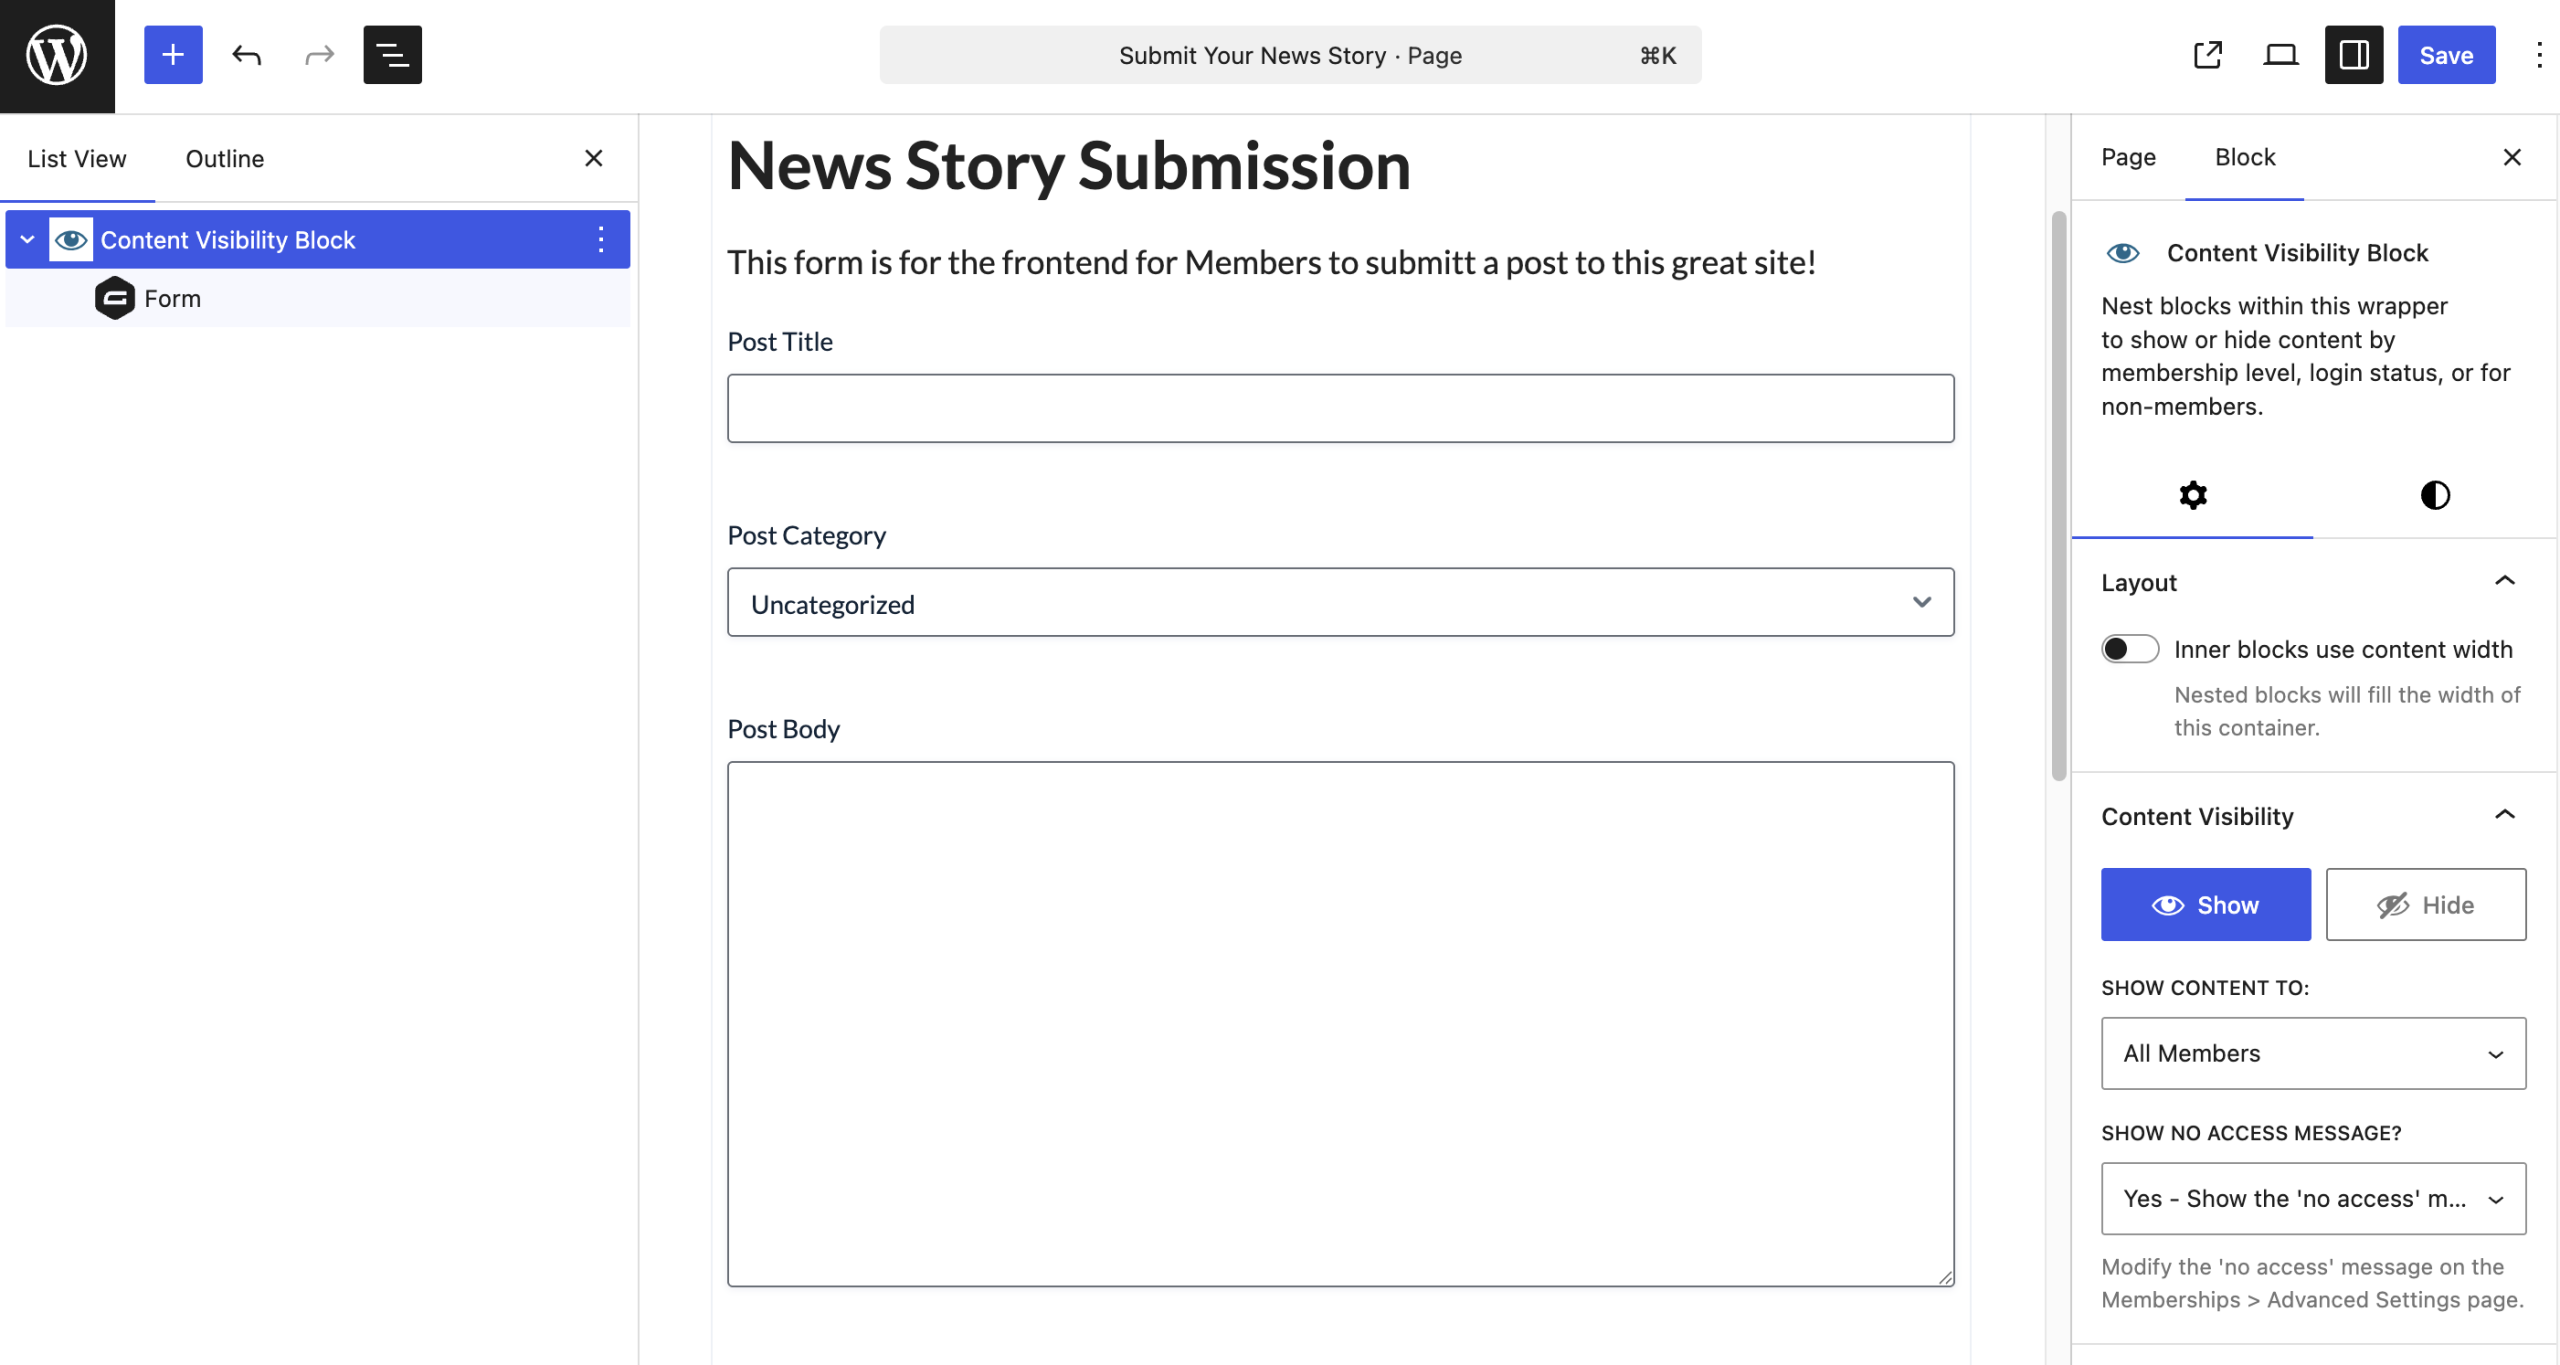
If the submission form lives inside a page with other content (like a member dashboard), use block-level visibility instead of locking the whole page.
- Insert the Gravity Forms block inside a Content Visibility block.
- In the block sidebar, enable Content Visibility.
- Set which member levels can see the block.
Option C: Wrap the Shortcode
The classic, theme-agnostic approach. Works in classic editor, page builders, and template files.
[membership level="1"]
[gravityform id="1" title="false" description="false"]
[/membership]
Read more about the membership shortcode.
4. Walk Through the Member’s Experience
Don’t ship a submission flow you haven’t lived in. Test it as a non-admin before opening the doors.
Run through the full path with a fresh member account:
- Sign up. Were the submission benefits visible on the pricing and checkout pages? If a member can’t tell that submitting content is part of the deal, they won’t use it.
- Find the form. Is there a clear path from the member’s dashboard or the main nav to the submission page?
- Submit. Fill the form out completely. Then try again with a missing required field. Are the validation messages helpful?
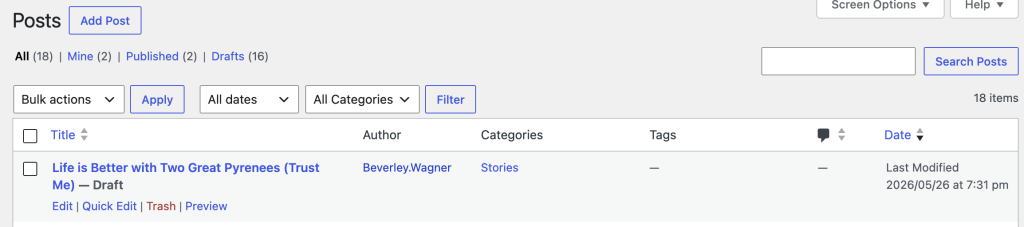
- Verify the submission. If the form auto-publishes, check the post on the frontend. If it goes to Draft or Pending, log back in as admin and approve it.
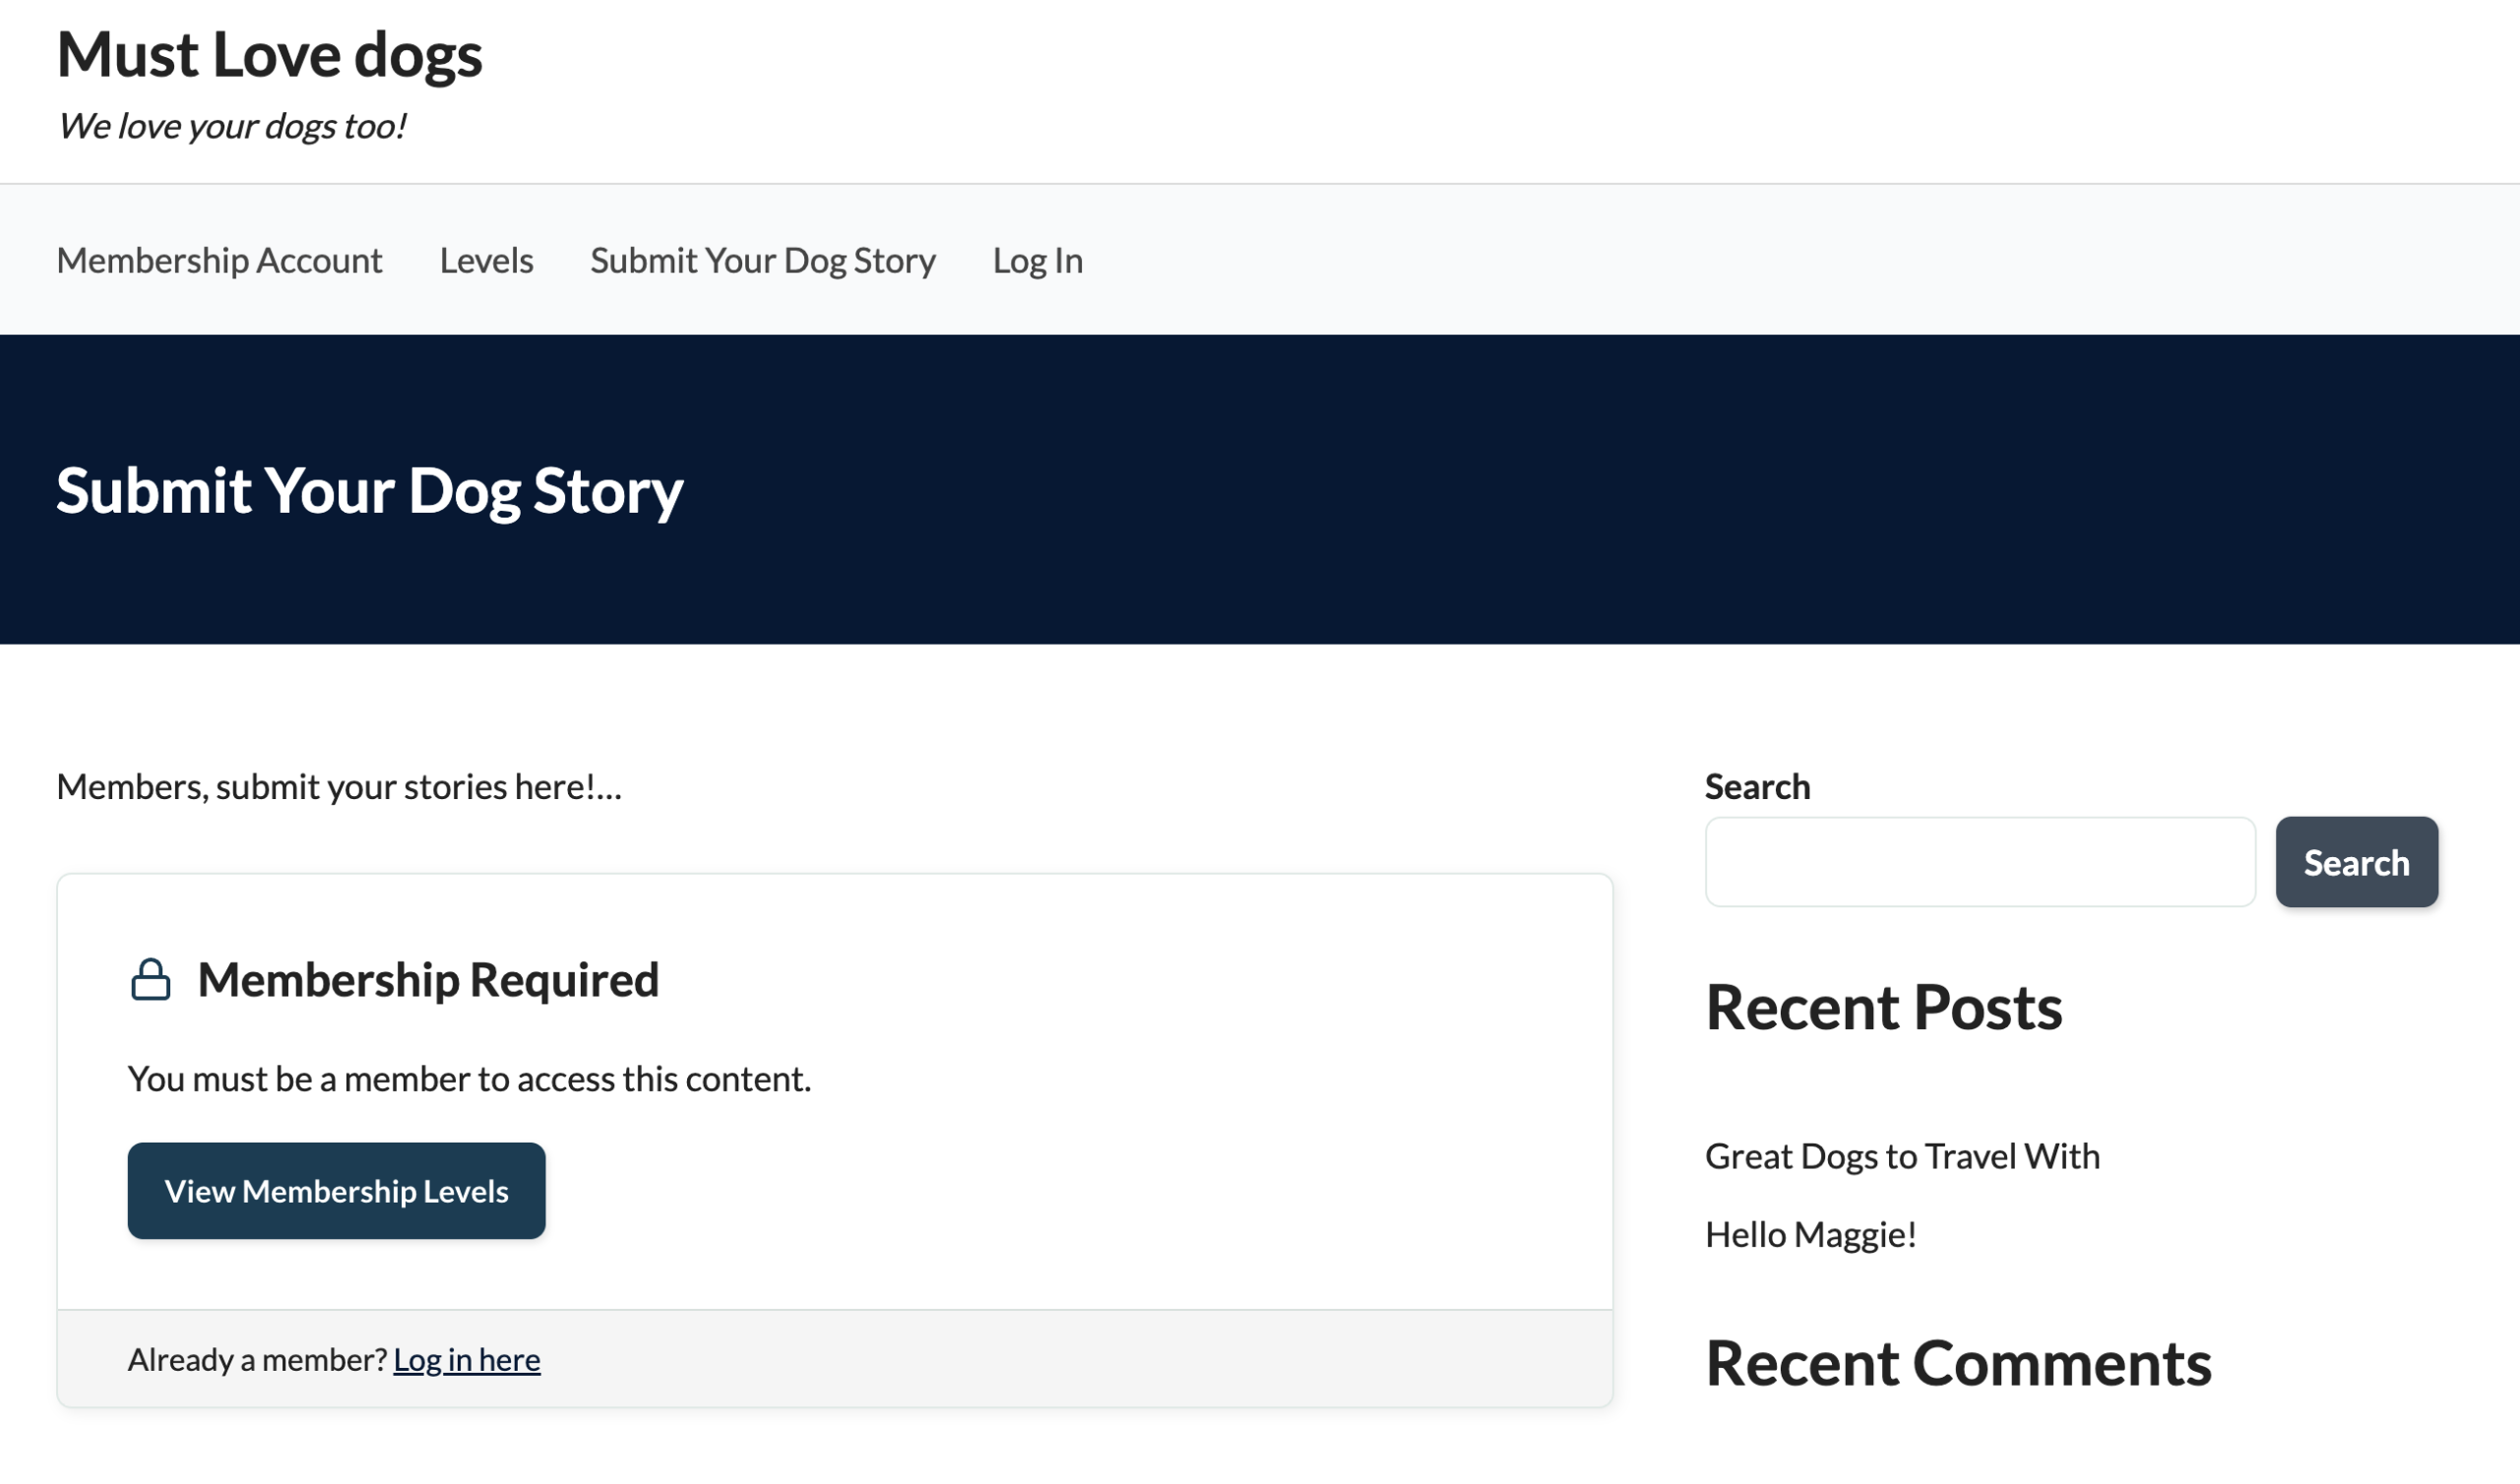
- Try as a non-member. Visit the submission page logged out, and again as a member without the right level. Confirm the form is hidden and membership is required.
If anything in that walkthrough surprised you, fix it now. Members will not give you a second chance to make submission feel easy.

Power Your Publishing with a Platform You Can Control
Paid Memberships Pro is the best tool for online publishers: an open source WordPress plugin that transforms your blog or news site into a revenue-generating platform.
Tailor your site to engage readers, monetize content, and grow a loyal subscriber base. Give your subscribers the premium content they seek and earn a reliable income with a totally independent online business.
Why This Matters: The Feed Model
Most form builders treat post creation as a single, fixed mapping: this field goes to this post property, end of story. Gravity Forms doesn’t.
Because submissions trigger feeds, you can:
- Run multiple Create Post feeds on one form, each with conditional logic. Example: members at Level 1 submit posts that go to Pending Review. Members at Level 2 submit posts that auto-publish. Same form, two outcomes.
- Branch by content type: submissions tagged “News” become Posts, submissions tagged “Event” become a custom post type.
- Chain feeds with other Gravity Forms add-ons. The same submission can create a post and notify Slack and register the member for a related event.
That flexibility is why we keep recommending Gravity Forms for membership sites that have outgrown a basic submission flow. Once you start thinking in feeds, you stop hand-coding workflow rules.
Tuning the Workflow
The default setup will work for most sites. The settings below are where you go when you want more control over moderation, frequency, and presentation.
Setting the Default Post Status
The single most important setting on a member submission flow. Get it wrong, and member content goes live before you’ve reviewed it.
- Open the form and go to Settings > Post Creation.
- Edit your Create Post feed.
- Find the Post Status field.
- For most membership sites, choose Pending Review or Draft. Reserve Publish for trusted, high-tier members or content types where speed matters more than moderation.
- Save.
If you want different statuses for different member levels, add a second feed with conditional logic. That’s the feed model paying off.
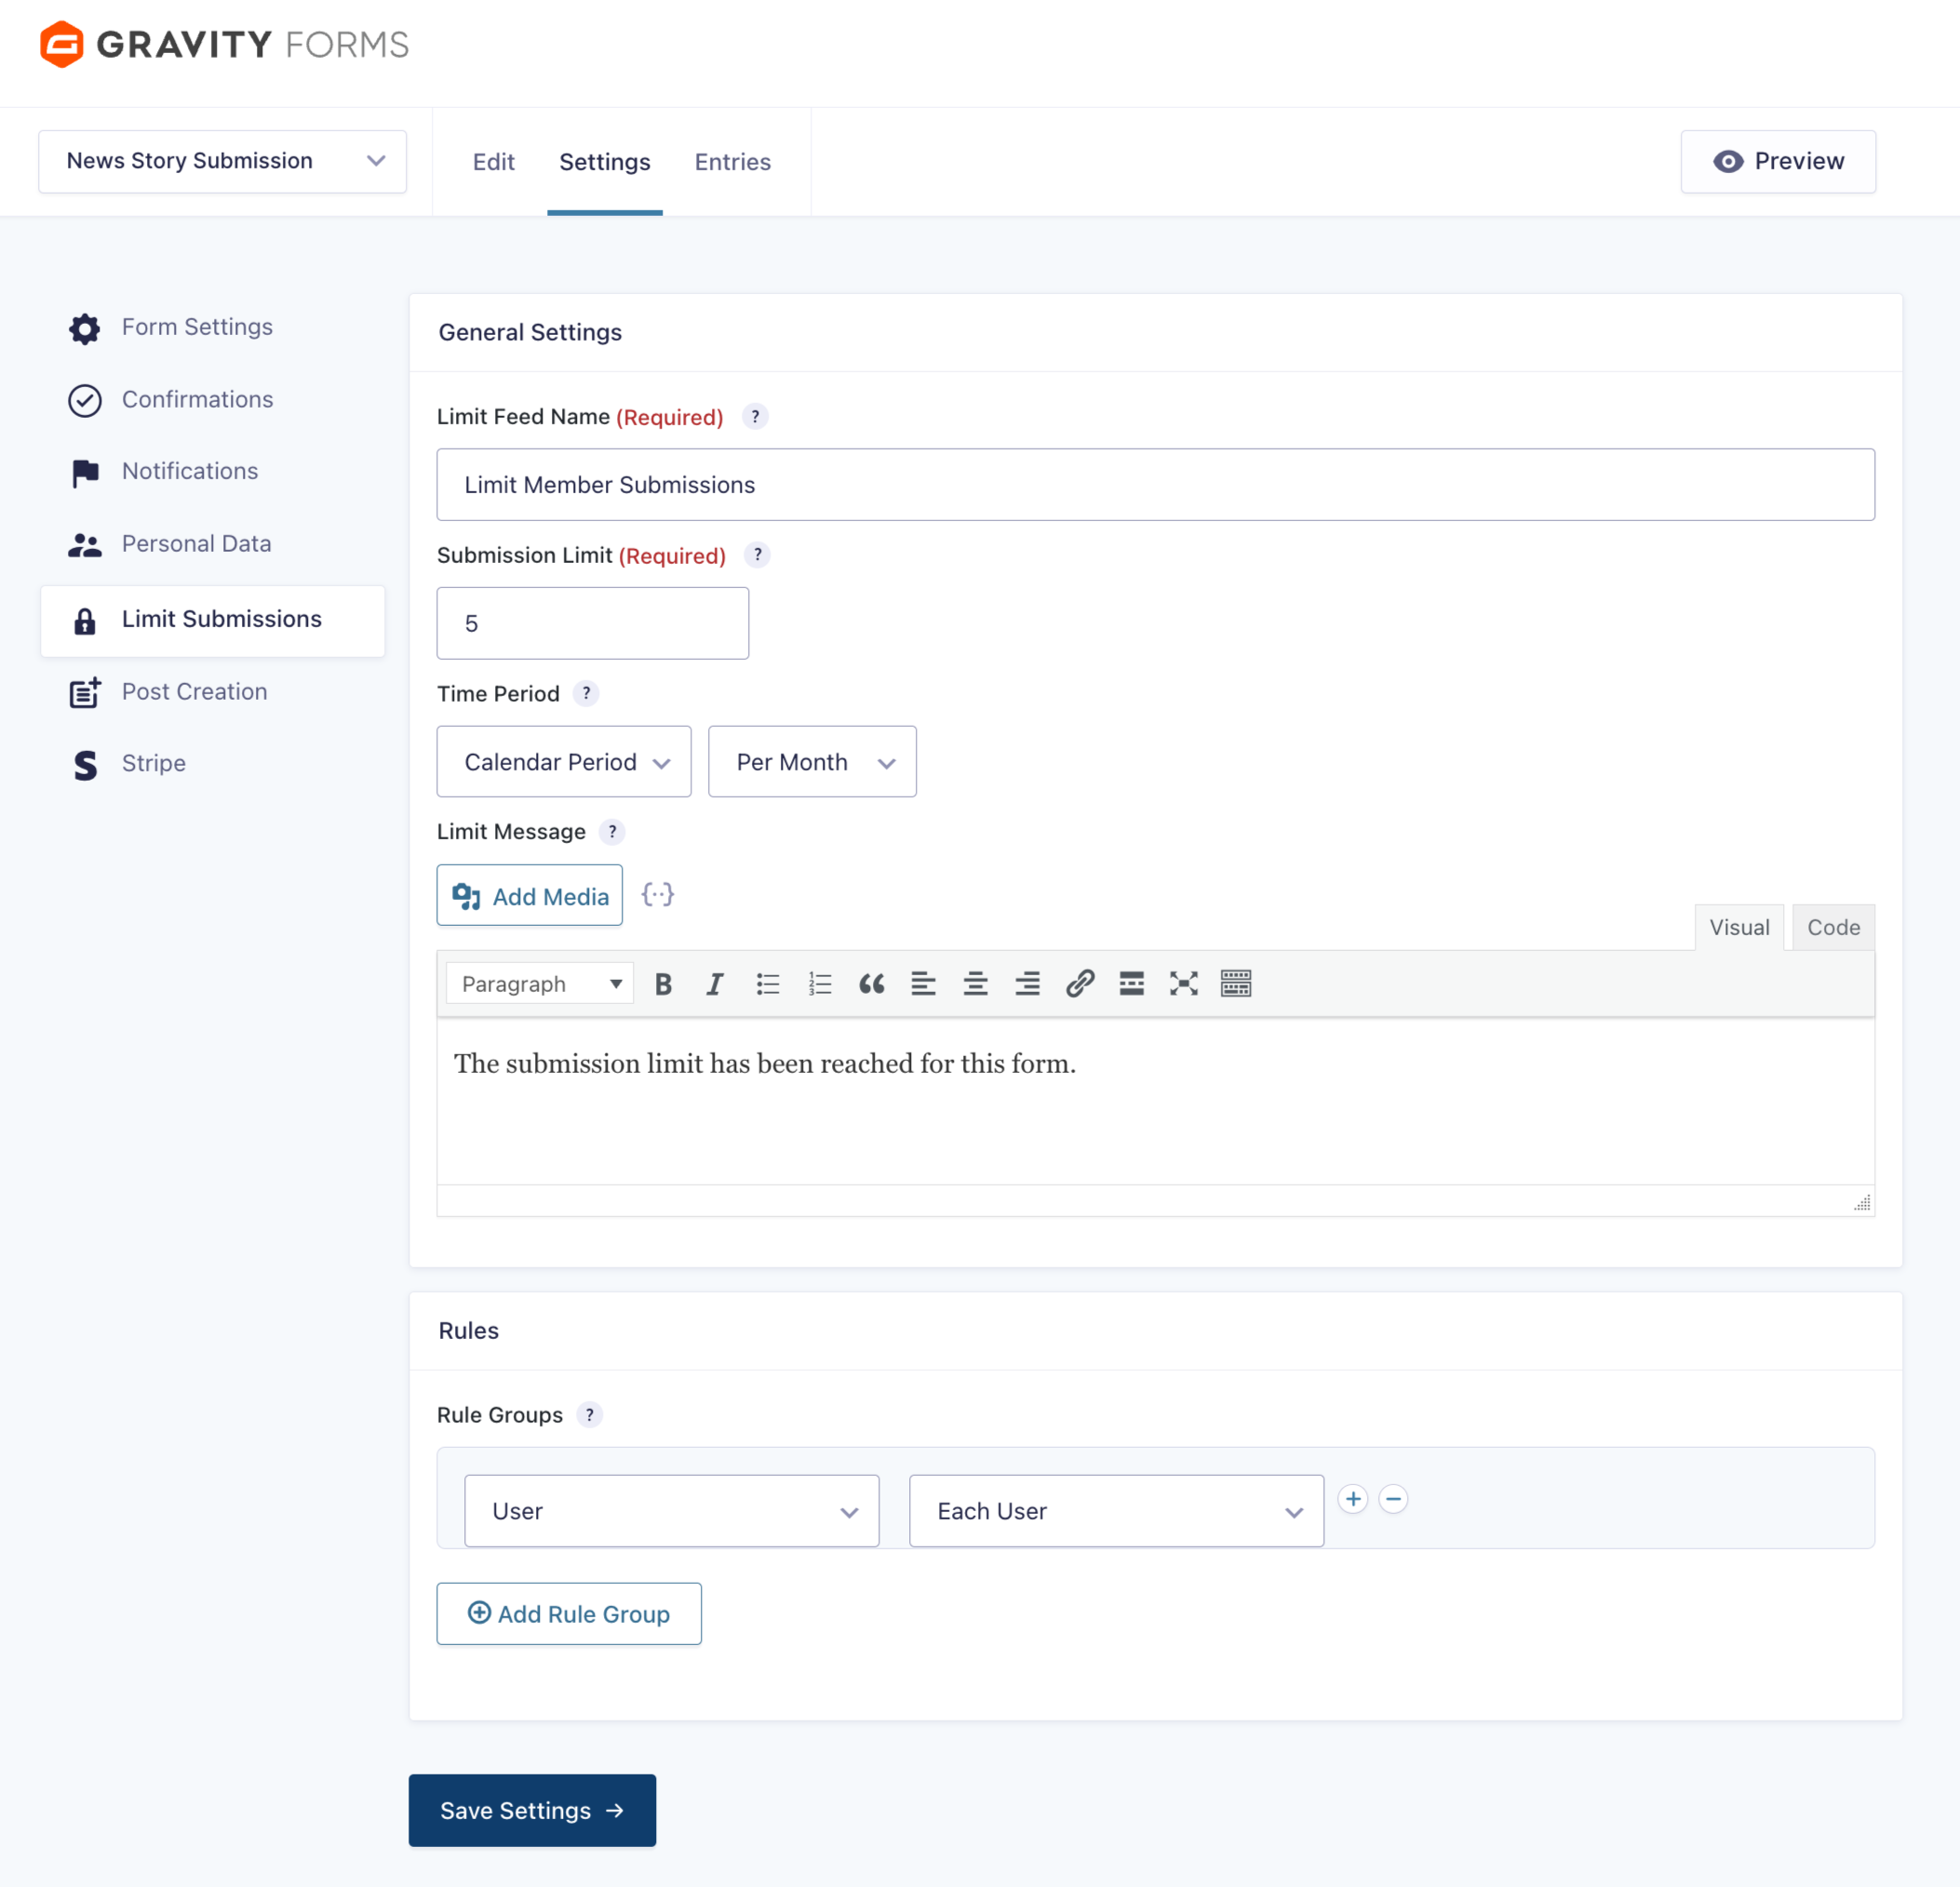
Capping Submissions Per Member or Per Level
Gravity Forms doesn’t ship a built-in per-user submission limit, but two paths get you there.
Out of the box (form-wide limits): Under Form Settings > Form Options > Restrictions, you can require login to submit and set a global submission cap. Useful for time-bound calls for entries (e.g., a monthly contest), less useful for ongoing programs.
By Membership Level With a Code Recipe
If you want PMPro level-aware limits without buying another perk, the same approach we documented in the WS Form guide works here. Use pmpro_hasMembershipLevel to count a member’s existing submissions, then strip the form out of the page once they hit their cap.
Reach out to our support team for help creating this snippet for Gravity Forms. We offer Do It For Me services for all members on a PMPro Max plan.
Showing Member Posts on the Frontend
Submissions are useless if no one sees them. A few options, ordered from least to most work:
- Lean on the existing post type archive. Standard posts get an archive at
/blog/for free. Custom post types may need an archive template, depending on your theme. - Build a Query Loop block. The Block Editor’s Query Loop gives you a customizable, no-code feed. You can filter by category, author, post status, and more, perfect for a “Submitted by Members” page.
- Link to single posts. Whatever archive view you build, every entry should link to the full post. Sounds obvious. Skipped more often than you’d think.
- Drop in Posts Table by Barn2. A no-code table view with sorting and filtering.
What to Watch For After Launch
The first month of a member submission program is the most informative one you’ll have. Pay attention to:
- Submissions per member. If one or two members are doing all the submitting, your form is too hidden or your other members don’t know they have permission. Both are fixable.
- Approval queue depth. If pending submissions pile up, your moderation process needs help. Bring in a second moderator or relax the status default for trusted levels.
- What members submit vs. what you expected. Your members will surprise you. Let the data shape your editorial direction instead of fighting it.
The setup is the easy part. The hard part is the editorial muscle to actually do something with what members give you.
If you have questions or want to compare notes on what’s working, our support team and the broader PMPro community are happy to dig in with you.
Related Resources
Free Download: The AI-Powered Membership Site Blueprint
Download the free guide: Learn how to plan, build, and grow a membership site using AI as your strategic partner: from buyer persona to launch and beyond.


