Changing membership platforms can feel like an overwhelming task, even if you’re very comfortable with technology and data. If you’ve outgrown your existing platform and want to migrate from Restrict Content Pro to Paid Memberships Pro, take a deep breath and know that it is possible.
The team at Paid Memberships Pro has supported several customers through this migration. This developer-focused guide summarizes everything we’ve learned about the migration process into step-by-step instructions.
Heads up: Restrict Content Pro is now Kadence Memberships. In 2026, Liquid Web consolidated its WordPress plugins and retired the StellarWP brand. Restrict Content Pro is no longer sold as a standalone plugin. Its features now live in Kadence Memberships (formerly Restrict Content Pro). If you are running an existing Restrict Content Pro site, everything in this guide still applies. Your install, database tables, and export tools are unchanged.
Note: This guide is specifically written to support someone migrating active subscriptions and members from Kadence Memberships (RCP) to Paid Memberships Pro.
Table of contents
How to Migrate from Restrict Content Pro to Paid Memberships Pro
Active eCommerce businesses receive new orders, new members, new comments or posts in forums, and other engagement activity on a regular basis. This is why it’s important to minimize interruptions to a live revenue-generating website.
However, you can simplify the migration process if you close your membership site to the public. If your site happens to be on the smaller side, you might be able to afford taking it down for a day or two.
If you can’t, we’ve included information on how to complete your migration through the use of a staging environment.
The process of transitioning from Kadence Memberships to Paid Memberships Pro involves two crucial steps:
- Transferring your members and their subscriptions
- Moving the content protections from the old system to the new system.
This guide will provide you with comprehensive instructions and advice to ensure a smooth migration. By following these steps, you will be able to continue receiving recurring payments from existing customers and process payments from new members using Paid Memberships Pro.
Let’s do this.
Let Us Handle It: Migration with PMPro Max
If doing this yourself feels overwhelming, PMPro Max includes hands-on migration support as part of the service. We handle the move from these platforms and many others, with the goal of getting you up and running on PMPro with as little disruption to your business as possible.
Here’s our honest commitment on what that looks like:
- When we can preserve your active member subscriptions, we will. For most WordPress-to-WordPress migrations and some gateway-to-gateway transitions, your members keep paying without interruption and without needing to re-enter their billing info.
- When we can’t preserve subscriptions, we’ll be upfront about it and give you a clear plan. Some platforms (WooCommerce Subscriptions, most SaaS tools) create subscriptions in ways that can’t be transferred to another system, even with the same payment gateway. In those cases, we’ll help you set appropriate expiration dates, craft the member communication, and use PMPro’s renewal flow to bring members back into an active subscription on the new platform.
- Either way, you keep your members and your revenue. The goal isn’t just to move data, it’s to land you on a membership platform built for where your business is going, not where it started.
Part 1: Migrating Members and Subscriptions
1. Backup Your WordPress Website
In our article Backup Your WordPress Site: The Complete Guide to Site Backups, we highlight the significance of frequent backups and provide a guide on how to create one for your site. This is particularly crucial for membership sites that involve customer accounts and sensitive information.
Please make sure to create a backup of your site before proceeding with the migration process.
Free Download: Migrate Kadence Memberships (RCP) to Paid Memberships Pro
We have a downloadable version of this setup guide with the specific steps you need to convert Kadence Memberships (formerly Restrict Content Pro) to PMPro members, without affecting current active subscriptions.
Migration Guide: Kadence Memberships (RCP) to PMPro
You must be a How to Migrate to Paid Memberships Pro from Kadence Memberships (Restrict Content Pro) member to access this download.
2. Pause Your Live Website
During the migration process, it’s essential to prevent any data loss or mismatch, which can occur quickly. To ensure this doesn’t happen, it’s advisable to temporarily pause your live website. This includes:
- Disconnecting your Kadence Memberships (RCP) payment gateway
- Deactivating all new membership sign-ups
- Putting your main website in “Maintenance Mode” or “Coming Soon” mode.
You can use plugins like WP Maintenance Mode & Coming Soon to add a maintenance or coming soon page to your website.
Note: If it’s not possible to pause your active site, proceed to Export and Import Your Data. Keep in mind that you may still need to move some data before the final import, which is normal.
3. Install and Set Up Paid Memberships Pro
The following step is to install Paid Memberships Pro on your website or on a staging site.
Note: If you’re unable to turn off your main website or want to test PMPro’s functionality, it’s advisable to use a staging site or a local development site.
Keep in mind that once you create a staging site, your live site and development site will no longer be in sync. If you choose this option, there will be some data that you’ll need to migrate to the new site before it goes live.
If You’re Installing PMPro on Your Main Website
Our Initial Setup guide provides information on how to install Paid Memberships Pro.
After successfully installing PMPro, you’ll have to recreate your Kadence Memberships levels as membership levels in Paid Memberships Pro.
To do this, go to Memberships > Settings > Membership Levels in the WordPress admin. You can refer to the aforementioned Initial Setup guide for further details.
Make sure to save the membership level IDs for future reference, and hold off on connecting your payment gateway until later.
If You’re Installing PMPro on a Staging Site
Once your staging site is set up, make sure that it’s not connected to either your Kadence Memberships or Paid Memberships Pro payment gateway.
Note: During the migration process, some actions on your staging site might result in system emails being sent from WordPress, Kadence Memberships, or Paid Memberships Pro. To prevent accidental sending of messages from your staging site, you can use the Disable Emails plugin.
4. Set Up User Fields (If Applicable)
Are there any custom user fields set up in Kadence Memberships (RCP) for your membership? Do you wish to add new user fields? Paid Memberships Pro utilizes User Fields to create and gather additional checkout fields and custom profile fields for your members and administrators.
If you don’t need to collect custom fields, proceed to Export & Import Your Data.
User Fields
Kadence Memberships fields are stored in user meta (just like the User Fields created by Paid Memberships Pro). This is the WordPress database table that stores all the custom user data that is not part of the user object itself.
Paid Memberships Pro features an intuitive settings interface to create and manage custom profile fields. In Kadence Memberships, these fields would have been created through custom code. You’ll need to locate the custom code that added fields to your Kadence Memberships site in order to migrate that field information to PMPro.
- Navigate to Memberships > Settings > User Fields in the WordPress admin.
- Create a new field group or add fields to the default group.
- Add a new field for every custom field you have within your Kadence Memberships member profiles.
- When you create fields, you must set the field’s
nameto the exact same meta key in your Kadence Memberships custom field code.
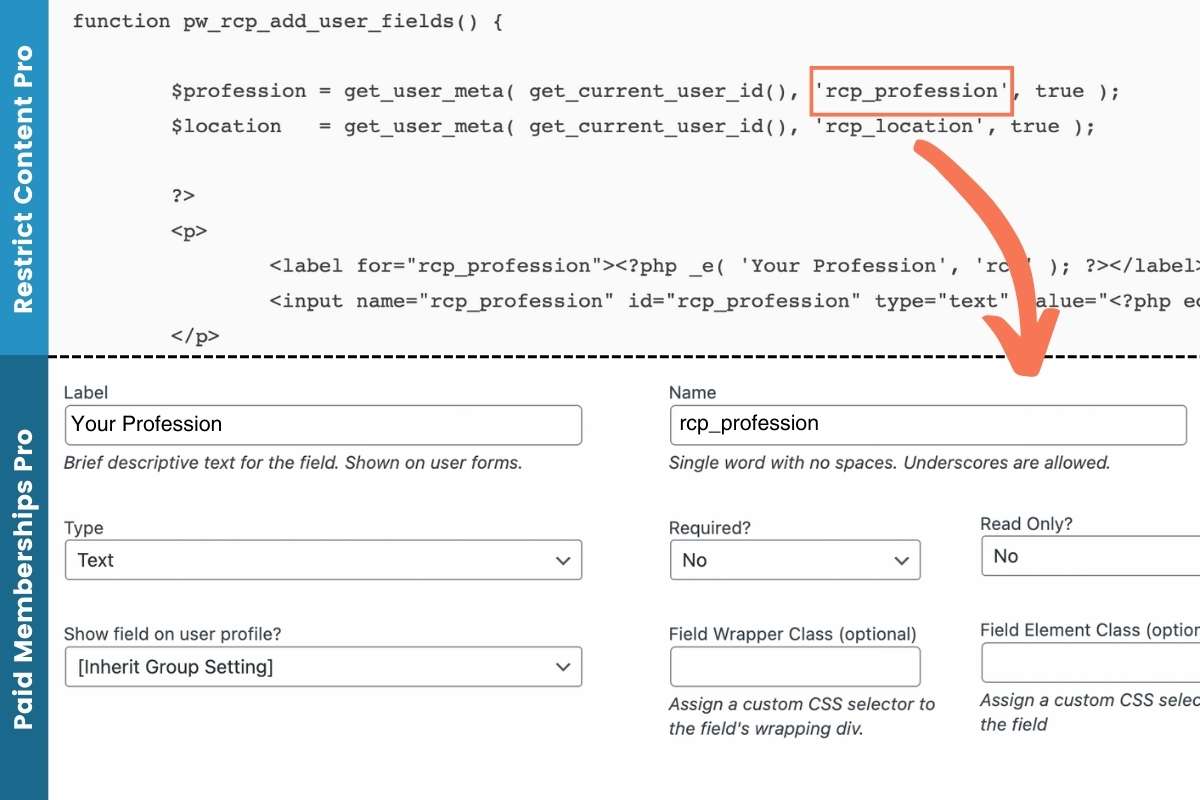
- Repeat these steps for each custom profile field you want to preserve.
- Add new fields for new data you want to capture.
- Save your fields settings.
Check out the User Fields documentation for specific help configuring fields.
5. Export and Import Your Data
First, Export Your Kadence Memberships (RCP) Data
To export your Kadence Memberships membership data, navigate to Restrict > Tools > Export > Memberships.
Now that you have your Kadence Memberships data, you are ready to create a file that PMPro can use to import memberships and subscriptions.
You will need the PMPro Import Members From CSV Add On.
The plugin includes a starter import template file. Navigate to Users > Import Members in your WordPress admin. You’ll see a link to download the example CSV file from this page.
Prepare Your Import File
The table below shows the Kadence Memberships data fields you should map to the required PMPro Import fields:
| PMPro Column | Restrict Content Pro Column | Data Description and Location |
|---|---|---|
| user_login | User Login | Required field to match the imported data to the existing WordPress user; Included in the Restrict Content Pro Members export. |
| user_email | User Email | Included in the Restrict Content Pro Members export |
| first_name | First Name | Optional field; Included in the Restrict Content Pro export. |
| last_name | Last Name | Optional field; Included in the Restrict Content Pro export. |
| display_name | N/A | Optional field; Not included in the Restrict Content Pro export. |
| role | (add this) | For most sites, set this role to “subscriber” which is the base level role and capability for users in WordPress. Restrict Content Pro does not include an export column for role, but you can add it manually here. This column is optional. If you omit this column, the user will be assigned the “subscriber” role. |
| membership_id | (add this) | Add the numerical ID for the level in Paid Memberships Pro. Restrict Content Pro exports a field “Membership Level ID” that you can use to match to the appropriate level ID in PMPro. |
| membership_initial_payment | N/A | Optional field. If you want to include this, export your payment data from Restrict Content Pro. |
| membership_billing_amount | N/A | Optional field. If you want to include this, export your payment data from Restrict Content Pro. |
| membership_cycle_number | N/A | Optional field. If you want to include this, export your payment data from Restrict Content Pro. |
| membership_cycle_period | N/A | Optional field. If you want to include this, export your payment data from Restrict Content Pro. |
| membership_status | Status | For this migration, it is recommended that you only import members with an ‘active’ status and remove all others. |
| membership_startdate | Created Date | Note that the Restrict Content Pro data is exported as a full timestamp. Paid Memberships Pro import requires this data to be in the format YYYY-MM-DD. |
| membership_enddate | Expiration Date | Only include this date if the member should expire and the recurring subscription should cancel. Members on a recurring subscription in Paid Memberships Pro do not have an end date (leave blank). |
| membership_subscription_transaction_id | Gateway Subscription ID | For Stripe, these values will all begin with sub_X.For PayPal, this ID always begins with the value I- |
| membership_gateway | Gateway | Name of Gateway |
| membership_payment_transaction_id | Transaction ID | Optionally import the last transaction ID. If you want to include this, export your payment data from Restrict Content Pro. |
| pmpro_stripe_customerid | Gateway Customer ID | For Stripe, you want to locate a field that begins with the characters cus_X.This field is not needed for any other payment gateway, such as PayPal. |
Export the file to CSV and Test the Import
We recommend testing the import with a subset of your data (the first 10 records) to ensure that everything works as expected.
- Export the first few rows CSV file With your exported .CSV file, adjust the rows to only include the first 5 or 10 records.
- Run that import by following the directions on the Import Users from CSV Add On documentation page.
- Double check the data to be sure everything looks correct. You can check your Members List under Memberships > Members and the Orders list under Memberships > Orders.
- The import process will create one PMPro order for each newly imported member.
- The import process will not create a history of orders for all payments that member had made previously through Kadence Memberships.
If everything looks correct, you are ready to do the full and final import. To do this, repeat the process from your test above using the full set of data (minus those test members already imported).
6. Resume Your Live Website
You’re almost done! Now it’s time to connect your payment gateway in PMPro.
First, deactivate Kadence Memberships (RCP). Once you are sure everything is working properly, you can deactivate the plugin. Documentation on exactly what gets removed when you delete it can be sparse. Kadence Memberships is now part of Liquid Web, so we recommend reaching out to the Kadence Memberships team for help resetting or removing any legacy data from your site (if required).
Now, activate your payment gateway in Paid Memberships Pro. PMPro has only one settings page to configure the payment gateway for all memberships. Navigate to Memberships > Settings > Payment Settings. The process of setting up a payment gateway is also outlined in the Initial Setup guide we mentioned earlier.
Part 2: Configuring Content Protection
Every membership plugin handles content restrictions in a different way. With Paid Memberships Pro, you can restrict individual pages, posts, or entire categories of posts.
Browse our documentation on restricting content to learn more about the various ways you can protect your content with PMPro.
This includes:
- Pages
- Posts and Categories
- Other content types including CPTs
- Courses
- Community features like bbPress and BuddyPress
You’ll need to manually update every piece of content that was protected through the Kadence Memberships (RCP) methods to now use the Paid Memberships Pro methods. If you have a very large membership site, there are some developer-level methods to bulk apply content restrictions. Here are a two primary resources:
- Methods to Restrict Access by Membership Level in Bulk
- Developer’s Toolkit: Add On to duplicate content restrictions for newly added levels.
It’s Time to Celebrate
You did it! You’ve successfully migrated your active subscriptions and members from Kadence Memberships (RCP) to Paid Memberships Pro, and configured your content protection so that your membership site is officially ready for action.
If you’re still in need of additional help, be sure to check the Frequently Asked Questions section below, or contact our support team if you’re a premium member.
You have made a great choice by switching to Paid Memberships Pro, the most trusted membership platform that grows with you. We are here by your side as you take your membership business to new heights.
Thinking about switching to PMPro? Our How to Migrate to Paid Memberships Pro guide provides a general overview of the migration process.
Frequently Asked Questions
This seems really complicated!
If this is all too overwhelming or confusing for you, consider upgrading to PMPro Max. Our support team will facilitate your migration for you.
What is a Staging Site?
A staging site is essentially a duplicate of your website, where you can test out new features and make changes without affecting your live website.
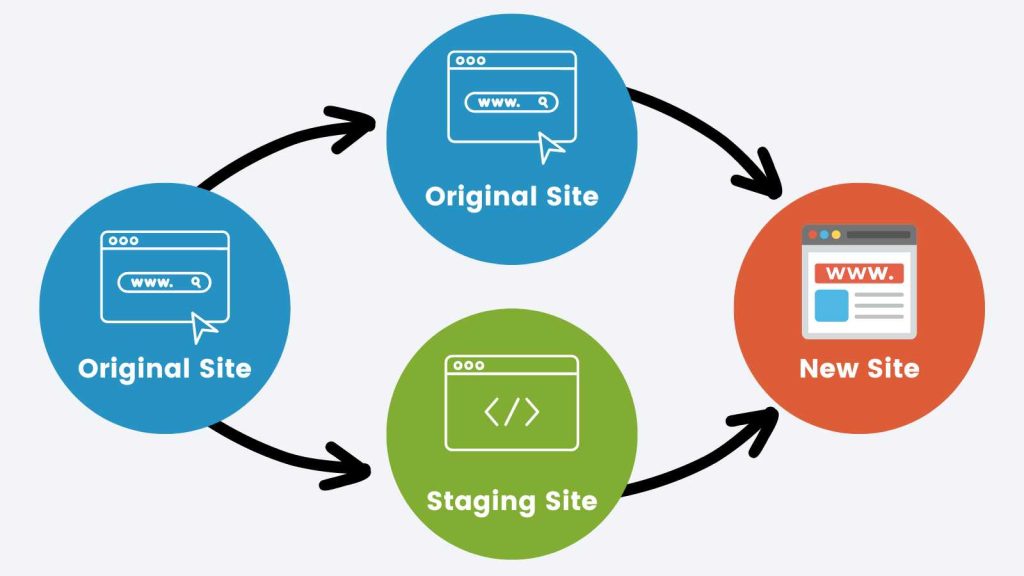
Creating a staging site allows you to get all of your membership data in place before merging it with your live site.
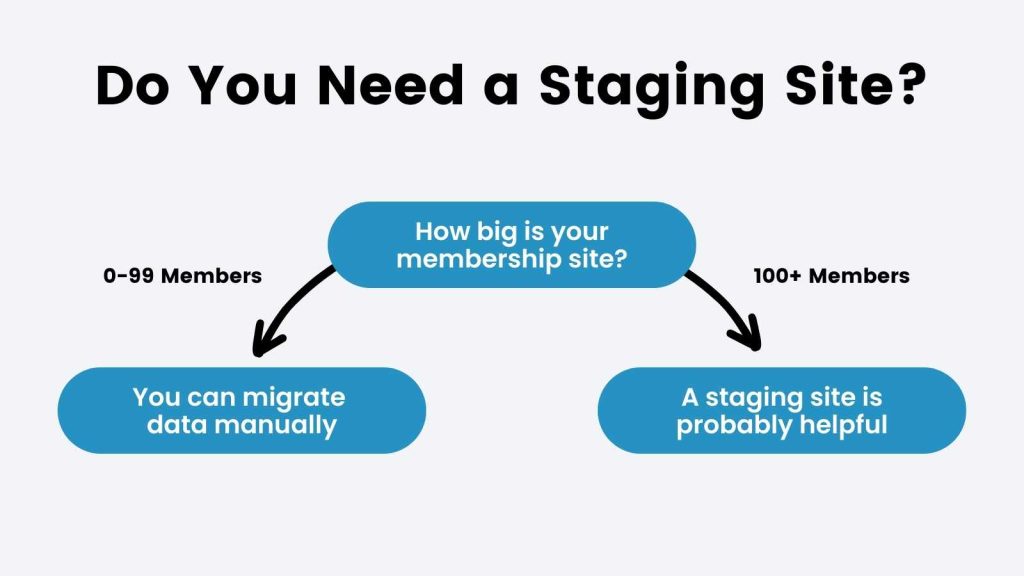
Do I Need a Staging Site?
A staging site is a non-public version of your site’s code that powers your live membership site. Your membership’s staging site, if set up properly, will allow you to add and test all kinds of things before releasing them on your live site.
With a staging site, you can test things like:
- Code recipes
- New features
- New plugins
- Plugin updates
If you have a very active membership site that receives a lot of traffic, or you don’t have a lot of development experience and you want to experiment without killing your live site, using a staging site is a wise choice.
More Migration Guides
- Migrate from MemberPress to PMPro: Preserve active Stripe and PayPal subscriptions, map custom fields, and retire MemberPress cleanly.
- Migrate from Kadence Memberships (RCP) to PMPro: A developer-focused walkthrough for moving members, subscriptions, and gateway data out of RCP.
- Migrate from s2Member to PMPro: Convert s2Member roles and subscriptions to PMPro levels, including scripts to fully remove s2Member’s custom role data.
- Migrate from Ultimate Member to PMPro: Bring your user profiles, custom fields, and member directory into PMPro, with an option to skip the CSV import entirely for simpler sites.
- Migrate from WooCommerce Subscriptions to PMPro: Transition off WooCommerce Subscriptions’ database-driven billing to PMPro’s gateway-native recurring payments.
Don’t see your platform? You’re not stuck. Our team has a general process that works for any migration, and PMPro supports imports from any system that can export member data to CSV. If you’re coming from a SaaS platform like Kajabi, Memberful, Substack, Patreon, Squarespace, or Mighty Networks, the core steps are the same, you’ll just need to adapt the export process to your current tool. Reach out to our support team to chat through how we can facilitate the migration process for you.
Free Download: The AI-Powered Membership Site Blueprint
Download the free guide: Learn how to plan, build, and grow a membership site using AI as your strategic partner: from buyer persona to launch and beyond.


