Memberlite gives you several ways to control navigation and widget content across your site. The method you use depends on whether you are working with the default header, a custom Header Variation, or widget-based areas like sidebars and the mobile menu.
Menu Locations in Memberlite
Memberlite registers four navigation menu locations. Each location appears in a specific place on your site.
| Location | Where It Appears |
|---|---|
| Primary | Main navigation in the default header |
| Member | Navigation shown only to logged-in members |
| Member – Logged Out | Navigation shown only to visitors who are not logged in |
| Footer | Navigation in the default footer |
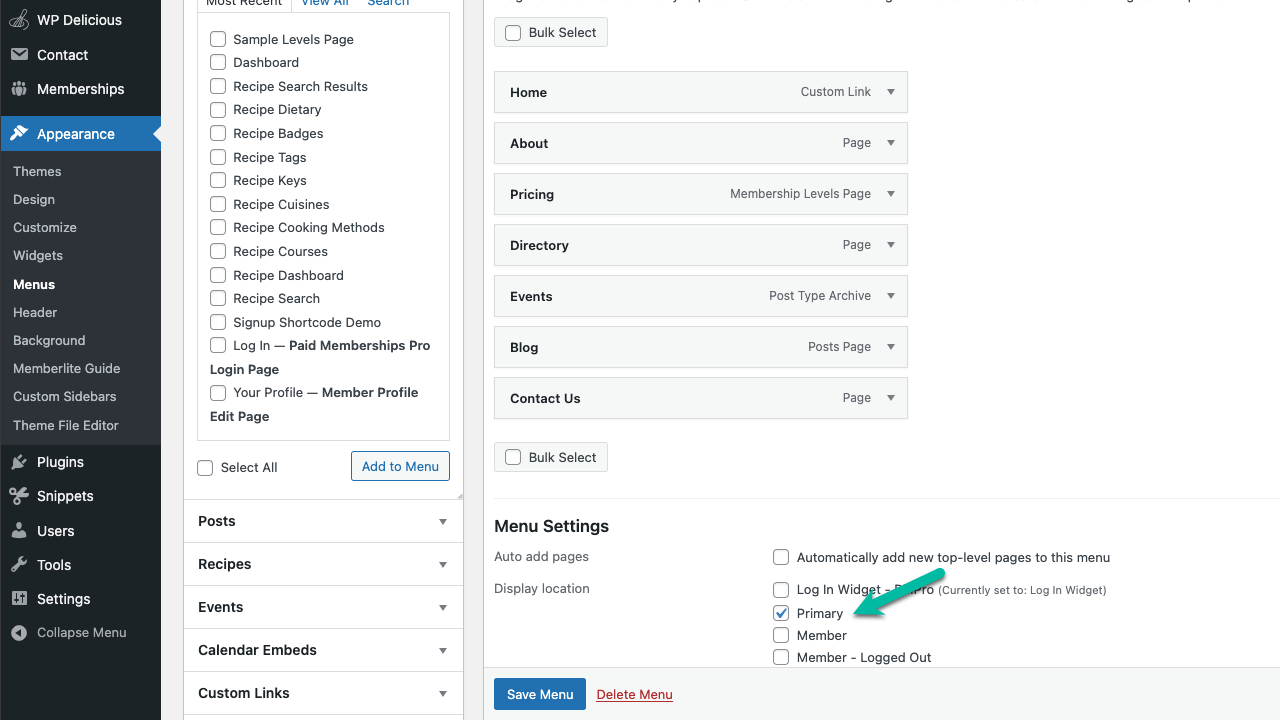
You assign a menu to a location at Appearance > Menus > Manage Locations.
Setting Up Menus
The Primary menu location controls the main navigation in Memberlite’s default header. If you are using a Header Variation instead of the default header, you can still create your menu, but you can use the Nav Menu Block to pull the menu instead.
To create a menu and assign it to the Primary location:
- Go to Appearance > Menus.
- Click create a new menu, enter a name (for example, “Main Navigation”), and click Create Menu.
- Add the pages, posts, or links you want using the panels on the left.
- Under Menu Settings, check Primary in the Display location list.
- Click Save Menu.
Your new menu now appears in the header on every page of your site.
Member and Member – Logged Out Menus
The Member and Member – Logged Out locations let you show a different set of links depending on whether a visitor is logged in. This is useful for showing a “My Account” or “Log Out” link to members and a “Log In” or “Join” link to everyone else.
To set up both locations:
- Go to Appearance > Menus.
- Create a menu with links for logged-in members (for example, “My Account”, “Log Out”).
- Under Menu Settings, check Member in the Display location list.
- Click Save Menu.
- Create a second menu with links for visitors who are not logged in (for example, “Log In”, “Membership Levels”).
- Under Menu Settings, check Member – Logged Out in the Display location list.
- Click Save Menu.
Custom Menus
Memberlite > Custom Menus is a menu management page built into the Memberlite admin area. It gives you a central place to create, duplicate, and delete menus without navigating between multiple WordPress screens.
Go to Memberlite > Custom Menus in your WordPress admin to access this page.
Creating a New Menu from Scratch
- Under Add New Menu, enter a name in the Menu Name field.
- Leave Duplicate Items From set to “None (Start Empty)”.
- Click Add Menu.
- You will see a confirmation with a link to edit the new menu in Appearance > Menus, where you can add items and assign it to a location.
Creating a Menu by Copying an Existing One
- Under Add New Menu, enter a name for the new menu.
- Under Duplicate Items From, select the menu you want to copy.
- Click Add Menu.
- The new menu is created with the same items as the original. You can then edit it independently without affecting the source menu.
Managing Existing Menus
The Existing Menus table shows all menus on your site, including which locations they are assigned to and how many items they contain. From that table, you can click Edit to open a menu in Appearance > Menus, Duplicate to create a copy, or Delete to remove it.
Widget Areas
Memberlite registers several widget areas you can populate at Appearance > Widgets.
| Widget Area | Where It Appears |
|---|---|
| Header | Inside the default header, depending on your header layout |
| Footer Widgets | The default footer’s widget columns |
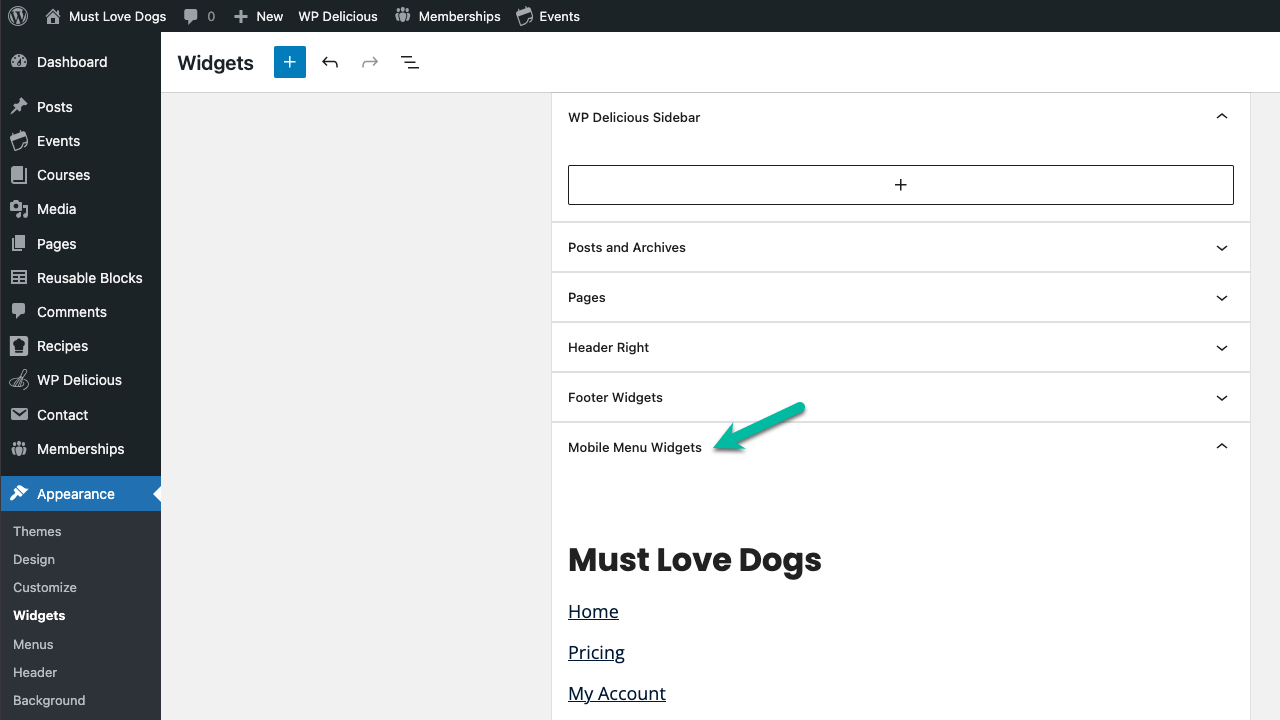
| Mobile Menu Widgets | The slide-out mobile menu, below the navigation |
| Pages | The sidebar on page templates that include a sidebar |
| Posts and Archives | The sidebar on blog posts and archive pages |
To add widgets to any of these areas, go to Appearance > Widgets, find the widget area you want, and add your widgets there.
The Header widget area is only visible in the default header. If your site uses a Header Variation, this widget area is not displayed. Use the block editor inside your Header Variation instead.
Mobile Menu Behavior
The Members and Main menus are all hidden on small devices. A toggle-able widget area is displayed on these smaller screens. You can add a Custom Menu widget to the Mobile Menu widget area under Appearance > Widgets.
Memberlite Blocks for Header and Footer Variations
Memberlite includes two custom blocks designed for use inside Header and Footer Variations: Nav Menu and Member Info. These blocks do not appear in the block inserter when you are editing a regular page or post. They are only available when you open a Header or Footer Variation for editing. You can find them in the block inserter.
Nav Menu Block
The Nav Menu block renders one of your WordPress navigation menus inside a Header or Footer Variation. Use it to place your primary navigation, footer links, or any other menu you have created.
To add the Nav Menu block to a variation:
- Open a Header or Footer Variation for editing.
- Click the + button where you want the menu to appear and search for Nav Menu.
- Insert the Nav Menu block.
- In the block settings panel on the right, open Menu Settings and use the Select Menu dropdown to choose which menu to display.
- Click Update to save your changes.
If you have not created any menus yet, the dropdown will be empty. Create your menus first under Appearance > Menus, then return to your variation to select one.
Selecting a Menu
The Select Menu dropdown lists all existing menus on your site grouped under By Menu. Select the menu you want to display by name.
If you have the PMPro Nav Menus add-on active, you will also see a By Location group. Selecting a location instead of a specific menu means the block will display whatever menu is currently assigned to that location, so you can swap menus at Appearance > Menus without editing the variation again.
Styling the Nav Menu Block
The Nav Menu block supports the full set of block-level design controls. Use the settings panel to adjust:
- Color: Text color, background color, and link color.
- Typography: Font family, size, weight, style, line height, letter spacing, and text transform.
- Border: Color, radius, style, and width.
- Width: Wide or full alignment.
Member Info Block
The Member Info block shows login-aware content in the header. It automatically displays different content depending on whether the visitor is logged in.
When a visitor is logged in, the block shows:
- A welcome message: “Welcome, [First Name]” with a link to the member’s account page (on by default).
- The menu assigned to the Member location at Appearance > Menus.
When a visitor is not logged in, the block shows:
- The menu assigned to the Member – Logged Out location at Appearance > Menus.
Before adding this block, make sure you have assigned menus to the Member and Member – Logged Out locations. Go to Appearance > Menus > Manage Locations to assign them.
To add the Member Info block to a variation:
- Open a Header or Footer Variation for editing.
- Click the + button where you want the member area to appear and search for Member Info.
- Insert the Member Info block.
- In the block settings panel on the right, use the toggle to turn the welcome message on or off.
- Click Update to save your changes.
Member Info Block Settings
- Show Welcome Message: When turned on, the block displays “Welcome, [First Name]” above the member menu for logged-in users. The name links to the member’s account page. Turn this off if you want to show only the navigation links without a greeting.
The Member Info block also supports color settings for text, background, and links.
The Nav Menu block renders one of your WordPress navigation menus inside a Header or Footer Variation. Use it to place your primary navigation, footer links, or any other menu you have created.
To add the Nav Menu block to a variation:
- Open a Header or Footer Variation for editing.
- Click the + button where you want the menu to appear and search for Nav Menu.
- Insert the Nav Menu block.
- In the block settings panel on the right, open Menu Settings and use the Select Menu dropdown to choose which menu to display.
- Click Update to save your changes.
If you have not created any menus yet, the dropdown will be empty. Create your menus first at Appearance > Menus, then return to your variation to select one.
Selecting a Menu
The Select Menu dropdown lists all existing menus on your site grouped under By Menu. Select the menu you want to display by name.
If you have the PMPro Nav Menus add-on active, you will also see a By Location group. Selecting a location instead of a specific menu means the block will display whatever menu is currently assigned to that location, so you can swap menus at Appearance > Menus without editing the variation again.
Styling the Nav Menu Block
The Nav Menu block supports the full set of block-level design controls. Use the settings panel to adjust:
- Color: Text color, background color, and link color.
- Typography: Font family, size, weight, style, line height, letter spacing, and text transform.
- Border: Color, radius, style, and width.
- Width: Wide or full alignment.
Member Info Block
The Member Info block shows login-aware content in the header. It automatically displays different content depending on whether the visitor is logged in.
When a visitor is logged in, the block shows:
- A welcome message: “Welcome, [First Name]” with a link to the member’s account page (on by default).
- The menu assigned to the Member location at Appearance > Menus.
When a visitor is not logged in, the block shows:
- The menu assigned to the Member – Logged Out location at Appearance > Menus.
Before adding this block, make sure you have assigned menus to the Member and Member – Logged Out locations. Go to Appearance > Menus > Manage Locations to assign them.
To add the Member Info block to a variation:
- Open a Header or Footer Variation for editing.
- Click the + button where you want the member area to appear and search for Member Info.
- Insert the Member Info block.
- In the block settings panel on the right, use the toggle to turn the welcome message on or off.
- Click Update to save your changes.
Member Info Block Settings
- Show Welcome Message: When turned on, the block displays “Welcome, [First Name]” above the member menu for logged-in users. The name links to the member’s account page. Turn this off if you want to show only the navigation links without a greeting.
The Member Info block also supports color settings for text, background, and links.
Because navigation inside a Variation is managed directly in the block editor, changes you make at Appearance > Menus to the Primary or Footer locations will not affect any Header or Footer Variations you have created.ordPress’s Navigation block directly in the block editor.
To add navigation to a Header Variation:
- Go to Memberlite > Headers in your WordPress admin.
- Click the name of the header you want to edit, or click Edit to open it in the block editor.
- In the block editor, click the + button to insert a block and search for Navigation.
- Insert the Navigation block and select the menu you want to display, or build a new menu inline.
- Click Update to save your changes.
The same approach applies to Footer Variations at Memberlite > Footers. Add a Navigation block wherever you want footer links to appear.
Because navigation inside a Variation is managed directly in the block editor, changes you make at Appearance > Menus to the Primary or Footer locations will not affect any Header or Footer Variations you have created.
Get Support From Our Team of Experts
For more help with this PMPro feature, check out our Support Page with three ways to get support as a free or premium member.
Last updated on June 22, 2026

